
Insulation is one of the most foundational areas of a good campervan conversion. It’s also likely to be one of the first jobs you tackle when starting from a blank slate after removing everything you don’t need from the base vehicle.
Whether you’re travelling through extreme heat or freezing temperatures, proper campervan insulation will keep your living space comfortable across the full range of climates you’ll encounter.
In this ultimate guide, we’ll cover everything you need to know about campervan insulation, including how heat transfers through your van, the best material choices, and how to install them to keep you cosy all year round.
We’ll also break down the costs involved and provide example setups for a range of budgets and use cases.
Why campervan insulation matters
Campervan insulation brings unique challenges compared to insulating traditional habitats like houses. Insulation solutions need to account for the fact that vans are primarily made of metal. This means surfaces conduct heat much more efficiently than wood or drywalls.
You also need to maximise space, so choosing materials that provide the right thermal resistance while taking up the least amount of interior room is crucial. Before we dive into material choice, let’s break down the key heat principles going on in a campervan.
Conduction, convection, and radiation
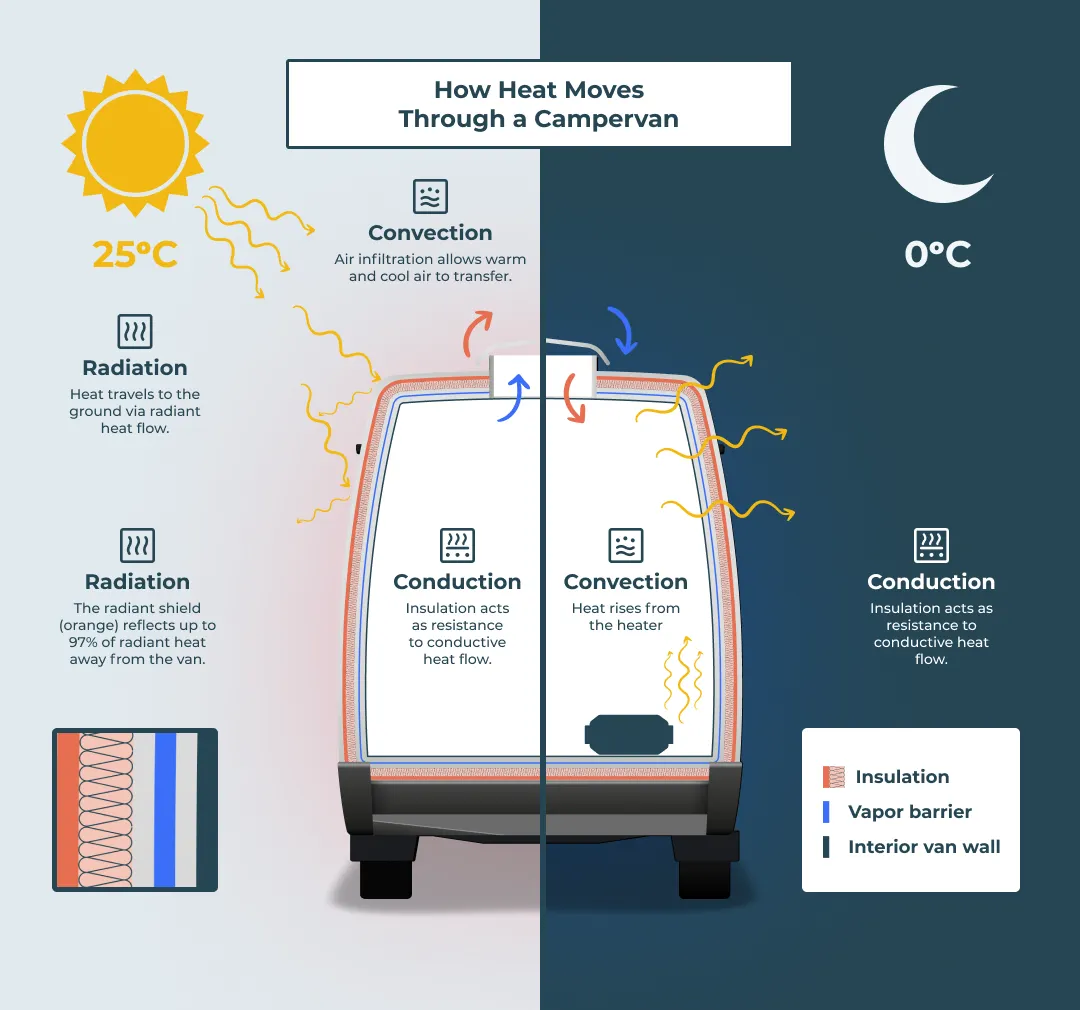
To understand campervan insulation, you need to understand how heat actually moves through your campervan. This happens in three ways: conduction, convection, and radiation.
Conduction is the transfer of heat through direct contact between different materials. For example, the metal panels of a campervan absorb heat or cold (the absence of heat) from the surrounding environment.
For example, on sunny days the panels will heat up due to outside temperatures. On cold days, the reverse happens and panels will cool down due to absorbing heat from the interior of the campervan.
Convection is when heat moves through air or liquids. Since heat rises through air, in a campervan warm air will collect around the roof while cold air settles near the floor. This can create uncomfortable variations in temperature between the two spaces.
This is compounded by the fact that campervans aren’t airtight (which is a good thing, since you need to breathe). However, it does mean that cracks and gaps in the body of the campervan allow air to circulate in and out, making it difficult to maintain a steady temperature without the right measures.
Radiation is the transfer of heat through electromagnetic waves, like infrared radiation produced by sunlight. Even when you’re parked in the shade, refraction of these invisible waves from the surrounding environment can still warm up the metal exterior of a campervan.
Thermal bridging occurs when heat bypasses insulation due to parts of the van's structure conducting heat more efficiently. In campervans, you see this in metal beams, ribs, and window frames which all act as thermal bridges and reduce the efficiency of surrounding insulation.
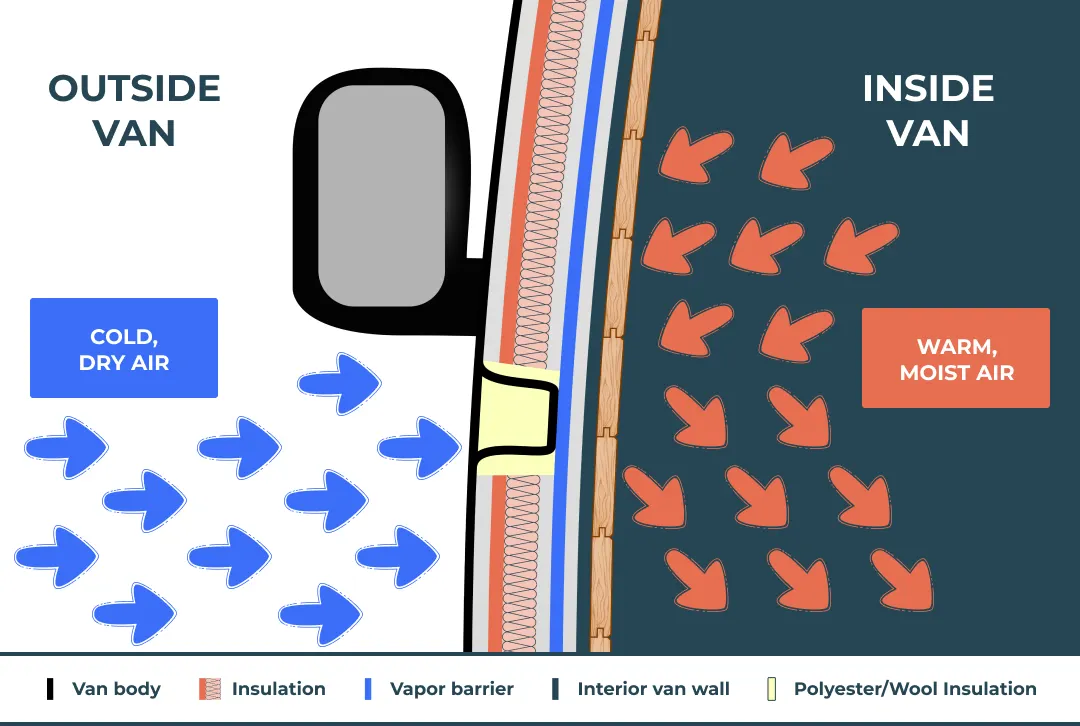
Condensation builds up when moist air inside the van comes into contact with cold metal surfaces. This leads to water droplets forming which can cause both rust and mold growth. Managing this requires not just appropriate insulation but also ventilation to keep air from becoming too moist.
Choosing the right campervan insulation is about managing these five principles to ensure your campervan is comfortable and livable throughout the range of climates you’ll be using the van in.
Insulation efficiency, R-values, and K-values
Insulation isn’t just about keeping warm, but managing heat in the full range of climates you expect to encounter. Insulation achieves this by mitigating the transfer of heat, whether it’s from the outside in or the inside out.
How effective it can do this is represented by what’s called an R-value. This indicates how resistant a given material is to heat flow. The higher the R-value, the more resistant it is, leading to better insulating performance.
R-value is measured per a given thickness, usually an inch. This stops materials from being listed as having high insulation if the material would need to be unnecessarily bulky to achieve it, limiting your interior space.
The other useful value to be aware of in campervan insulation materials is K-value. This is measured inversely to R-value, measuring how well a material conducts heat as opposed to how well it resists heat transfer. That means the lower the K-value, the better the material works as insulation.
K-value also doesn’t take thickness into consideration, acting as a simple measure of the materials intrinsic properties. This can be useful for comparing the insulating properties of different materials at their face value.
Choosing the right material
There are plenty of insulation options to choose from, with each offering unique benefits and areas around the van they're best suited to. These materials fall into five primary categories which we explore here.
Fiberglass & rockwool
Commonly used in house insulation, fiberglass and rockwool are widely available but not always the best option for campervans. Fibreglass provides decent R-value per inch but can trap moisture due to its high absorbency, leading to mould and mildew. Without a vapour barrier to protect the insulation, its fibres can also escape into the air, which is harmful if inhaled.
Fibreglass can also be a pain to install due to its loose nature, and it’s important to wear the right PPE when doing so. Almost invisible individual fibres can become lodged in the skin, causing irritation and itching.
Rockwool, made from volcanic rock and recycled materials, is a better option due to offering better moisture resistance and sound-deadening qualities. However, it still requires careful installation to work well and isn’t great at stopping water absorption.
Foam boards (xps, eps, polyiso)
Foam boards are one of the most effective and widely used materials for campervan insulation. They’re easy to cut into shape and work with while offering high R-values and high moisture resistance. Foam boards come in three types:
- XPS (extruded polystyrene). High R-value per inch, moisture-resistant, and very rigid. A good all-around choice for walls, floors, and ceilings.
- EPS (expanded polystyrene). Cheaper than XPS with slightly lower durability and R-values per inch. A good compromise if budget is a major concern.
- Polyiso (polyisocyanurate): Highest R-value per inch and great in warm climates. Performance is limited in extremely cold temperatures.
All foam boards can be easily cut to fit into campervan panels and secured using either glue or mechanical fasteners. In addition to great thermal resistance, they also minimise thermal bridging when cut perfectly to fill the spaces they’re used in.
Spray foam
Spray foam offers high-performance insulation by expanding to fill every gap within a given surface. Automatically adhering directly to the surface, spray foam expands to provide the best air-sealing of all solutions. It’s also great for use in things like metal cavities inside structural ribs to completely eliminate thermal bridging.
Spray foam comes in two forms. Closed-cell spray foam offers high R-value per inch, is waterproof, and also adds structural rigidity to surfaces it’s applied to. Open-cell spray foam is less dense and can absorb moisture. If you’re going the spray foam route, always look for closed-cell options.
Just be aware that spray foams require careful application to avoid overexpansion and waste. You’ll also need to make sure working areas are moisture-free before application as once expanded spray foam is airtight and won’t allow the moisture to escape.
Reflective insulation (low-e/radiant barriers)
Reflective insulation, sometimes called low-e or radiant barriers, works by blocking heat transfer through radiation as opposed to conduction. The insulation consists of a thin metallic foil layer that reflects heat away from the van. This is ideal for hot climates where solar heat gain is a major concern.
Reflective insulation isn’t measured in R-values like regular insulation as it doesn’t provide resistance to heat transfer, instead aiming to prevent absorption from the environment in the first place. This means that despite reducing interior temperatures when installed correctly, reflective insulation will do little to keep the van warm in colder climates.
They also require a gap of air between the barrier and the surface being insulated. This should be around 15mm and without it, performance deteriorates rapidly.
This is usually achieved by layering reflective insulation over a conventional layer of air-trapping insulation such as foam or wool to get good performance in both hot and cold climates.
There are also brands like Low-E that produce reflective insulation with a closed-cell foam core to provide a built-in moisture barrier to underlying insulation and prevent condensation.
You’ll see reflective insulation used on roof panels, windows, and between conventional insulation and wall covering to stop heat buildup. You can also get reflective window coverings which are ideal when parking up on a hot day and trying to keep the interior cool. These are lightweight and quick to hang up and remove as necessary.
Natural & eco-friendly options (sheep’s wool, cork, recycled cotton, hemp)
If you’re prioritising sustainability in your build, then natural non-toxic materials like sheep’s wool, cork, recycled cotton, and hemp are a great eco-friendly alternative to synthetics like fibreglass.
Sheep’s wool is probably the best-performing natural insulation material, offering excellent natural thermal and moisture resistance with high breathability. Unlike synthetics, wool absorbs and releases moisture without losing its insulating power. This makes it ideal for managing condensation. Wool also provides built-in soundproofing, resists mould, and is fire-resistant due to its natural lanolin content.
Cork is another eco-friendly option with natural resistance to moisture, mould and fire. While it doesn't offer quite as high R-values as wool, it’s lightweight, flexible, and easy to work with. It’s also great for floor insulation where its natural cushioning makes it comfortable to walk around on when placed under carpets or laminate.
Recycled cotton, made from denim, is a non-toxic, sustainable alternative to fibreglass. It offers good thermal resistance and sound absorption, while also being much easier to handle and work with. There’s also no need to worry about harmful fibres being released into the air down the line. However, unlike sheep’s wool, cotton requires a vapour barrier to stop it from absorbing moisture. This isn’t a dealbreaker, but important to note as its thermal resistance is massively reduced when damp.
Hemp hasn’t seen the same level of adoption in campervans but offers similar thermal and acoustic performance to wool and cotton. It’s durable, renewable, and also offers natural mould resistance and a good balance of breathability and warmth. The main issue is availability, with hemp insulation less common than other options. However, if you can source it, hemp is certainly worth considering.
Each of these materials is suited to different budgets and areas around your campervan. In reality, you’ll probably want to use a combination of materials to achieve the best results.
Vapour barriers
You’ll often see vapor barriers mentioned as a necessity when using certain types of insulation. While not insulation themselves, vapor barriers are sheets of material that cover the insulation in your campervan to stop moisture ingress. They’re usually made of plastic or foil, and there are also materials like Reflectix which combine resistance to moisture diffusion with reflective insulation properties.
In theory, vapour barriers are an extremely effective way to prevent moisture build-up in campervan insulation. The issue with them lies in the fact that without a 100% airtight seal, they can do more harm than good.
Even small gaps can lead to water ingress which then has nowhere to escape. This is because the exterior of a campervan isn’t vapor permeable like a house, so moisture becomes trapped between metal panels and the vapour barrier.
This can lead to mould and damage to the insulation, so only install a vapour barrier if you’re confident you can get a perfect seal. In most cases, it’s better to rely on breathable campervan insulation like sheep’s wool with good ventilation or moisture-resistant options like foam board and closed-cell spray foam.
Best insulation materials for different applications
Let’s break down which areas of the van each material excels at along with some common combinations to use as a guide when deciding which route to go down.
Use case | Best overall | Best eco-friendly | Best budget option |
Walls and ceiling | XPS or polyiso foam board (High R-value, moisture-resistant, lightweight) | Sheep’s wool (Breathable, regulates moisture, provides soundproofing) | EPS foam board (More affordable than XPS but still effective) |
Floor insulation | XPS foam board with plywood overlay (Strong insulation and durability) | Cork (Water-resistant, lightweight, comfortable) | Recycled cotton or Rockwool with optional vapour barrier (Also offers soundproofing benefits) |
Window | Vehicle-specific Reflectix or Low-E insulation (Best at blocking radiant heat) | Insulated fabric window covers (Also provides blackout benefits) | DIY reflective covers (Effectiveness depends on how well they’re made) |
Doors and cavities | Spray foam (Fills small gaps easily, eliminates thermal bridges) | Sheep’s wool (Easily packs into irregular spaces, works when moist) | Rockwool or recycled cotton - (Decent insulation but benefits from an optional vapour barrier) |
Given that different areas of the van have different heat properties and needs, you’ll probably want to take a hybrid approach to campervan insulation to create the most effective system. Combinations you could use include:
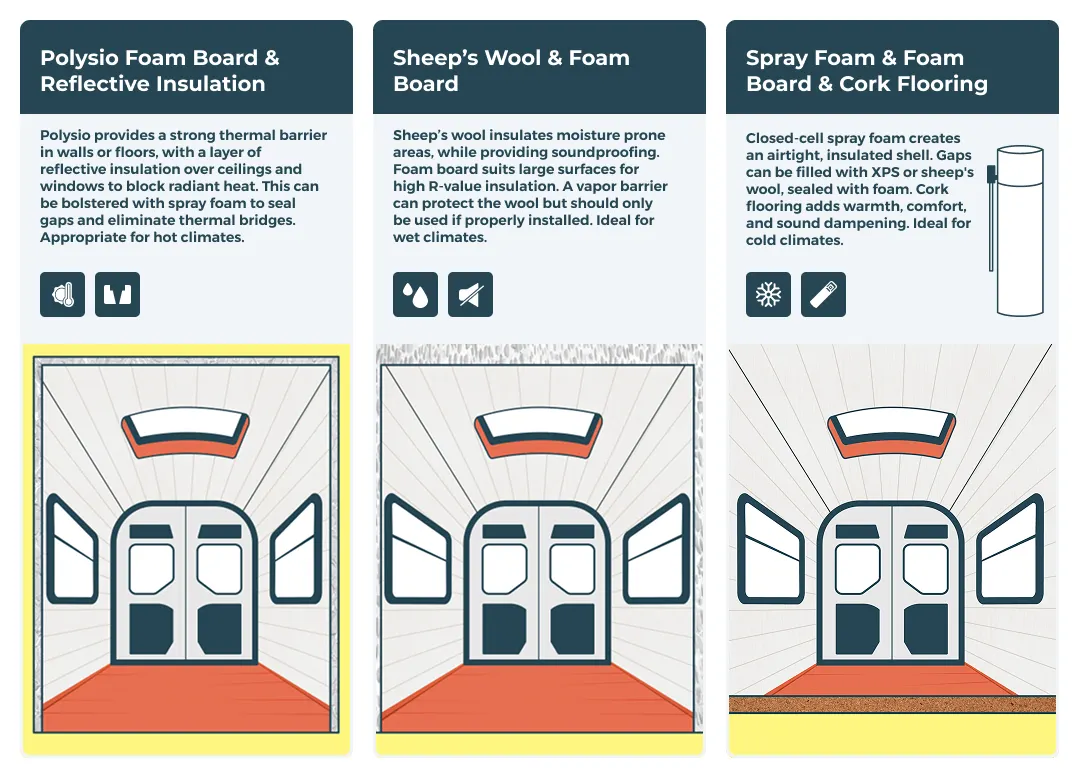
Polysio foam board + reflective insulation. Polysio provides a strong thermal barrier in walls or floors, with a layer of reflective insulation over ceilings and windows to block radiant heat. This could be bolstered with spray foam to seal gaps and eliminate thermal bridges. Appropriate for hot climates.
Sheep’s wool + foam board. Sheep’s wool would be used in walls and other awkwardly shaped or moisture-prone spaces, offering both insulation and natural soundproofing. Foam board could then be fitted to large surfaces like floors and ceilings for high R-value insulation and easy fitment. This could be finished off with a vapour barrier over the walls to protect the wool from excessive moisture. However only include a vapour barrier if you are certain you can get it right, anything but complete airtightness will do more harm than good.
Spray foam + foam board + cork flooring. You could use closed-cell spray foam in ribs and cavities for an airtight, highly insulated shell. The large gaps between these could be insulated with panels of XPS or sheep's wool, again sealed with closed-cell foam to prevent any gaps in insulation. Finally, cork could be used on floors for its warmth, comfort, and sound dampening. Appropriate for cold climates.
Remember, these examples are just a guide, and you can mix and match materials based on the properties described in this article and your specific use case for the van.
Step-by-step guide to insulating a campervan
So, you’ve decided on which materials you want to use for each area based on where your four-wheeled adventures are likely to take you. Next, you’ll need to actually install it. This isn’t as complicated as it sounds, and with the right tools and practices, it should be more than achievable for the average DIY campervan build.
Tools-wise, you’re likely to need a utility knife, a straightedge, measuring tapes, marker pens, and adhesives. You’ll probably also want a sealant gun for sealing gaps and making areas airtight unless you’re predominantly using spray foam.
Some people get really hardcore and use thermal imaging cameras to identify potential heat loss points. However, for most builds not planning an arctic trip any time soon, keeping in mind our explanations of how heat interacts with a campervan and using your head should suffice.
Top tips for insulating each area of the campervan
With your tools gathered and a good idea of which materials you’ll need for each area, all that’s left to do is measure and buy. Since there are hundreds of material combinations possible, we’ll focus the next part of this guide on best practices and important considerations for each area of the campervan.
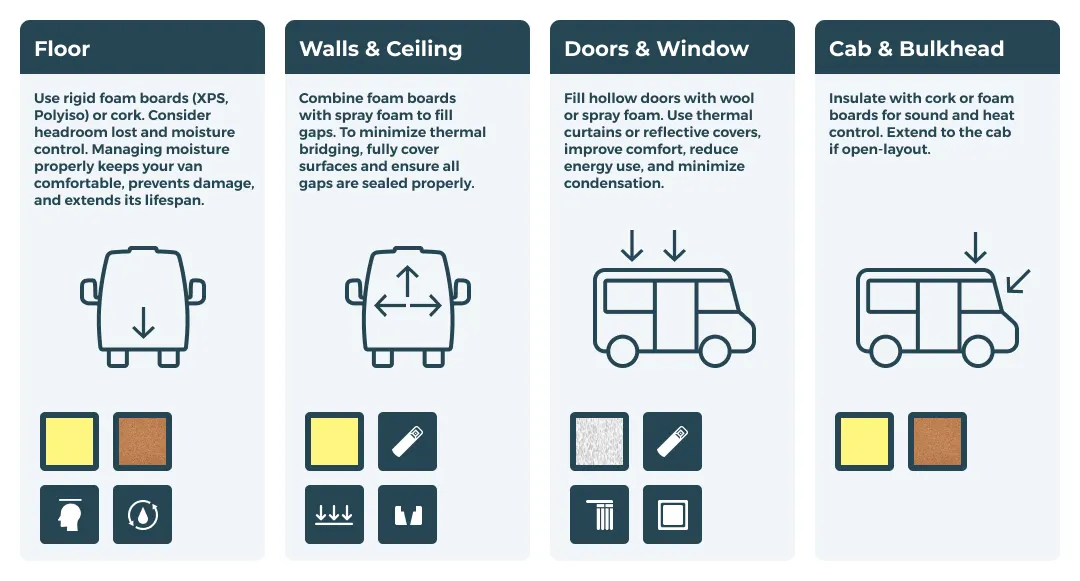
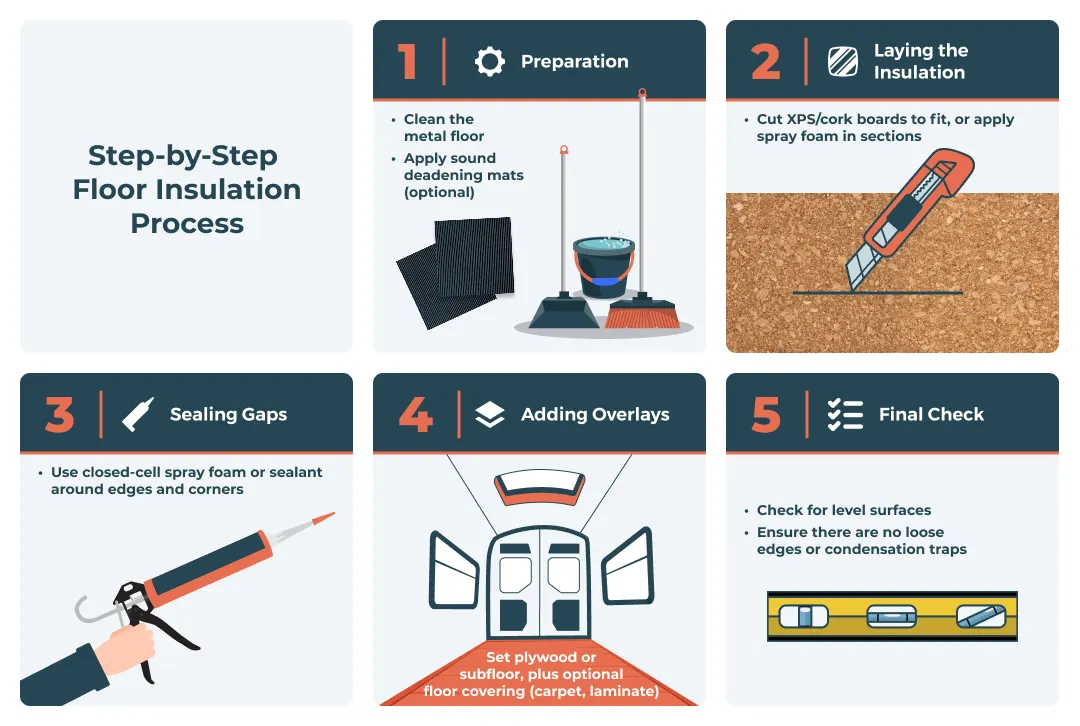
Floor insulation
Floors are an often overlooked but crucial part of campervan insulation. Since heat naturally rises it’s easy to focus on walls and ceilings. However, floors are the closest surface to the chilly ground, making it easy for cold to seep up into the living space.
You’ll normally be looking at rigid foam boards, like XPS or polysio, or cork for floors due to their durability and high R-values per inch. The springy nature of cork means it’s often more comfortable to walk on, but XPS has higher R-values so keep this in mind if travelling to colder climates.
You can also use closed-cell spray foam in floors, which creates a fantastic barrier against cold and moisture, however, it’s more awkward to work with and you’ll need to be precise to avoid uneven surfaces. Once the foam’s expanded you can remove material as needed similar to how you flatten off filler, just be aware of the extra work.
If you’re using spray foam, you’ll also probably want some sort of framework between sections of foam and wooden panelling over the top to provide support and avoid crushing the foam when walking around.
This also provides a good base for carpets or foam mats, which can be overlaid on top of spray foam or foam boards for an extra thermal break. Just keep vertical space in mind, since every layer of floor insulation will reduce headroom.
This is especially apparent in low-roof vans, where a couple of inches can be the difference between comfort and awkwardly tilting your head to the side to get around.
Wall & ceiling insulation
Floors are important, but walls and ceilings are the primary areas for heat transfer in a campervan. These large metal surfaces require thorough insulation and even coverage to prevent heat loss.
The most common approach is to use foam board cut into pieces which fit inside the large flat surfaces between any structural ribs. These can be secured with mechanical fasteners like clips or brackets, but the easiest way is to use simple adhesive. Some people use spray foam as an adhesive but the easiest way is to grab a sealant gun and use general all-purpose DIY adhesive like Evo-Stik. You can also buy spray adhesive in cans from most DIY stores.
This can then be bolstered with spray foam as it will expand into gaps and eliminate air pockets or gaps between panels and structural ribs to eliminate thermal bridging. You can also use sections of more flexible adhesive-backed foam or even stick reflective insulation over the top of these ribs to further break the conductive path.
Doors & windows
Doors and windows allow for significant heat transfer and need to be addressed when installing your insulation. Most van doors have hollow cavities behind the plastics that can be filled with insulation. This is difficult with rigid boards, so you’ll probably want to stick to wool-based or spray insulation here to minimise heat loss.
Be careful of internal mechanisms like locks and wiring, and if you’re not comfortable with using spray foam stick to wool-like materials as they're easy to move around and adjust if needed.
Windows are the least insulated area of the campervan, so you’ll need to use thermal curtains of some description. These can be made from reflective materials or insulated fabric. You can buy vehicle-specific premade reflective curtains, but a more popular DIY option is to buy a large roll of material such as Reflectix and simply create a template from your window and cut to size.
Cab & bulkhead insulation
The driver's area is often separated from the living space by a metal bulkhead. In these cases, you can insulate this area in the same way as the other walls. However, if the campervan has an open layout you’ll want to insulate the ceiling and floor of this area too.
It’s best to use insulation with natural sound-deadening here such as cork, which still retains thermal resistance, Ceilings can be insulated using foam boards for colder climates or simple reflective insulation for hot-weather setups. It’s also important to buy or make reflective insulation panels for the windows in the cab area as these are generally the largest windows in the van.
Should you install insulation or electrics first?
You’ll see this debated endlessly in campervan build forums so here’s our take. Installing electrics before insulation can seem like a good way to hide wiring and create a clean-looking interior.
However, if you need to inspect or repair anything down the line it can turn into a nightmare if you need to rip out insulation to reach wiring. This can also be a huge problem when fault-finding with a multimeter if you have a loss of current somewhere along a particular circuit.
Our recommendation is to either install electrics over insulation and panelling for easy access, or, for a cleaner look install insulation first then hide electrics with easy-to-remove panelling in case of a fault.
It’s also best practice to use conduit or protective sheathing if wires will be placed behind panelling to ensure they aren’t damaged by compression or friction due to vibration and the chassis flexing.
Just be sure to plan your electrical system layout before you fully insulate everything so you have a good idea of where you’ll need to leave space to run wires and place components.
If you’re still not sure exactly which electrical components you need, why not use Vunked’s electrical system builder? Simply input your requirements and what appliances you plan to run and we’ll put together a complete electrical system based on your needs.
We’ll send you this in kit form, along with detailed instructions, wiring diagrams, and every little component needed for a complete set-up! We also sell pre-built electrical system kits ranging from weekend mild to full-time off-grid wild.
Considerations to get the most out of your insulation
While the primary role of insulation is to control the temperature of your campervan, it’s important to understand how it interacts with other factors like moisture and noise. The effectiveness of many campervan insulation materials relies on them not absorbing too much moisture, so let’s look at managing this first.
Managing moisture and ventilation
Since campervans are enclosed spaces, moisture is generated in the air from everyday things like breathing and cooking. Without proper ventilation and moisture management, this builds up and can lead to mould, corrosion, and worse performance from your insulation.
To combat this, your campervan will need to be ventilated. Roof vent systems, such as Maxxair or Fiamma fans can facilitate this airflow, expelling humid air while drawing in fresh air. You can also generate passive ventilation by cracking windows or installing static closable vents.
You can learn more about ventilation in our complete guide to 12V air conditioners, where we break down the electrical systems needed to maintain optimum ventilation.
Having a well-ventilated campervan is not only more comfortable, but it will also reduce the need to rely on vapour barriers over insulation materials as a way of keeping moisture under control. You can also prioritise closed-cell spray foam or XPS insulation as these naturally resist moisture and reduce the risk of condensation.
Whichever insulation you choose, just be aware that any gaps in the insulation can become moisture collection points, so use a water-resistant sealant like silicone or closed-cell spray in gaps near windows, doors, and panel seams. This keeps your campervan dry and free from long-term moisture-related damage.
Soundproofing requirements
As we’ve touched on, many insulation materials also offer soundproofing qualities. Without this, noise from roads or campsites can disrupt sleep, while audio playing from speakers sounds tinny due to reverberations from the confined acoustics.
The noise inside a van is caused by vibrations travelling through the metal body. Without soundproofing, your van walls and floor act like amplifiers for these vibrations causing annoyingly loud sounds inside.
While insulation often provides soundproofing, the best protection against this is to underlay dedicated sound-deadening mats such as Dynamat, Noico, or Kilmat under your insulation.
By covering just 25-40% of the van's metal surfaces with these thin but dense rubberized mats, huge amounts of vibration can be absorbed for significant sound deadening without a large penalty in weight or cost.
Apply in sheets directly under insulation, focusing on areas like wheel wells, doors, and bulkheads for the best results.
Budget considerations & cost breakdown
So, what’s the cost of all this? Well, it depends on the materials you choose and how thorough you decide to be. Weekend warriors with a simple summer set-up can probably get by with the basics, while large full-time living spaces need to be properly insulated against the full range of climates.
Let’s break down the costs, ranging from a budget-friendly set-up to a professional-grade high-performance solution that will work in any environment. These prices are only a rough guide, and your mileage may vary depending on where you can find discounts.
|
Area |
Budget option |
Mid-range option |
Premium option |
|
Floor insulation |
£50 - £75 |
£100 - £150 |
£200 - £300 |
|
Walls and Ceilings |
£100 - £125 |
£200 - £300 |
£400 - £500 |
|
Doors and windows |
£50 - £100 |
£150 - £200 |
£250 - £300 |
|
Cab and bulkhead |
£30 - £60 |
£80 - £120 |
£150 - £200 |
|
Soundproofing |
£60 - £90 |
£120 - £180 |
£250 - £300 |
|
Miscellaneous |
£20 - £40 |
£60 - £80 |
£100 - £150 |
|
Total |
£310 - £485 |
£910 - £1330 |
£1650 - £2050 |
For a budget option that’s appropriate for regular climates, EPS foam board and recycled wool insulation should be your go-to. Combine this with Reflectix for windows and roofs and you should have a decent set-up for most trips.
If you’re happy to spend a bit more for higher performance, XPS foam boards, Thinsulate, and natural sheep’s wool offer great insulation properties for a wider variety of climates.
At the premium end, closed-cell spray foam and high-density polyiso boards offer great performance but you will be paying for it.
Polyiso also doesn’t work great in extreme cold, so for winter set-ups we would recommend a mix of closed-cell spray foam, XPS, and natural sheep's wool where appropriate.
In general, you should invest in the best campervan insulation and ventilation your budget allows for. Savings can be made through DIY installation, recycled materials, and making your own thermal curtains instead of buying vehicle-specific options.
For a deeper dive into typical budgets of a complete campervan build, check out our full guide on everything you need to know about van conversion costs.
Keeping your van cosy whatever the weather
By choosing the right materials and installing them properly, you’ll be able to keep your campervan comfortable throughout the full range of temperatures you plan to travel in. The possibilities are endless, and we hope this guide has given you the information you need to decide what will work best for your unique needs.
As we mentioned in the installation section, it’s also important to plan out how the rest of your build will fit around your insulation solution. One of the most complex areas of a campervan build to plan is the electrical system.
Plenty of DIY heroes spend countless hours trawling through threads to find out exactly what they need, before ordering individual components from multiple suppliers to piece together a complete set-up.
Vunked takes the stress out of this, providing a simple online electrical system builder to put together exactly what you need and nothing you don’t. You’ll receive your electrics in a complete ready-to-go kit with every wiring diagram, instruction, and component needed for a clean install.
We also provide ready-made electrical kits designed for everything from short weekend getaways to full-time extreme off-grid living!