Nailing your campervan lighting is essential for both day-to-day practicality and creating the perfect ambience in your home on wheels. But it can be challenging to know where to start with choosing your lights, let alone wiring them and managing energy consumption.
In this guide, we’ll cover everything you need to know. We’ll also take a look at power considerations so you can rest easy knowing your electrical system can support whichever lights you choose to fit.

Campervan lighting options
We’ll touch on alternatives, but you’ll generally be looking at 12V LED lighting for a modern camper build. There are several types on the market, with each excelling for different reasons. Let’s look at the most common types of LED campervan lighting available and where they…shine.
1. LED strip lights
12V LED campervan strip lights are highly customisable and can be cut down to whatever length you need to fit them. They consume slightly more power than puck lights but are still extremely efficient, making them ideal for off-grid set-ups.
Power consumption here is measured per metre, with the average 12V LED strip using around 4-10 watts of power per metre. Many also come with dimmable options for mood lighting.
12V LED campervan strip lights are super easy to install in any location, and fitting is as easy as cutting to size and peeling off the adhesive backing. This makes them great for under cabinets or along ceiling panels due to their low profile design.
Limited brightness with some models means they aren’t the best for task-oriented activities so it’s best to pair them with dedicated task-lighting for things like reading or cooking.
You’ll also want to consider heat dissipation when fitting and try to avoid mounting in overly enclosed spaces with no airflow.
2. Recessed LED downlights
Sometimes called campervan spotlights or puck lights, these small 12V interior van lights offer a sleek look by sitting flush with ceiling panels to maximise headspace. They’re ideal for task lighting, providing direct light to specific areas like a reading nook or kitchen.
Like LED strip lights these are highly energy-efficient, consuming just 3-6 watts per light. However, they do need a bit more effort to install, usually involving cutting holes into the van’s ceiling panels to fit and mounting cables behind the panel.
3. Pendant and ceiling lights
Pendant and ceiling lights are ideal if you’re going for a cosy bohemian aesthetic for your campervan interior.
From a power standpoint, they’re similar to regular 12V LED downlights, with power consumption sometimes slightly higher due to the stronger illumination provided. This makes them an attractive alternative to strip lights to provide general all-round illumination without compromising on aesthetics.
However, since they hang down from the ceiling they will take up some valuable headspace, and it’s crucial to securely mount them to prevent movement while you’re driving.
4. Touch LED lights
Touch LED lights are similar to regular puck lights only with the convenience of turning them on and off individually with just a touch. This is great when you’re cooking and just need a bit of extra light but don’t want to turn on a full row of puck lights.
They’re generally small and unobtrusive, making them ideal for tight spaces. They can also be powered by your regular 12V system or simply stuck under surfaces and powered by AA batteries to make a small part of your campervan lighting wireless.
It’s best to avoid using these to light up larger spaces due to the limited brightness. Depending on the quality, touch sensors might degrade over time with constant use.
How to wire your campervan lights
Getting the wiring right will mean your campervan lights are both efficient and safe. How complicated this will be depends on the type of lights you go for and the layout of your van, but the guide below will be applicable regardless of the details. We’ll start with the basics: wires, fuses, and switches.
Wire and fuse sizes
The right wiring gauge is crucial for safety since undersized wiring can overheat and cause electrical fires. Fuses are the second failsafe in this regard and protect both your wires and lights from overheating and power surges.
- Wire sizes. LEDs generally draw low current but you still need to use the right wire size for safety. 1.5mm2 SWG wire (16 AWG) is fine for most low-wattage LED lights. If you’re wiring lots of lights into one circuit you can use 2.5mm2 (14 AWG) to play it safe.
- Fuse sizing. Fuses need to be rated lower than your wire's maximum current to prevent overheating. For example, if your wire can handle 10A use a 7.5A fuse.
Example set-up: If you’re fitting five recessed LED lights that consume 4 watts each, the total current drawn will be around 1.67A. In this instance, 1.3mm SWG wire and a 3A fuse would be ideal.
Switches
Switches are essential to control your lighting system. There are a few types available, including:
- Single Pole Single Throw (SPST). The proper term for simple on/off switches.
- Dimmable Switches. Compatible with dimmable 12v dimmable LED lights for campervans. The switch on its own will not make a regular LED dimmable.
- 3-Way Switches. Control the same light from multiple locations. Convenient for larger camper vans but more complex to wire up.
Simple step-by-step guide to installing 12V lights
Wiring 12V lights is a manageable task for most DIY enthusiasts. Here’s a brief rundown of the practical steps involved.
1. Plan your layout
Start by planning out where your lights and switches will go. Sketch out a simple diagram that shows the light locations (e.g., ceiling, under cabinets, etc.) and where you’ll fit the switches.
This will help you plan where the wires will be routed and keep track of where each connection will be. It’s also worth thinking about where you’ll place your fuse holder as it should be easily accessible if you ever need to replace a blown one. We usually recommend keeping your fuse holder and your other electrical goodies (batteries, inverter, etc) in the same place.
Keep heat management in mind when mapping where everything will go. While most quality LEDs will have built-in heat sinks, it’s still worth leaving airflow around fixtures to prevent heat build-up and keep them running efficiently over their full lifespan.
It’s also a good idea to use a simple 12V LED lights wiring diagram like below as a reference for the next steps.
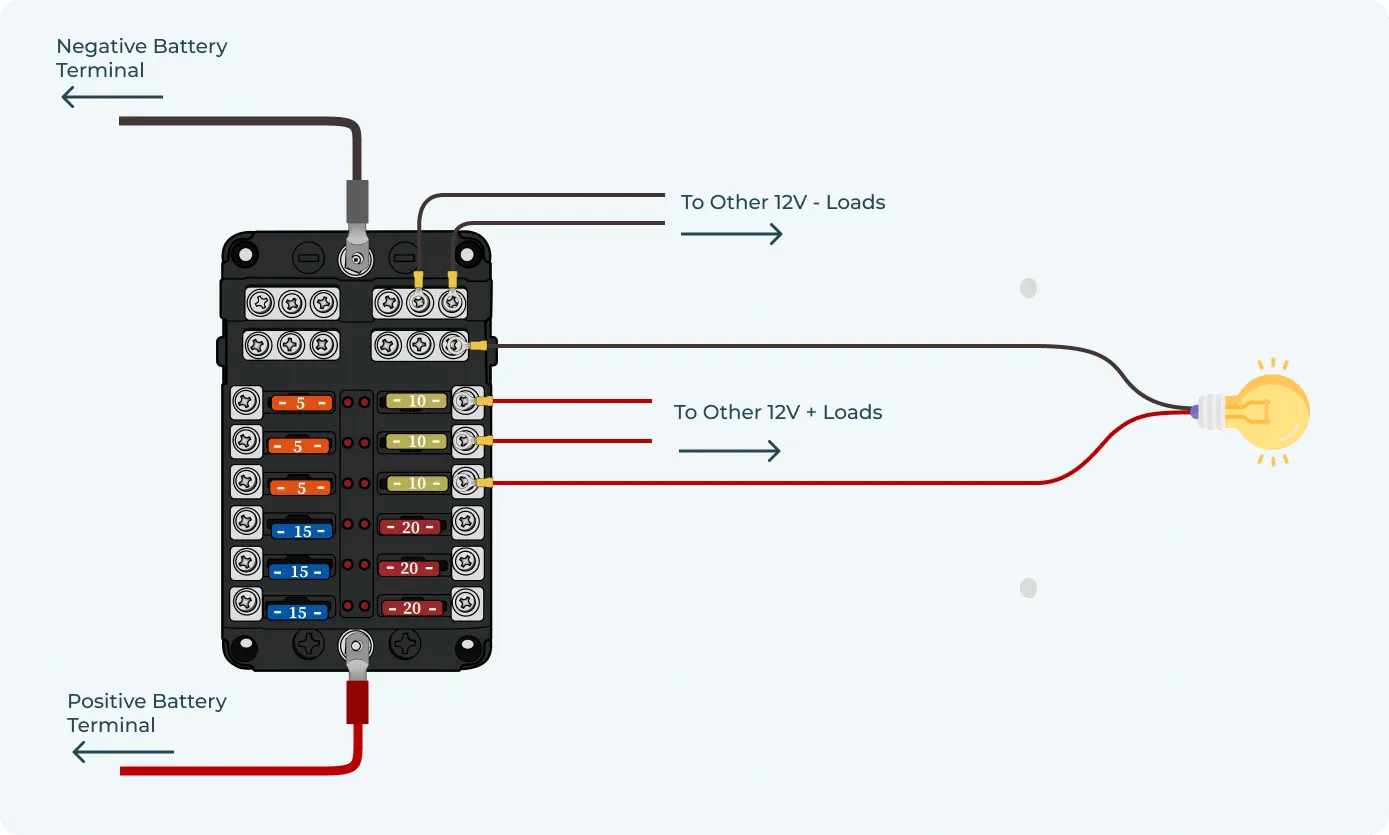
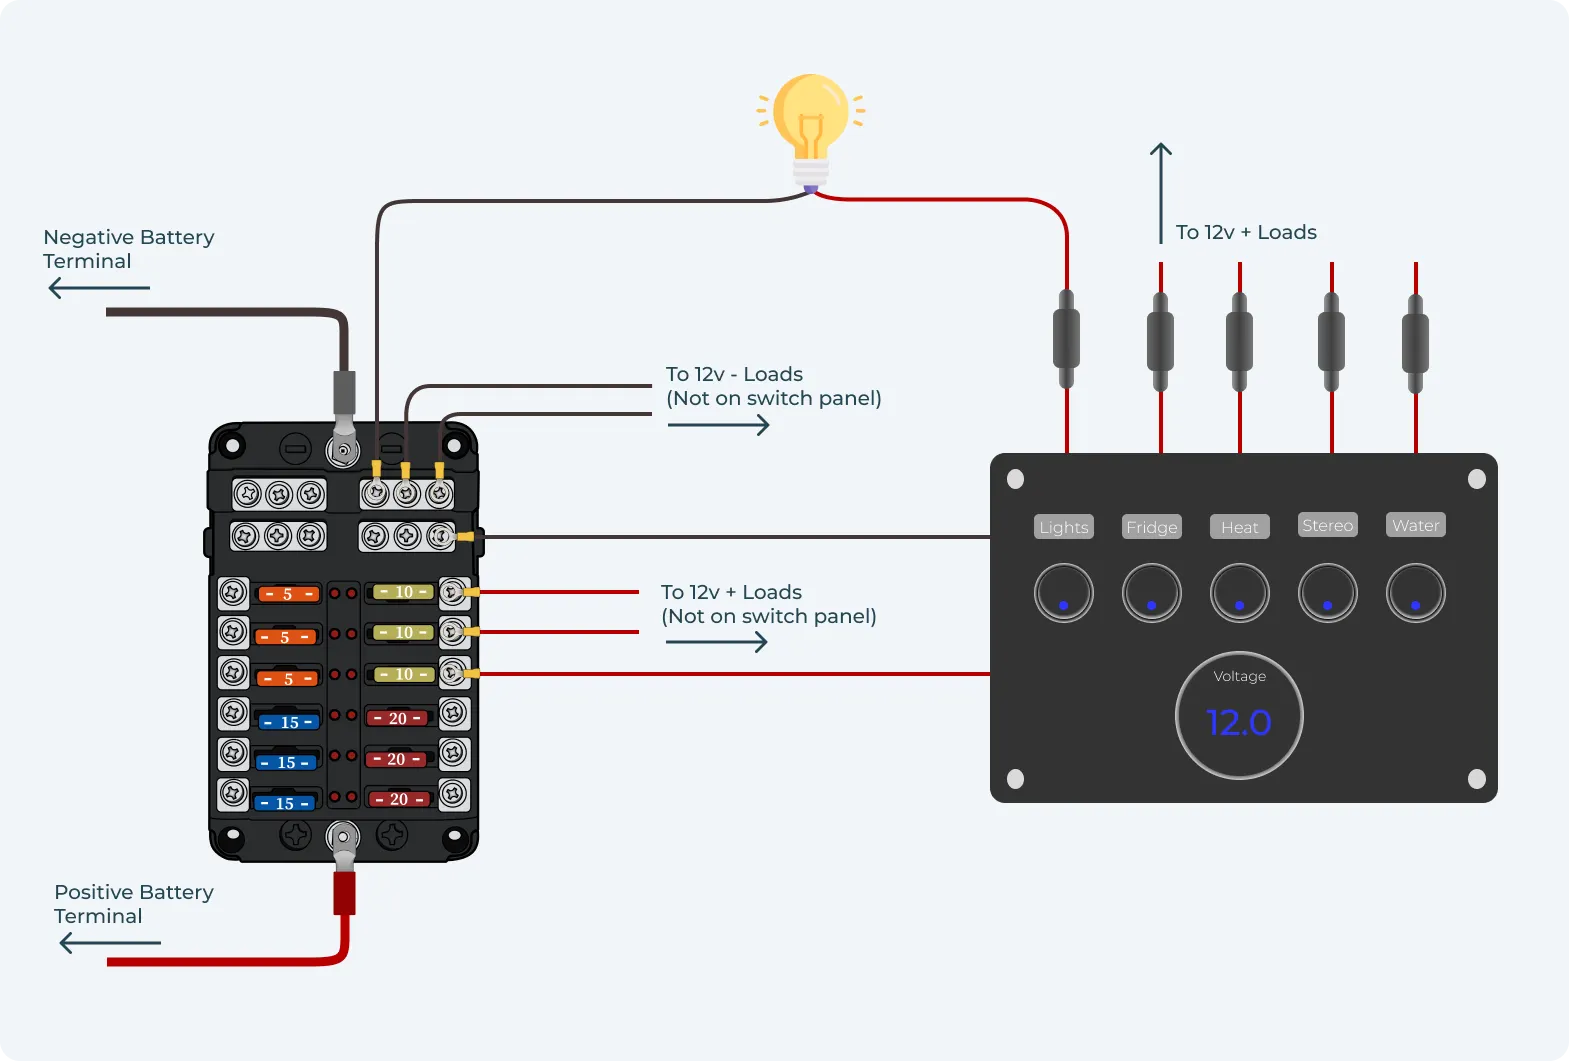
With switch box installed:
2. Gather your materials
Get together everything. This includes your basic components such as:
- 12V LED lights.
- 12V battery
- Appropriate gauge wire
- Switches
- Blade fuses and 12V fuse box
As well as some basic electrical tools. These include:
- Wire cutters to cut wire.
- Wire strippers to remove insulation from wire ends.
- Crimping tool to attach connectors to wires.
- Lighter or mini butane torch for heat-shrink tubing.
- Multimeter to test voltage and continuity
- Screwdrivers to secure terminals and switches.
- Heat shrink tubing to protect wire joints and make a clean installation.
3. Run the wiring
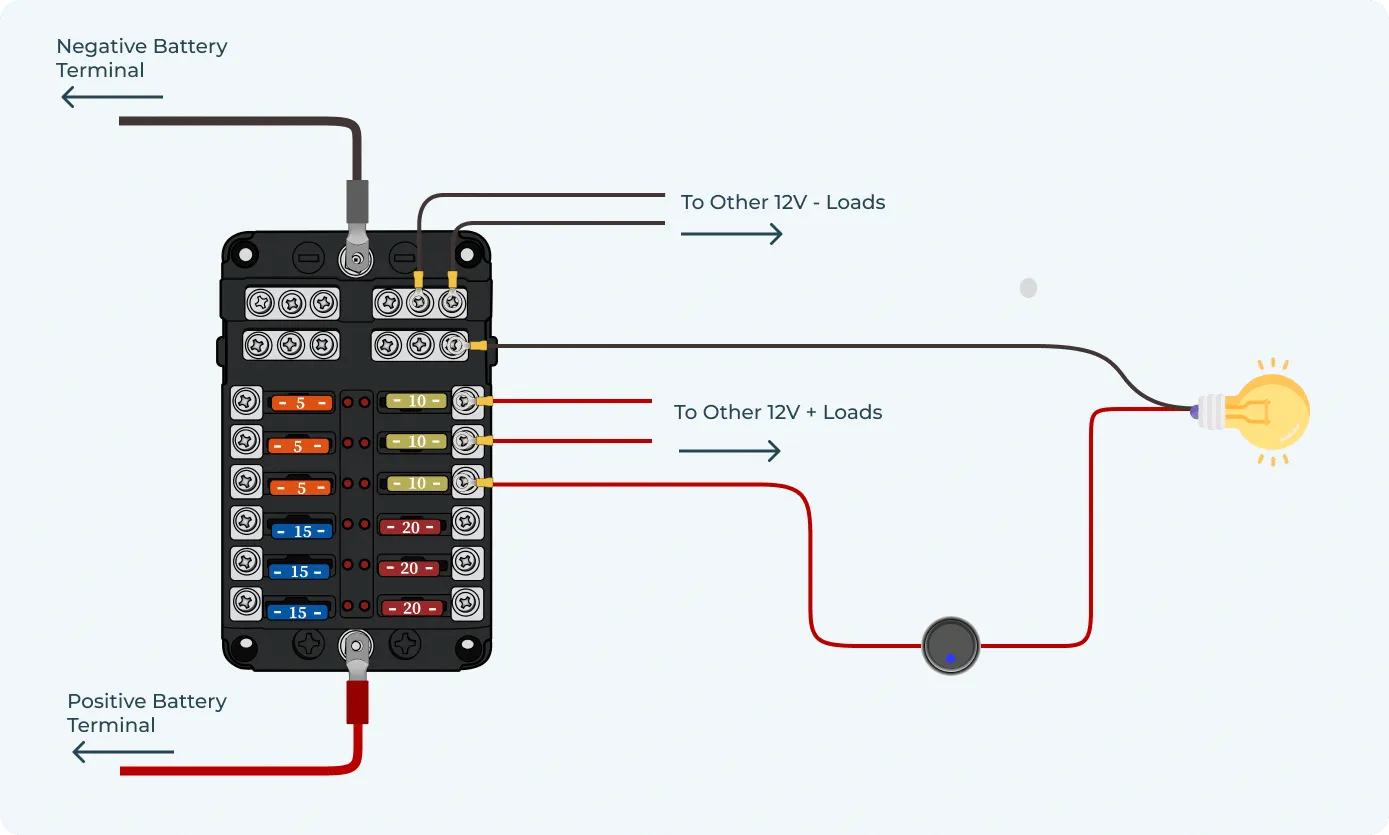
With your materials together and the layout planned, begin running the wires from your 12V fuse box to the locations of light fixtures and switches.
Each 12V circuit will run from a separate positive and negative terminal on your 12V fuse box.
Start by running the positive wire (red) from the positive terminal on your 12V fuse box to the first switch location. You can secure the wires to walls or ceilings with adhesive cable clips or conduit.
You can either use a different circuit for each of your lights—though this will use up a lot of room on your 12V fuse box, and you likely have other goodies you want to power (USB Sockets, fridge, air fan). Instead, you likely want to run a few lights from the same circuit.
Run wires from the 12V fuse box to each light fixture. If you’re running multiple lights, wire these in parallel so each light receives the same voltage and puts out consistent brightness.
Here’s how this looks:
4. Install the switches
Now, install the switches at their designated locations, making any cuts needed to the van interior panelling to attach the switch assembly. Note, some lights may come with a switch already attached.
Strip the wire ends you’ve put in place and connect the positive wire from the 12V fuse box to the input terminal on your switches.
Then, connect the wire from the output terminal that runs to the positive terminal of the light fixture.
Use crimp connectors for this and cover them with heat shrink tubing or electrical tape to keep the connections solid and prevent moisture ingress.
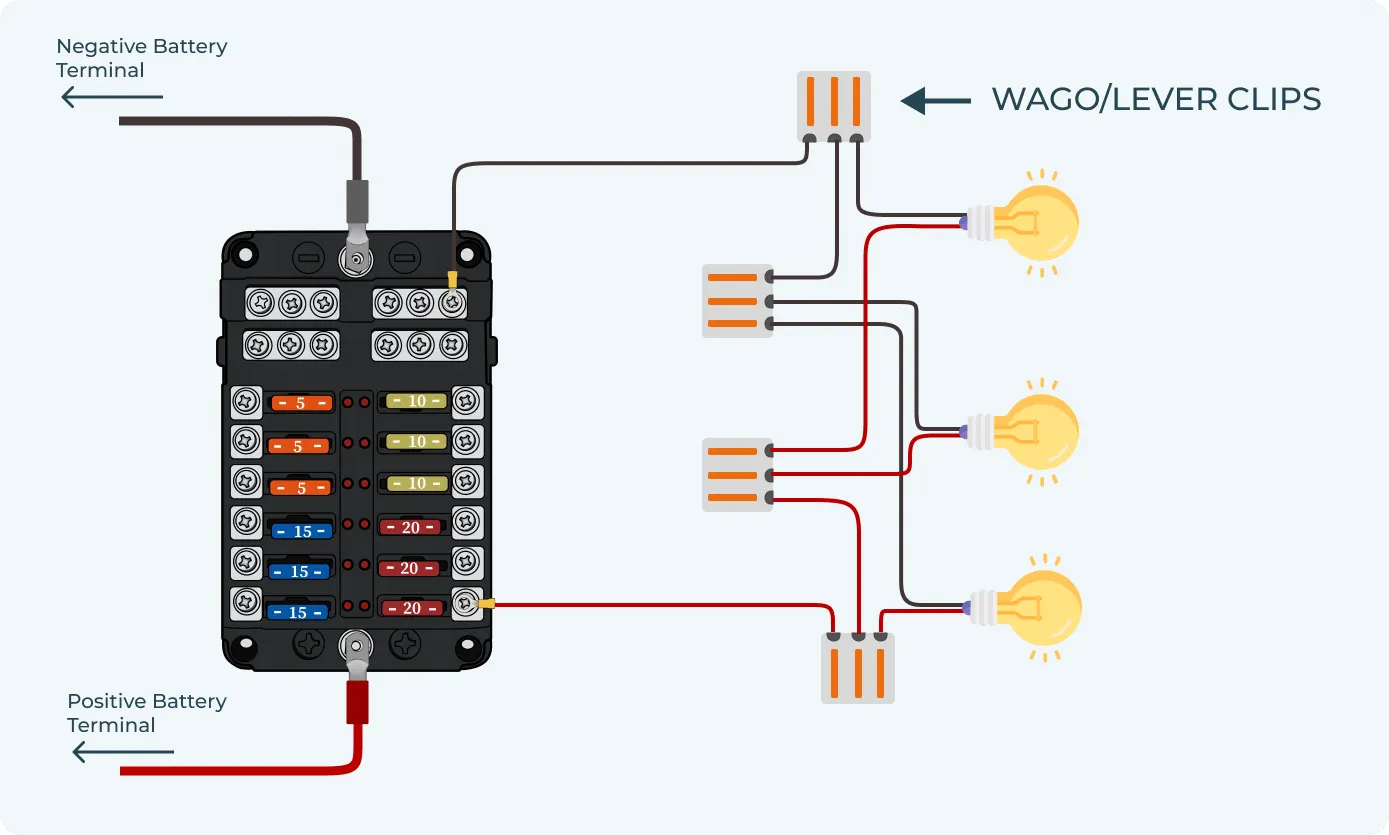
5. Wire the lights
Install your 12V LED lights of choice into their designated locations. For strip lights simply peel the backing and press into place. For recessed ceiling lights you’ll need a drill and screws.
Once your fixtures are in place:
- Strip both the positive and negative wires running to the fixture at their ends.
- Connect the positive wire from the switch to the light's positive terminal.
- Connect the negative wire from the light fixture to the negative terminal on your battery.
If you’re grounding the negative wire to the camper van’s chassis, you’ll need to make sure you’ve got a good patch of bare metal to attach to.
6. Add your fuse
Fit the blade inline fuse in the 12V fuse box. This protects your wires from surges and shorts, avoiding overheating and fires.
As we’ve discussed, the fuse you choose will be based on the total amperage of the circuit. 5A-10A is normally appropriate for 12V LED circuits.
7. Test your circuit
When everything is wired, test the system to make sure everything works before tidying up the wiring and securing the panelling.
Flip the switch and make sure everything turns on/off as expected. Look out for any dim or flickering lights and double-check your connections to rectify issues if they’re present.
Finally, use your multimeter to test the voltage at every light fixture. If you’ve wired them in parallel as recommended you should get around 12V at every point.
8. Secure and protect wiring
Once you’re satisfied the system works as expected, use cable ties to bundle wires neatly and prevent them from rubbing or snagging on anything. Secure them along the ceiling or walls and make sure they won’t contact any moving parts like sunroofs.
With everything in place, you can install your vehicle's panelling or coverings back in place and enjoy a well-lit camper van!
Key campervan lighting considerations
Here are some key considerations to bear in mind when designing your camper van lighting systems.
Light temperature
As well as the different kinds of 12V LED lights, you’ll find each model can usually be purchased in a variety of light ‘temperatures’. This temperature is measured in Kelvin (K) and plays a massive role in the atmosphere of your build.
The higher the Kelvin, the closer the light is to pure brilliant white. Lower Kelvin ratings look more similar to traditional incandescent bulbs and create a cosier feel. As a general guide:
- Warm white (2700K-3000K) for a cosy inviting atmosphere, best for living and sleeping spaces.
- Neutral white (3500K-4000K) looks the closest to natural daylight, best for general lighting.
- Cool white (5000K-6000K) is bright and crisp, best for task areas like cooking areas.
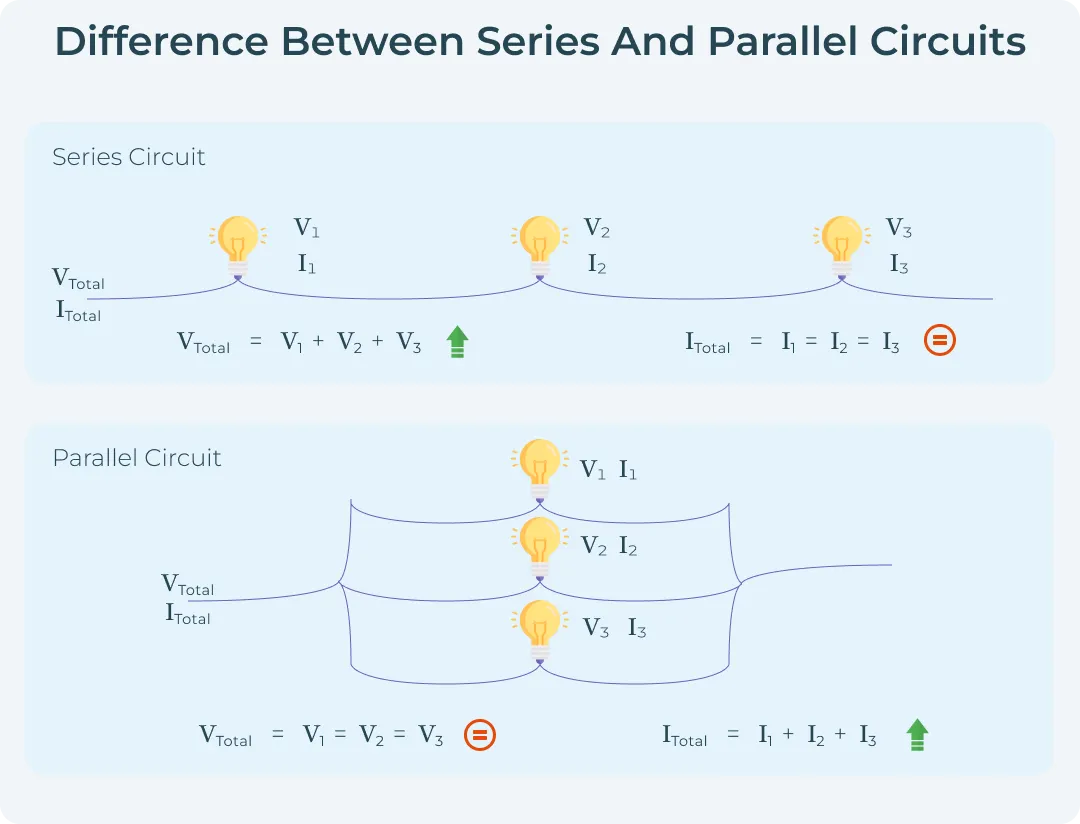
Wiring 12V campervan lights in series vs. parallel
You’ll see we recommended parallel wiring for 12V LED light installations rather than series configurations.
In a parallel circuit, every light is connected directly to the power source. That means if one goes out the rest can still function fine. It’s also more efficient, keeping the voltage the same across every light.
In comparison, in series wiring, every light is connected to the one before it. Think of this like old-fashioned Christmas tree lights where if one goes, they all go. There’s also the potential for voltage drops across the lights.
Safety considerations
- Proper grounding. Make sure any circuits in your campervan are properly grounded to a bare metal contact point on the chassis to prevent shock or fire hazards.
- Fuse protection. Follow the above instructions and use properly rated fuses to avoid overloading circuits. A blown fuse is a lot safer than a melted wire.
- Wire protection. Use protected coverings or conduit wherever wires run through metal surfaces. Pay extra care to tight spaces where even minuscule movements and flexing in your camper’s chassis can cause abrasion and shorting over time.
Powering 12v lights
Let’s take a detailed look at all things power when it comes to your 12V LED lighting system. It’s important to think about the consumption of the circuit as well as generation and how you’ll store the power.
12V systems run from the leisure battery in your van, but these come in a couple of different forms. You’ll also need to think about the best way to recharge this based on your intended use and the nature of your build.
In this section, we’ll look at battery options, power considerations, and useful tips for optimising power use during off-grid living.
Battery systems for 12V Lighting
Leisure batteries generally fall into two categories. The first is Lead-Acid Batteries (AGM, Gel). These are more affordable but have lower energy density and a shorter lifespan.
They also need careful management as frequently discharging more than 50% of their total capacity can significantly cut down their lifespan.
For this reason, Lithium-Ion batteries (LiFePO4) are recommended for a modern camper build. They’re more expensive but are much lighter and significantly more energy-dense.
They can also be deeply discharged, so frequently using 80%-90% of their total capacity leaves the battery completely unharmed. This makes them excellent for off-grid applications.
Battery capacity calculation for 12V lighting
To calculate the size of battery you need it’s important to work out how much power both your lights and the wider 12V system of appliances will consume over time.
LEDs are particularly energy efficient but it’s still a good idea to calculate your total amp-hour (Ah) requirements when choosing battery size.
Here’s a guide:
Power formula: Power (W) = Voltage (V) × Current (A).
For example, if you’re running six 4W LED lights, the total energy consumption would be 24W (Total power=6×4W=24W).
Since your lights run on 12V, the current draw would be:
Current=24W / 12V =2A.
Over 5 hours, this would need:
Amp-hours=2A×5=10Ah.
That means running the lights for 5 hours would consume 10Ah from your battery. If you’re off-grid using a common battery size such as 100Ah, this would give you about 8-9 days of use in the healthy discharge range of 80%-90%.
Efficiency tips for powering 12V lights
Want to minimize your power draw and extend off-grid times? Here’s how.
- Use low-power LEDs. Try to source high-quality energy-efficient LEDs to reduce your overall consumption. Strip lights are rated per metre so think about how long you’ll need to cut them to.
- Install dimmers. Dimmable lights will let you adjust brightness according to the environment, reducing your consumption of low brightness. You’ll need dimmable lights and switches, not just a dimmer switch.
- Optimise solar angle. If you’re using solar panels to recharge your battery, make sure they’re at the perfect angle for maximum light exposure.
- Monitor battery level. Use a battery monitor to track your consumption and battery level. This helps avoid over-discharging and is particularly crucial if you opt for a lead-acid model.
Combining an appropriate lighting system with clean installation and the right energy storage solution will ensure you’re 12V campervan lights provide years of reliable use.
Optimizing your build
Now you know how to choose the right lights and wire them up properly, it’s time to start putting together the parts you need. This is pretty straightforward for a 12V LED set-up but can be daunting when building out your wider power system to support them.
Often you have to spend hours trawling through forums and fragmented blog posts, piecing together parts in multiple shopping baskets, and hoping you haven’t overlooked any minor components that will leave you waiting for a parcel before finishing the installation.
Or, you could just use Vunked.
Our electrical system builder is a seamless online tool that lets you order a complete bespoke electrical system in kit form, with every part you need in one convenient package.
Our tool lets you choose exactly the right parts for your build based on how you want to use your camper and the appliances you’ll be installing.
You’ll also recieve full wiring diagrams and can rest east easy knowing your system is up to professional wiring and safety standards.