
Vanlife offers the ultimate escape, but to stay off-grid, you need reliable power. That's where a campervan solar panel kit comes in. These kits allow you to generate electricity from the sun, keeping your van ready for anything.
Whether deep in the wilderness or camping on a remote sandy shoreline, solar panel kits provide the energy to power your devices and appliances. Let's break down what a campervan solar panel kit includes and how it supports your off-grid lifestyle.
What is a Campervan Solar Panel Kit?
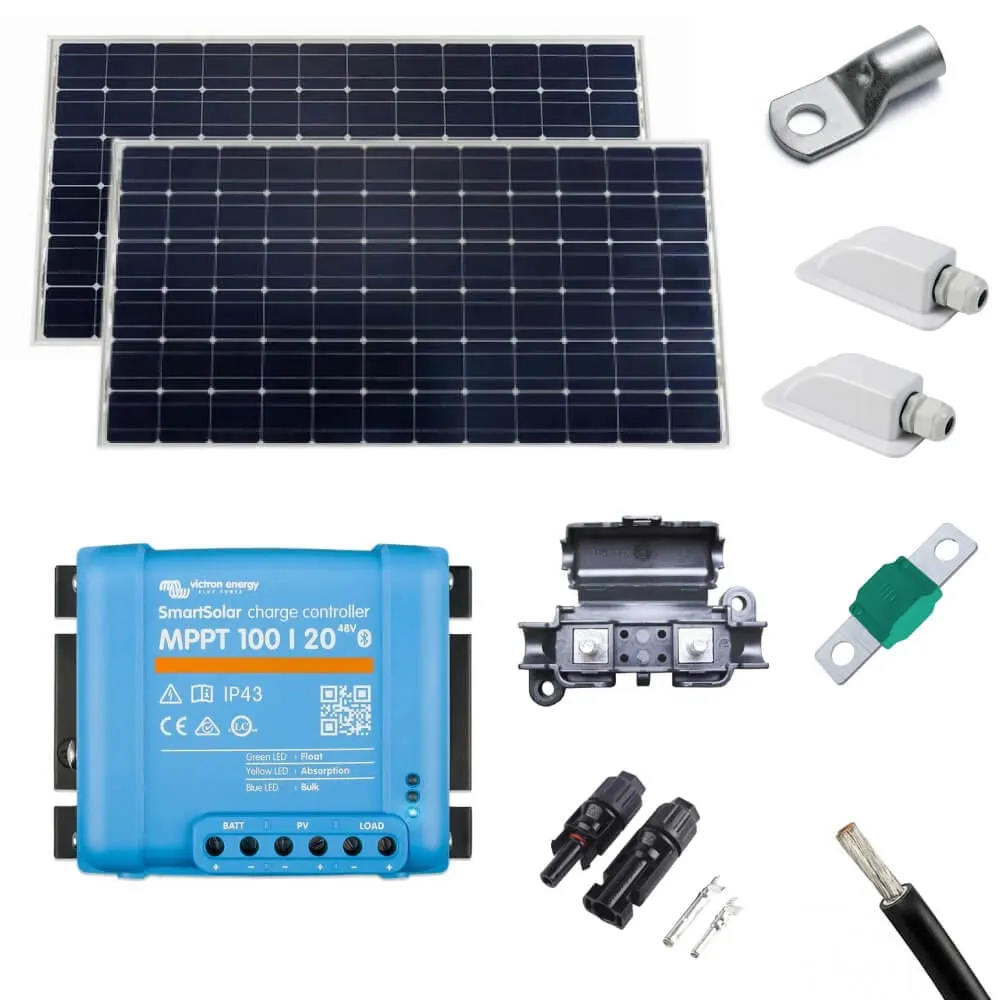
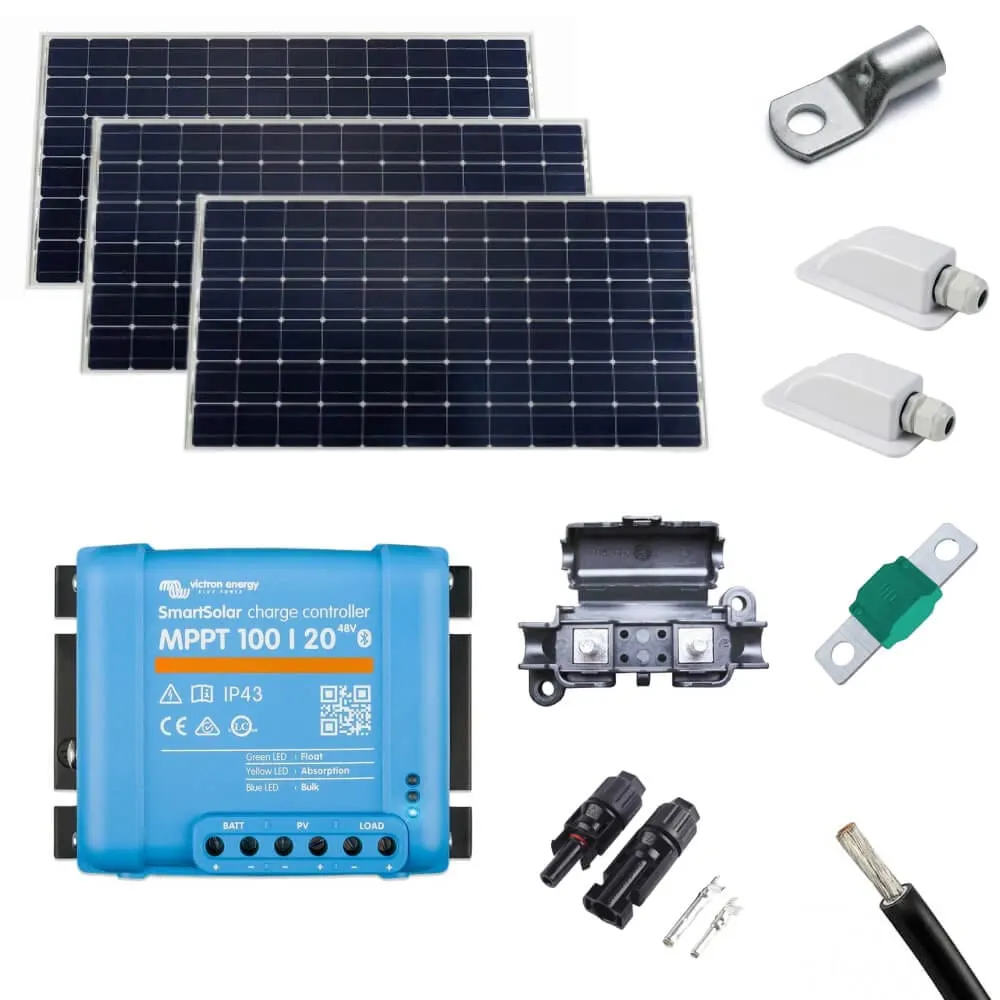
A campervan solar panel kit is a complete package of components designed to convert sunlight into electricity for your van. It typically includes solar panels, a charge controller, cables, and mounting hardware.
It's important to note that some solar kits include batteries while others don't. If you need a solar panel kit with a battery, make sure you choose a kit that comes with one.
The kit works together to capture solar energy, store it in batteries, and power your devices, allowing you to stay off-grid and enjoy your travels without relying on external power sources. Understanding each part of the kit helps you choose the proper setup for your energy needs.
Campervan Solar Panel Types
Types: Monocrystalline or Polycrystalline
Impact on energy: Campervan solar panels are the heart of your system, converting sunlight into electricity. The type of panel you choose affects efficiency, durability, and space requirements.
What to consider: Balance your budget, available roof space, and how much power you need. If you plan to stay off-grid for extended periods, prioritise the efficiency of monocrystalline panels.
- Monocrystalline: These panels are the most efficient, converting more sunlight into electricity per square inch. They're great if you have limited roof space. However, they're usually pricier.
- Polycrystalline: These are less efficient but more affordable. Polycrystalline panels require more space for the same power output as monocrystalline panels. If you're on a budget and have enough roof space, these might be your go-to solar panel.
Solar Panel Structure
Monocrystalline and polycrystalline solar panels come in two structural variations:
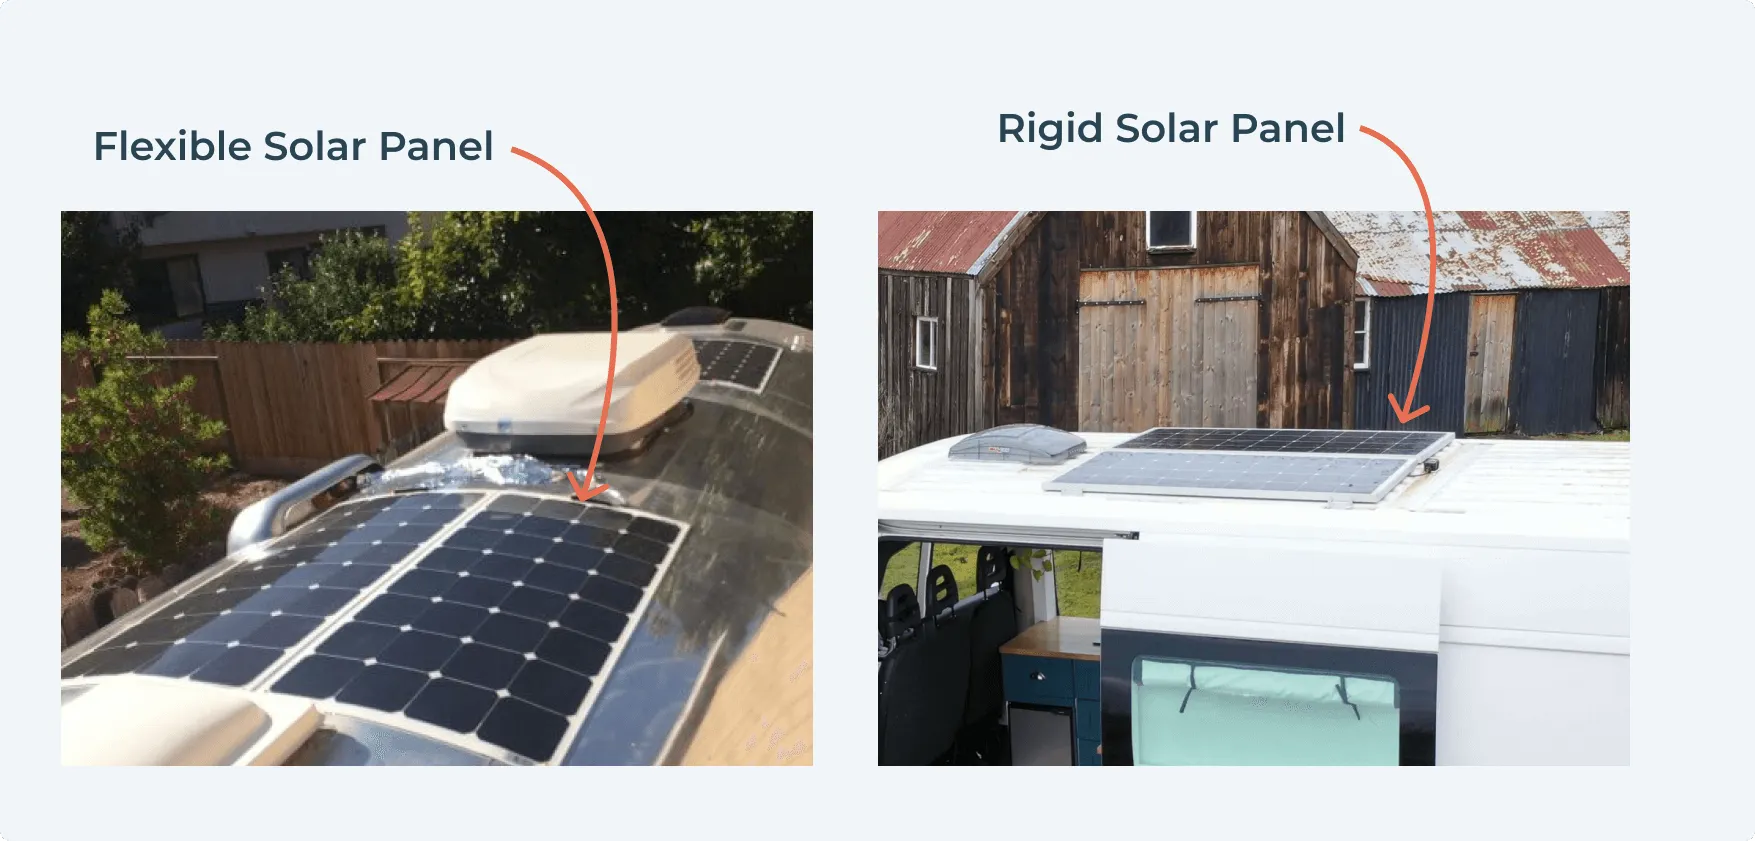
- Rigid solar panels: Durable and efficient, rigid panels are the go-to choice for most campervans with flat roofs. They're encased in a protective frame, making them long-lasting and cost-effective. However, they require flat surfaces and proper mounts, which can limit placement options on non-standard roofs.
- Flexible solar panels: Lightweight and adaptable, flexible panels can contour to curved surfaces, making them ideal for unique or space-limited van builds. They're easier to install but generally less efficient and more expensive per watt. They also lack a protective frame, which can lead to quicker wear and tear.
Campervan Charge Controller
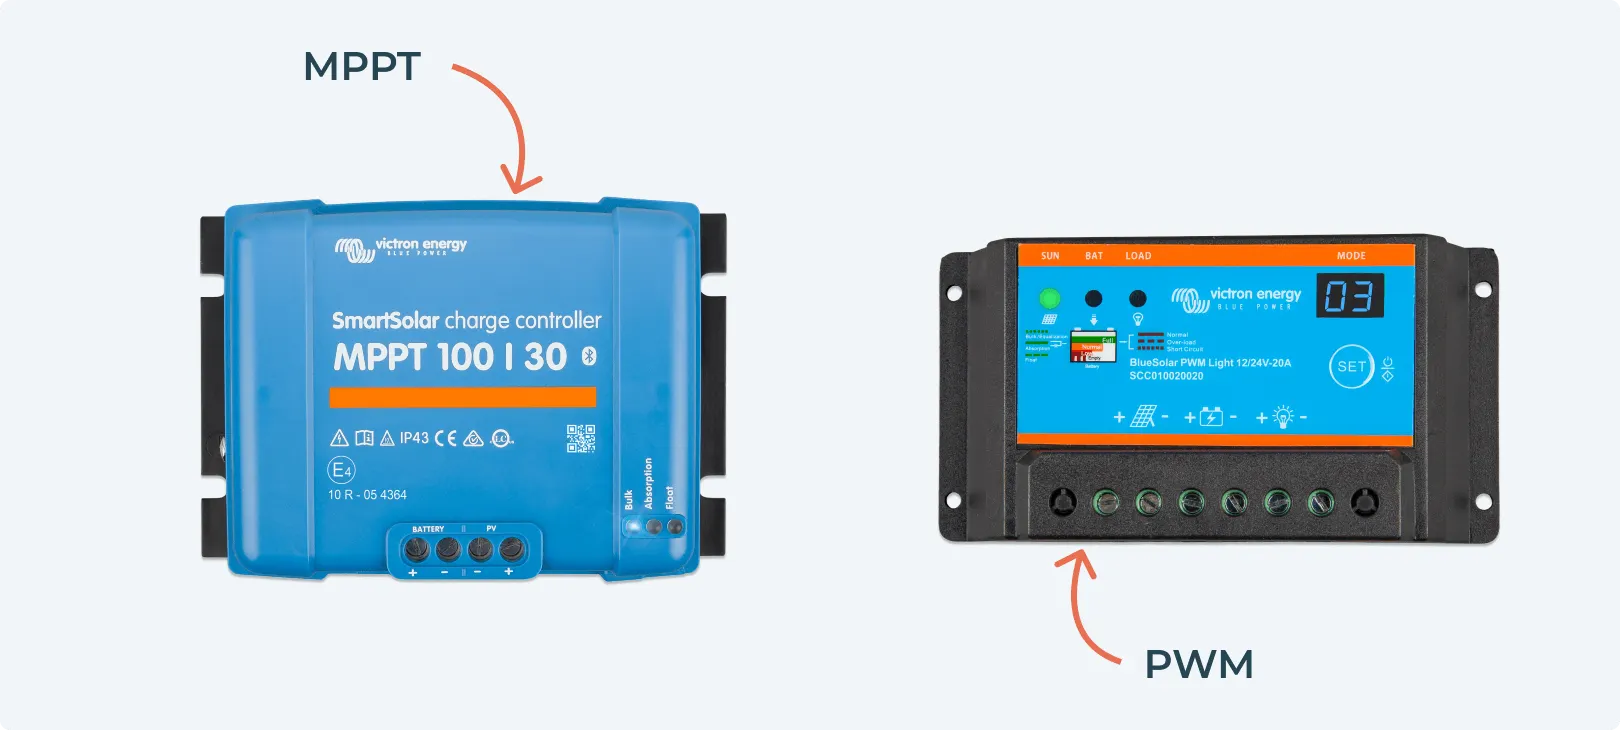
Types: PWM vs. MPPT
Impact on energy: The charge controller regulates the voltage and current from the solar panels to the battery, ensuring safe charging and preventing overcharging.
What to consider: If you're serious about maximising your solar system's efficiency, go with an MPPT controller. It's more expensive but worth the investment for the extra energy it delivers, especially with limited roof space.
- PWM (Pulse Width Modulation): A basic, budget-friendly option. It reduces the power from the panels as the battery nears full charge. While reliable, it's less efficient, potentially wasting some of your panels' energy.
- MPPT (Maximum Power Point Tracking): More advanced and efficient, MPPT controllers adjust the input from the panels to match what the battery can handle best. This charge controller maximises the power you get from your panels, making it the preferred choice for most vanlifers.
Campervan Inverter (optional—only required for 230V appliances)
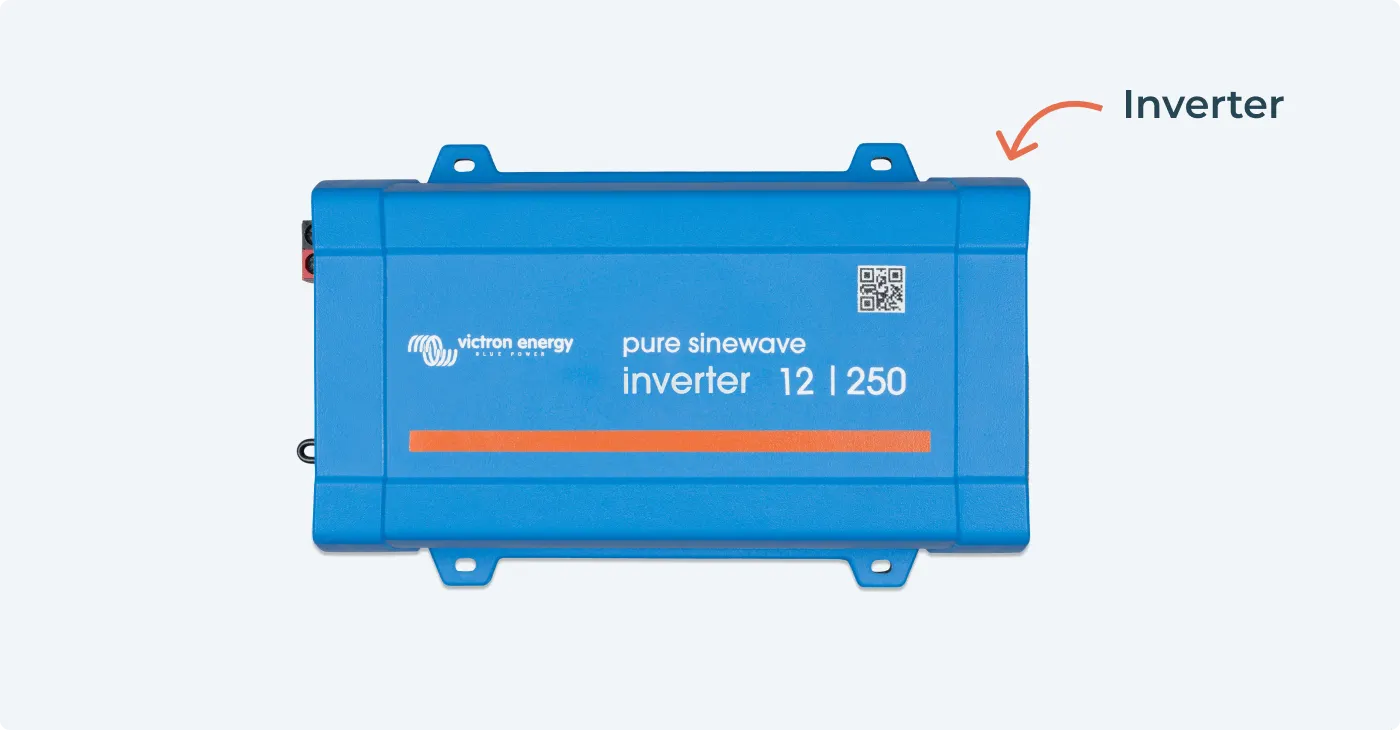
Note: If you are only powering 12V appliances, you do not need an inverter. You will only need an inverter if you want to run 230V appliances.
Importance: Converting DC (Direct Current) from your panels and batteries into AC (Alternating Current) is necessary for running most campervan appliances, including laptops, fridges, and other devices with a standard plug.
What to consider: Choose a pure sine wave inverter if you use sensitive or high-end electronics. For basic power needs, a modified sine wave inverter might suffice. Match the inverter size (in watts) to your expected power use.
- Pure sine wave inverter: Provides clean, smooth power identical to what you'd get from a home outlet. It's essential if you plan to run sensitive electronics like laptops or medical equipment.
- Modified sine wave inverter: A cheaper option for charging small devices like phones or basic appliances (LED light or a small fan). However, these inverters can cause problems with more sensitive electronics, leading to shorter lifespans or malfunctioning.
Campervan Battery
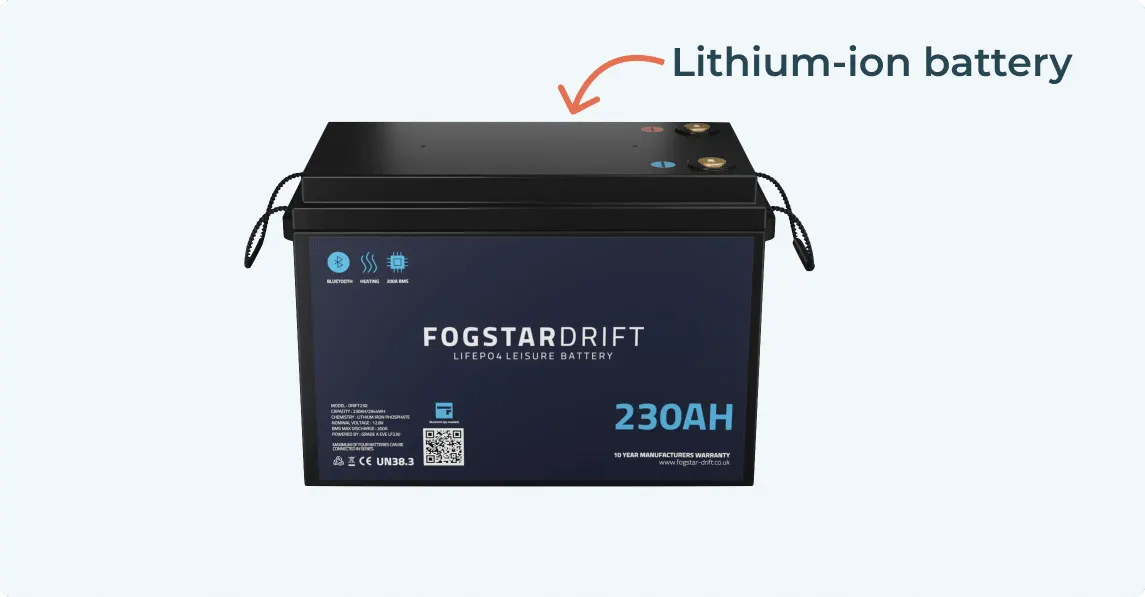
Types: Lead-acid, Lithium-ion, AGM (Absorbent Glass Mat)
Impact on energy: The battery stores power generated by your solar panels, allowing you to use it when the sun isn't shining. The type of battery you choose affects how much energy you can store, how long it lasts, and how heavy your setup is.
What to consider: AGM will be your best option if you're on a tight budget and only occasionally go off-grid. Despite the higher cost, lithium-ion is the preferred choice for long-term reliability and weight savings.
- Lead-acid: The most affordable option, but they're heavy, have a shorter lifespan, and require regular maintenance. Due to these downsides, most campervan solar panel kits don't include lead-acid batteries but are suitable for budget setups or infrequent use.
- Lithium-ion: These are more expensive upfront but lighter, longer-lasting, and maintenance-free. Lithium-ion can be discharged more deeply without damaging the battery, which is ideal for full-time vanlifers or those needing a reliable energy source. One downside is that they won’t perform below 0 degrees Celsius without active heating.
- AGM: A type of lead-acid battery that's sealed and maintenance-free. AGMs are more durable, and you can mount the battery in any orientation. It's a good middle-ground option if you want something better than a basic lead acid battery but can't afford lithium-ion.
Cables, Mounting Hardware, and Fuses
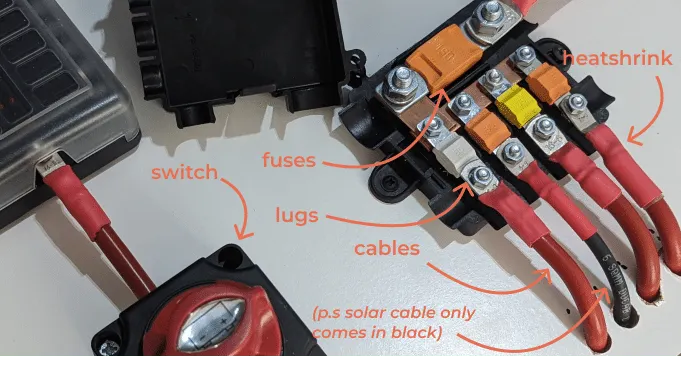
Overview: These components are often overlooked but are essential for a functional and safe setup.
What to consider: Ensure you have cables of the right length and gauge for your setup to prevent power loss. Choose mounting hardware that suits your panel type and roof surface. Rigid panels usually require more secure mounts, while flexible panels can often be glued down.
- Cables: These connect your solar panels, charge controller, inverter, and battery. They must be the correct gauge (thickness) to handle the current safely without causing voltage drops or overheating.
- Mounting hardware: This includes brackets, screws, and adhesive mounts that secure your panels to the roof. The type you choose depends on whether you use rigid or flexible panels and are willing to drill into your roof.
- Fuses: Fuses protect your electrical system from overloading and short circuits. Your fuse is there to protect your cables. It should always be rated lower than the max rating of your cable, so if there's a current spike, the fuse will blow before the wire overheats.
Understanding these components and how they work together is key to building a reliable solar panel kit for your campervan. Make informed choices based on your energy needs, travel style, and budget, and you'll be well on your way to enjoying the freedom of off-grid vanlife.
How to Choose the Right Campervan Solar Panel Kit
Choosing a suitable solar panel kit for your campervan starts with understanding your energy needs and matching them to the right equipment. Here's a step-by-step guide to help you pick the best setup for your travel lifestyle.
How to Size Your Solar Panel Kit
Sizing your solar panel kit starts with understanding how much energy you need. We've created a free online builder tool to calculate the electrical system required to meet your energy requirements.
Here's a simple way to calculate it:
- List your appliances: List everything you plan to power with your solar setup. Common items include lights, a fridge, a fan, and charging devices like phones or laptops. Each appliance has a power rating, usually in watts.
- Calculate daily usage: Estimate how many hours per day you'll use each appliance. Multiply the power rating (watts) by the hours of use to get the total watt-hours per day. For example, if your fridge uses 60 watts and runs for 24 hours, that's 1,440 watts daily.
- Add it all up: Add the watt-hours for all your appliances to get your total daily energy consumption. This total gives you a baseline for how much solar power your solar panels must generate daily.
- Factor in sunlight: Consider where you'll be travelling. If you're in a sunny climate, you can expect more energy from your panels. If you're often in cloudy or shaded areas, you might need more panels to meet your energy needs.
Example: How to calculate the size of a solar panel for a camper van
If your total daily energy use is 1,600 watt-hours and you get five peak sunlight hours daily, you'll need a kit that generates at least 320 watts (1,600 ÷ 5 = 320). You might opt for a 350W or 400W kit to give yourself a buffer.
What to Consider When Buying a Campervan Solar Panel Kit
Once you know your energy requirements, consider the following before making a buying decision:
- Budget: Solar kits range from budget-friendly to high-end. A basic kit might cost less upfront, but it may not meet all your needs if you use many devices. Investing in a more comprehensive kit could save you money in the long run by avoiding the need for upgrades.
- Space: Campervans have limited roof space. Measure your roof area and match it with the dimensions of the panels included in the kit.
- Installation ease: Some kits are easier to install than others. If you're handy with tools, you might be comfortable with a more complex setup. If not, look for a kit with straightforward instructions and fewer components. Alternatively, consider hiring an auto electrician to install your solar panel kit.
- Long-term goals: Think about how you'll use your campervan now and in the future. If you're planning longer trips or full-time van life, invest in a more robust kit that can grow with your needs. A smaller, simpler kit might be enough if you only go out on weekends.
If you're on a tight budget and only need to charge small devices, a 200W kit will likely do the job. But if you plan to live off-grid for weeks, investing in a 400W+ kit with more efficient panels and a larger battery is essential.
Cost of Solar Panel Kits for Campervans
Campervan solar panel kits vary widely in price, depending on the size and features. Here's a breakdown of what you can expect to spend, plus a look at additional costs you'll need to consider.
Price Ranges for Solar Panel Kits
Basic Kits (Around £300 - £350):

- Example: 140W Victron Solar Panel System.
- What You Get: These kits typically include a single solar panel, a SmartSolar MPPT charge controller, cables, and connectors. Ideal for small vans or basic setups, they provide enough power for lights, phone chargers, and small devices.
- Who it's for: Weekend travellers or those with minimal power needs.
Mid-Range Kits (Around £450 - £600):
- Example: 215W or 280W Victron Solar Panel Systems.
- What you get: These kits offer more power with multiple panels and a higher-capacity charge controller. They can handle larger appliances like fridges and fans, making them suitable for extended trips.
- Who it's for: Vanlifers who spend more time off-grid and need reliable power for multiple devices.
High-End Kits (Above £600):
- Example: 360W or 420W Victron Solar Panel Systems.
- What you get: These comprehensive kits include several high-efficiency panels, a robust MPPT charge controller, and all necessary installation components. They provide ample power for full-time van life, supporting everything from kitchen appliances to entertainment systems.
- Who it's for: Full-time vanlifers or those with significant power needs.
Additional Costs to Consider
While these kits cover the essentials, they don't include everything you'll need for a complete solar setup. Here's what else to budget for:
- Batteries: Your kit collects solar energy, but you'll need batteries to store it. Options like lead-acid, AGM, or lithium-ion batteries vary in price. Lithium-ion batteries are more expensive but offer better performance and longer life.
- Inverters: If you plan to run standard AC appliances (like a microwave or TV), you'll need an inverter to convert DC power from your battery to AC. Prices vary based on the inverter's capacity.
- Installation: If you're not comfortable installing the kit yourself, factor in the cost of professional installation. Depending on the complexity of your setup, a professional installation can range from a few hundred pounds to several thousand pounds.
- Mounting hardware: Some kits come with basic brackets, but you may need additional or specialised mounting hardware, especially for non-standard roof shapes.
- Monitoring systems: While the MPPT controllers include basic monitoring, you might want an advanced system for tracking your energy usage and battery health.
Best Campervan Solar Panel Kit
Below are our top recommendations, tailored for different use cases and requirements.
Best Solar Panel Kit for Small Vans and Weekend Trips
140W Victron Solar Panel System
- What it powers: Perfect for small vans or those who only need to power essential devices like lights, phone chargers, and a small fridge.
- Why it's ideal: This 140W system offers solid efficiency without taking up much space. The compact size makes it easy to install on smaller roofs. The Victron SmartSolar MPPT controller ensures you get the most out of every ray of sunlight.
- Budget: £319.99 – Great for those looking for a reliable, entry-level kit that covers the basics.
Best Solar Panel Kit for Medium Vans and Moderate Power Needs
175W Victron Solar Panel System
- What it powers: Ideal for medium-sized vans or those needing more power for devices like a laptop, fan, and lighting.
- Why it's ideal: With 175W of power, this kit balances size and output. It's suitable for longer trips where you need more energy without a massive roof footprint.
- Budget: £339.99 – A bit more investment for increased power, making it a versatile option.
Best Solar Panel for Full-Time Vanlifers (Small vans & moderate use)
215W Victron Solar Panel System
- What it powers: Designed for those living in their van full-time or running multiple devices, including a fridge, fan, and laptop.
- Why it's ideal: The 215W system provides a significant boost in power, paired with a higher-capacity Victron MPPT controller. It's perfect for those who need a reliable and consistent power source daily.
- Budget: £459.99 – A robust investment for full-time off-grid living.
Best Solar Panel Kit for Larger Vans or Heavy Power Users
305W Victron Solar Panel System
- What it covers: Suited for larger vans or heavy power users who need to run multiple high-demand devices like a fridge, TV, and more.
- Why it's Ideal: The 305W panel offers plenty of power, and the larger Victron MPPT controller ensures you maximise energy generation. This system supports an active lifestyle with all the comforts of home.
- Budget: £599.99 – A premium option for those who require high energy output.
Best Solar Panel Kit for Maximum Power and Flexibility
420W Victron Solar Panel System
- What it covers: Ideal for large vans with high power demands, including extensive electrical setups for full-time living.
- Why it's ideal: With three 140W panels, this kit provides ample power while offering flexibility in placement. It is perfect for those who want to stay off-grid for extended periods without compromising on comfort.
- Budget: £669.99 – The top choice for serious vanlifers who need maximum power and flexibility.
Regional Considerations for Campervan Solar Panel Kits
Different regions have different needs and popular kits. Let's explore the best options for various countries and how climate affects your setup.
Popular Solar Panel Kits in the UK & Ireland
- Popular kits: Compact and efficient kits like the 140W Victron Solar Panel System are popular in the UK and Ireland. These regions often experience overcast skies, so having a high-efficiency panel that performs well in low-light conditions is crucial.
- Why it works: Victron monocrystalline panels excel in these environments. They capture more energy from less sunlight, making them ideal for the UK and Ireland's cloudy weather.
Best Solar Panel Kits for the United States

- Popular kits: In the US, larger setups like the 360W Victron Solar Panel System are popular in sun-rich states like California and Arizona. These kits are perfect for full-time vanlifers needing to power multiple appliances.
- Why it works: The abundant sunshine in many parts of the US allows larger setups to maximise solar energy. These kits are perfect for extended off-grid living.
Recommended Solar Panel Kits in Europe

- Popular kits: In mainland Europe, where you might encounter a mix of climates, the 280W Victron Solar Panel System offers a balanced solution. It's powerful enough for long trips but compact for the smaller campervans common across Europe.
- Why it works: Europe's varying climates require a versatile kit. The 280W system provides enough power for most conditions without taking up too much roof space.
Considerations for Different Climates
Sunny Climates (e.g., Southern Europe, Southern US):
- Key considerations: In regions with abundant sunshine, you can maximise your power output with larger kits. Monocrystalline panels are a great choice because they perform well in strong sunlight.
- Recommended kits: Larger setups like the 420W Victron Solar Panel System are ideal. They harness the sun's full potential, ensuring you have more than enough energy for all your devices.
Cloudy or Rainy Climates (e.g., UK, Ireland, Northern Europe):
- Key considerations: In areas with frequent overcast skies, focus on kits that offer high efficiency in low light. Compact and efficient kits are your best bet.
- Recommended kits: The 140W Victron Solar Panel System is a solid choice. Its high-efficiency monocrystalline panels ensure you get the most power possible, even on cloudy days.
Cold Climates (e.g., Scandinavia, Northern US):
- Key considerations: Cold weather can affect battery performance, so pairing your solar kit with batteries that handle low temperatures well is essential. Also, consider panels that are durable and resistant to snow and ice buildup.
- Recommended kits: The 215W Victron Solar Panel System is a good match. Its robust construction and high-efficiency panels make it reliable in colder conditions.
Hot Climates (e.g., Southern US, Mediterranean):
- Key considerations: In hot climates, solar panels can overheat, reducing efficiency. Ensure your panels have good ventilation.
- Recommended kits: The 360W Victron Solar Panel System is suitable for hot climates, with proper installation to ensure airflow and avoid overheating.
How to Install a Campervan Solar Panel Kit
Installing a solar panel kit on your campervan might seem challenging, but with the proper steps, it can be straightforward. Here's how you can do it:
DIY vs. Professional Installation
Firstly, consider DIY vs. professional installation for your campervan solar panel kit.
DIY Installation:
- Pros: Saves money, offers complete control over the process, and can be a rewarding project.
- Cons: Risk of mistakes, potential safety hazards, and the need for specialised tools like wire crimpers and strippers.
Professional Installation:
- Pros: Ensures safety, comes with a warranty, and can be quicker if you lack experience.
- Cons: More expensive, less hands-on control, and scheduling with professionals might be tricky.
Tips for Ensuring a Successful Campervan Solar Installation
- Plan your layout: Before drilling or attaching anything, plan where each component will go. Consider both functionality and aesthetics.
- Double-check connections: Incorrect wiring can lead to inefficiency or even damage. Double-check all connections, especially polarity.
- Seal all openings: Thoroughly seal any holes drilled in the roof for wiring to prevent leaks. Water damage can be costly.
- Monitor Your System: After installation, monitor your system. If your controller supports it, use a monitoring app to ensure smooth operation.
Campervan Solar Panel Kit Installation Guide
The following steps will guide you through installing a campervan solar panel kit. For complete DIY instructions, check out our detailed installation guide, including wiring diagrams.
- Mount the Solar Panels:
- Rigid Panels: Use Z-brackets or adhesive mounts to secure the panels to your van's roof. Ensure the surface is clean, and if using brackets, drill carefully to avoid leaks.
- Flexible Panels: These are glued directly onto the roof. Ensure the surface is smooth and clean. Leave small gaps in the adhesive to allow for air expansion.
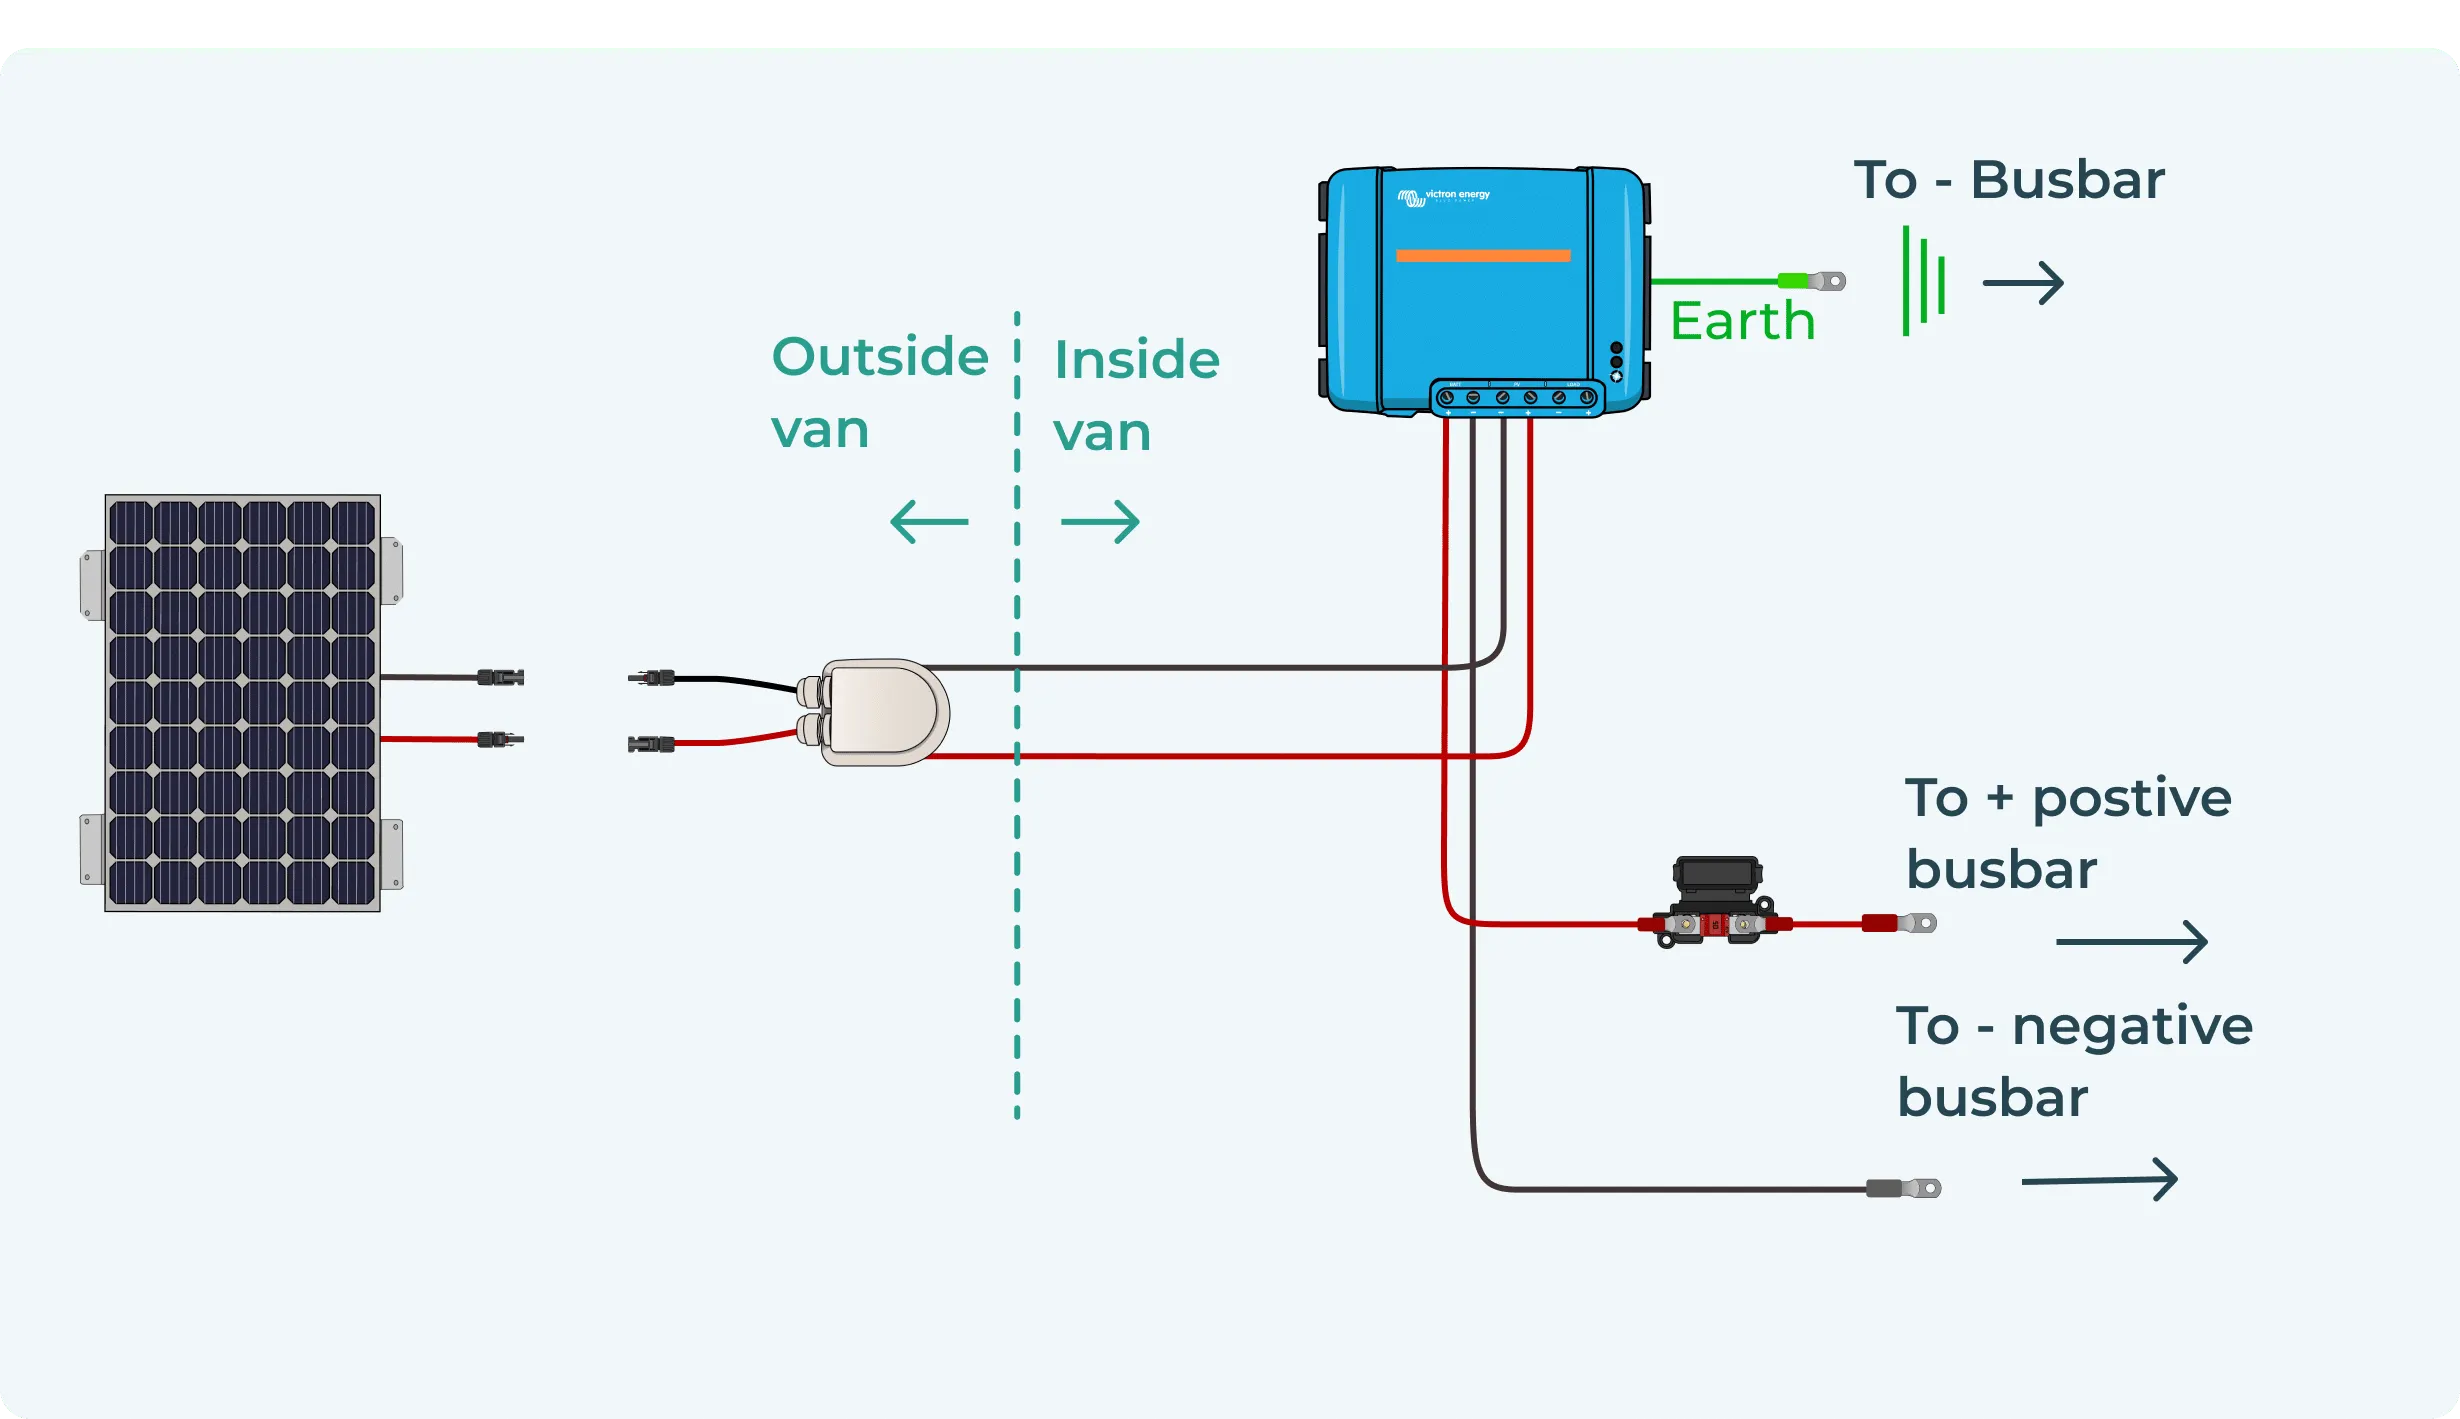
- Install the Solar Entry Gland:
- Drill a small hole through your van's roof to pass the cables inside. Use rubber grommets to protect the wires and seal everything with a waterproof sealant to prevent leaks.
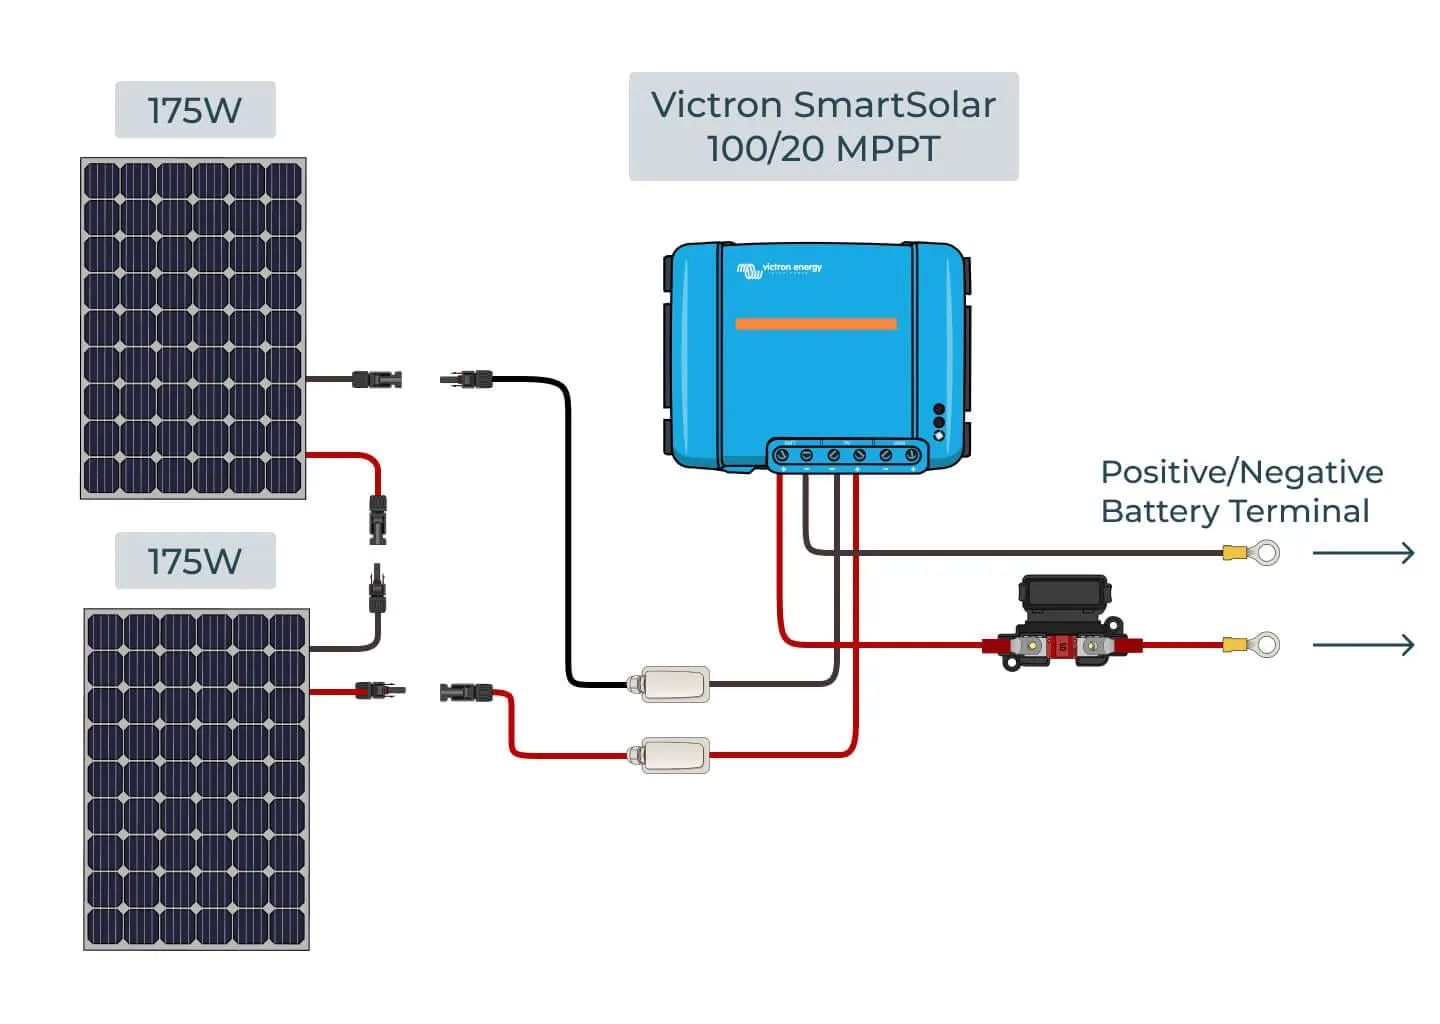
- Connect the Solar Panels to the Charge Controller:
- Attach MC4 connectors to the wires coming from the solar panels. Then, connect these wires to the charge controller. Ensure the polarity is correct—positive to positive and negative to negative.
- Connect the Charge Controller to the Battery:
- Connect the wires from the charge controller to your battery to store the energy from the panels. Tighten and secure all connections.
- (Optional) Connect the wires from the charge controller to the solar isolator to switch it on or off. BS7671 regulations state that all solar panels should contain a solar isolator. These regulations include private and commercial property but may not be necessary for campervans with smaller solar arrays.
- Ground Your System:
- Grounding is essential for safety. Connect the charge controller and battery to a common negative busbar and ground it to the vehicle chassis.
- Test the System:
- Once everything is connected, test your system by checking the charge controller's readings. Ensure the panels are generating power and the battery is charging.
Maintenance and Troubleshooting
Taking care of your campervan solar panel kit ensures it delivers power when needed. Here's how to maintain your system, tackle common issues, and upgrade as your needs grow.
Maintaining Your Campervan Solar Panel Kit
- Regular checks: Inspect your solar panels and wiring regularly. Look for any signs of wear, loose connections, or damage. Catching issues early prevents bigger problems down the road.
- Cleaning: Dust, dirt, and bird droppings can reduce your panels' efficiency. Wipe them down with a soft cloth and mild, soapy water every few weeks. Check them often when travelling on dusty roads or in rough weather.
- Part Replacements: Over time, some components might need replacing. Keep an eye on connectors and cables for signs of corrosion or wear. Replace them promptly to keep your system running smoothly. Batteries also have a limited lifespan, especially if they're lead-acid or AGM. Monitor battery health and replace when necessary.
Campervan Solar Panel Kits Common Issues and Solutions
- Reduced Power Output:
- Cause: Dirty panels, shading, or poor connections.
- Solution: Clean the panels, remove obstructions, and check all connections. If the issue persists, test the voltage output from the panels to ensure they're working correctly.
- Battery Not Charging:
- Cause: Faulty charge controller, poor wiring, or a dead battery.
- Solution: Check the charge controller's settings and wiring connections with a voltmeter. If everything looks good, test the battery. If it's not holding a charge, it might be time for a replacement.
- Inverter Problems:
- Cause: Incorrect wiring or a malfunctioning inverter.
- Solution: Double-check the wiring connections with a voltmeter, ensuring the inverter is connected correctly. If the problem persists, consult the inverter's manual for troubleshooting steps or consider replacing it.
- Overheating Panels:
- Cause: High temperatures or poor ventilation.
- Solution: Ensure adequate airflow around your panels. Elevate them slightly to allow better air circulation, especially in hot climates.
Upgrading Your Solar Panel Kit Over Time
Note: When adding new solar panels, they need to be the same size as your existing ones. If you connect panels of different sizes, the system will default to the output of the lowest-rated panel. For example, if you connect a 115W panel to a 360W panel, you get 230W (115 x2), not the expected 475W (115 + 360).
- Adding more panels: If your energy needs increase, add more solar panels, but ensure your charge controller can handle the extra input. If not, you might need to upgrade to a higher-capacity controller too.
- Upgrading your battery: As your power needs grow, consider upgrading to a larger or more efficient battery, like lithium-ion. This premium battery provides more storage capacity and better performance over time.
- Installing a better inverter: If you start using more AC-powered appliances, upgrading to a higher-wattage inverter can provide the necessary power. Ensure the new inverter matches your overall system capacity.
- Enhancing monitoring capabilities: Consider adding an advanced monitoring system to track your energy use and system performance more precisely. Some MPPT controllers offer Bluetooth connectivity for real-time monitoring via your smartphone.
Maintaining your solar panel kit and knowing how to troubleshoot common issues keeps your campervan powered and ready for adventure. And as your needs evolve, upgrading your system ensures you stay equipped for longer trips or additional devices.
FAQs
Can a 100W solar panel kit power a campervan?
A 100W solar panel kit can handle basic needs like charging phones and running LED lights. However, it's not enough to power larger appliances like a fridge or fan. You'll need a larger setup for anything beyond minimal use, especially if you plan to stay off-grid for extended periods.
How much power do I need for my campervan?
The power you need depends on the devices you plan to use. List your appliances and their wattage, then calculate your daily energy consumption. For most campervans, a setup between 200W and 400W is sufficient, covering essentials like lights, a fridge, and device charging. Consider a larger system if you have higher power demands or plan to live in your van full-time.
Are Solar Panel Kits Worth It?
Yes, solar panel kits are worth it if you spend time off-grid. They provide a reliable, renewable energy source, reducing your need for campsite hookups. Over time, they can save money by reducing fuel and generator use. Plus, they offer the freedom to camp in remote locations without sacrificing comfort.
Where to Buy Campervan Solar Panel Kits?
You can buy campervan solar panel kits from specialised retailers online, such as those focused on van conversions and off-grid living. Popular options include brands like Victron, available through online stores or local dealers, catering to campervan enthusiasts. Always ensure you buy from a reputable source with good reviews and support.