Keeping your campervan’s leisure batteries charged is essential if you want reliable power off-grid, and charging from a mains hook-up is one of the easiest and most dependable ways to do it. To charge a leisure battery from mains hook-up, you need a shore power inlet on the van, a 16A hook-up cable, a consumer unit with RCD and MCB protection, and a dedicated battery charger to safely convert 230V mains into the 12V charging your leisure battery needs, with the right cabling, fusing, and earth connection.
If you’re a DIY campervan builder in the UK or EU—especially a first-time or intermediate converter putting together a safe, dependable electrical system—this is the setup that keeps your battery topped up without relying on sun or driving, helps protect battery life, and leaves the van ready for the next trip.
But what do you actually need to charge through shore power? And how do you do it? In this guide to how to charge a leisure battery from mains hook-up, we’ll cover the core equipment, installation steps, charger types, charging times, why multi-stage charging matters, how shore power works alongside solar, common problems, and the key safety points to get right.
What you need to charge from mains hook-up: Here is your quick answer
- A shore power inlet (fitted to the outside of the van)
- A hook-up cable (16A rated is standard for UK campers)
- A consumer unit with RCD and MCB protection
- A battery charger — basic, smart, or an inverter/charger combo
- Correct cabling, fusing, and an earth connection for safety
We’ll cover the equipment you need, how it works, how to install it, and what to look out for to keep your system safe and efficient. We’ll also look at charging times and the easiest way to put together a shore power charging system yourself.
What you need to know about shore power & leisure batteries
Mains hook-up is the colloquial term for shore power charging, which involves connecting your campervan to an external power source. It is one of several leisure battery charging methods, used to charge the leisure batteries that run your regular 12V or 230V electrics or to power 230V household-style appliances directly while plugged in.
Shore power is one of the most reliable and convenient ways of charging, helping to avoid discharging/draining your batteries too much and keeping them topped up before off-grid use.
The power source you connect to will be 230V AC for the UK (110V in the US). This is the same power you'll find in your house and needs converting to charge a 12V leisure battery.
This conversion works differently from a standard inverter which turns the 12V DC power from your battery to 230V AC for powering bigger appliances while off-grid.
That means you can charge a 12V battery with 230V power without needing a full 230V electrical system and regular inverter in your van.
If you want to power 230V appliances (Induction hob, kettle, microwave) but want to keep the cost of your electrics down, a popular compromise is using a hookup, where you can simultaneously charge your battery and run your 230V appliances.
This is done by connecting a 3-pin plug to your consumer unit. The consumer unit (which contains an RCD and a MCB) sits between the hook-up and the battery charger so it has 230V AC power.
That means you can run a 3-pin plug from it and use 230V appliances, but only when connected to an electrical hook-up point.
It's worth noting that if you've seen 220V or 240V instead of 230V anywhere, it's essentially the same thing. You can also check out our other article for more info if you're wondering “Do I need 230V power in my campervan?”
Common usage of mains hook-up
You'll find mains electrical hook-up points at both campsites and designated parking areas. You can also use the mains power in your house by running an extension lead with an adapter to your campervan. This is great as it provides a reliable way to keep your battery levels topped up before a big trip or when you're parking up for an extended period.
The role of a leisure battery in off-grid campervan setups
Leisure batteries are the 12V energy sources that store the 12V power your campervan uses for appliances like lighting when you're away from external power, and they sit at the heart of any campervan electrics system.
They're different from car batteries and the vehicle's starter battery: a leisure battery is built to deliver steady power over long periods, while a starter battery is designed for a short burst of current to crank the engine.
Modern leisure batteries come in two main varieties:
- AGM (Absorbent Glass Mat) batteries. These are one of the most common lead acid batteries used for leisure setups, and they are versatile, durable, and can be deeply cycled better than old-fashioned flooded batteries. However, it is important to avoid discharging them too often to keep them healthy.
- Lithium-Ion batteries. These are more expensive but offer much longer lifespans and quicker charging times. Lithium batteries (or LiFeP04) are also lighter, and their efficiency makes them excellent for frequent use.
There are also gel batteries available, however, these aren't ideal for use as leisure batteries since they don't handle the high discharge currents needed with an inverter well. They also take longer to charge in the final phase of charging (absorption)... but more on charging phases later.
In general, you'll want to go with lithium-Ion if your budget allows or low-weight is paramount, but AGM batteries are still a popular and solid choice.
Why charge a leisure battery with shore power?
As we've touched on, charging a leisure battery with shore power is one of the easiest and most reliable ways to keep your campervan fully powered.
This is especially true if you're regularly staying at places like campsites with readily available hook-up points, or tend to drive straight from home to an off-grid location for a while.
The benefits of shore power charging include:
- Convenience. Whenever you're at home or a campsite you'll have a steady supply of 230V electricity, eliminating any worries about low battery levels.
- Supplementing off-grid charging. Unlike solar or split charging, shore power doesn't rely on external factors like weather or miles-driven, so you can keep batteries charged in any conditions, and it's one of the most dependable charging methods for keeping them ready.
- Extending battery life. AGM batteries in particular can be damaged with frequent deep discharge cycles. Shore power keeps them topped up, helping protect the battery's lifespan and efficiency.
Equipment needed to charge from shore power
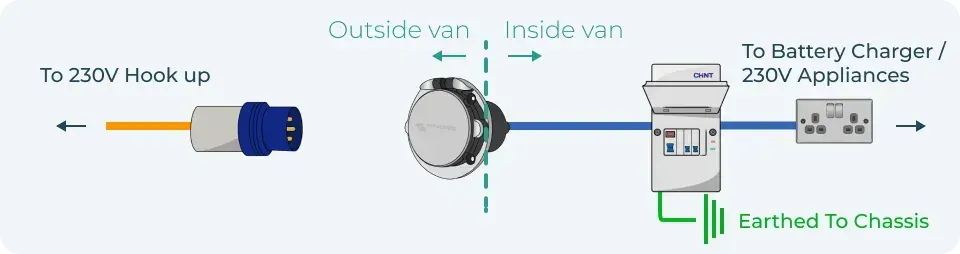
Charging a leisure battery from shore power requires a specific electrical system to work efficiently and safely, and aligns closely with the principles used in campervan 12V wiring diagrams. Check the image below to find out the parts you need.
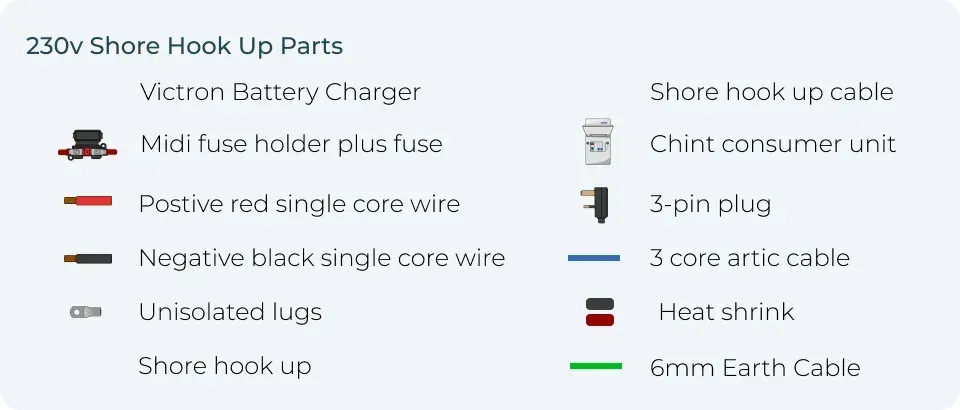
Here's what everything in this electric hook-up parts list does:
- Battery charger. A leisure battery charger converts the 230V mains to the right voltage for a 12V leisure battery, and better units are designed to charge leisure batteries safely from mains power. Some are smart chargers and you can also find inverter/charger hybrids.
- Shore hook-up. This is the physical point where your campervan is plugged into mains power. It's normally a 3-pin connector that connects to the power pedestal (charging point) at a campsite.
- Shore hook-up cable. This runs between the 3-pin connector and the rest of the charging system. A 16-A rated cable is the most common in UK campers.
- Consumer unit. Sometimes called RCDs (Residual Current Devices), these protect the system from electrical faults and help balance multiple circuits in your campervan. Note that you will want to make sure they contain both double-pole MCB and double-pole RCD. This ensures they are safe to use in Europe.
- Midi fuse holder and fuse. These provide overload protection between the leisure battery and charger, helping to avoid damage in the event of a short circuit.
- Positive red**& negative black single core wire.** These are the chunky wires that connect the charger to your leisure battery.
- 6mm earth cable. This safely grounds your electrical system to the chassis of the campervan.
- 3-Core arctic cable. This is used to wire the 230V connections in your van. It is thicker , sturdier and can handle cold temperatures compared to the cable found in a home.
- Unisolated lugs and heat shrink. This is used to terminate wires and provide insulation to connections. This prevents short circuits and stops moisture from corroding connections.
Vunked supplies complete plug-and-play battery charger systems and campsite hook up campervan electrical systems, allowing you to optimally charge your leisure battery while using 230V appliances whenever you have shore power.
If you're unsure about compatibility, battery specialists can help, and you can also book a free campervan electric consultation for tailored advice.
You can also source these components individually, but this often works out more expensive and you'll need to make sure that everything is compatible and you have every part needed for installation.
Additional considerations
Other factors to keep in mind when using a mains hook-up include:
- Shore power adapters. Different campsites or charging stations can use different plug standards, like 30A or 50A. It can be worth carrying an adapter to make sure you always have a compatible set-up depending on where you're travelling.
- Voltage Converters. If you're travelling internationally check the local standard voltage to see if you'll need a voltage converter too. For instance, 230V is used in the UK and across Europe, but the US uses 110V.
- Reverse polarity. Some campsites in Europe might have reversed polarity, which can be a safety risk. Ensure you have a double-pole RCD when travelling internationally as it will disconnect both live and neutral in case of a fault.
- Inlet location and weatherproofing. Be sure to install the inlet in a convenient location on the side of your van for charging. Around the rear is usually a safe bet. It's also important to use weatherproof covers to protect against rain and dirt, preventing leaks and keeping everything working well.
Types of battery chargers
Now you understand how the full system works, the next decision will be to choose what kind of battery charger to integrate into it. Battery chargers come in three main types which we explore here.
Basic battery chargers
These are basic units which convert mains electricity into the right voltage (12V) for charging your leisure battery. They're affordable but, unlike semi-automatic chargers or more advanced smart models, they tend to need more user oversight. It can also be more difficult to manage the different phases of charging and avoid overcharging, so they generally should not be left unattended like a fully automatic charger can.
Smart battery chargers
These are more advanced and can monitor the battery's condition in real-time to adjust the charging process dynamically, with smart chargers tracking battery voltage and battery condition as they charge. They normally use a multi-stage charging process (bulk/absorption/float stages) which we'll cover later, and some advanced models also use pulse charging to support battery health, but in basic terms, they prevent overcharging.
Some advanced smart battery chargers like those from Victron, with a Victron battery charger being a common example, also allow you to run 230V appliances from them while connected to shore power as they charge your battery (without needing a dedicated inverter for off-grid 230V).
Inverter/charger
These are combined units that work as both a battery charger and an inverter. That means you can charge your leisure battery while hooked up to shore power and then have 230V AC power in your camper at all times.
That means you can use normal household appliances in your campervan even when off-grid with the regular three-pin plugs found in your home.
This advanced functionality does come at a price, and inverter/charger hybrids are definitely more expensive than smart or basic chargers. If you intend to use solely 12V appliances like simple LED lighting and 12V air conditionerss when off-grid, then having an inverter/charger hybrid can be a needless expense.
However, if you might want to have off-grid 230V power in your van in your van down the line, it's probably worth investing in one from the get-go. This is because it's much simpler to install than wiring in a smart charger now and then setting up a separate off-grid 230V AC power system later using a standalone inverter. It will also also work out cheaper in the long run.
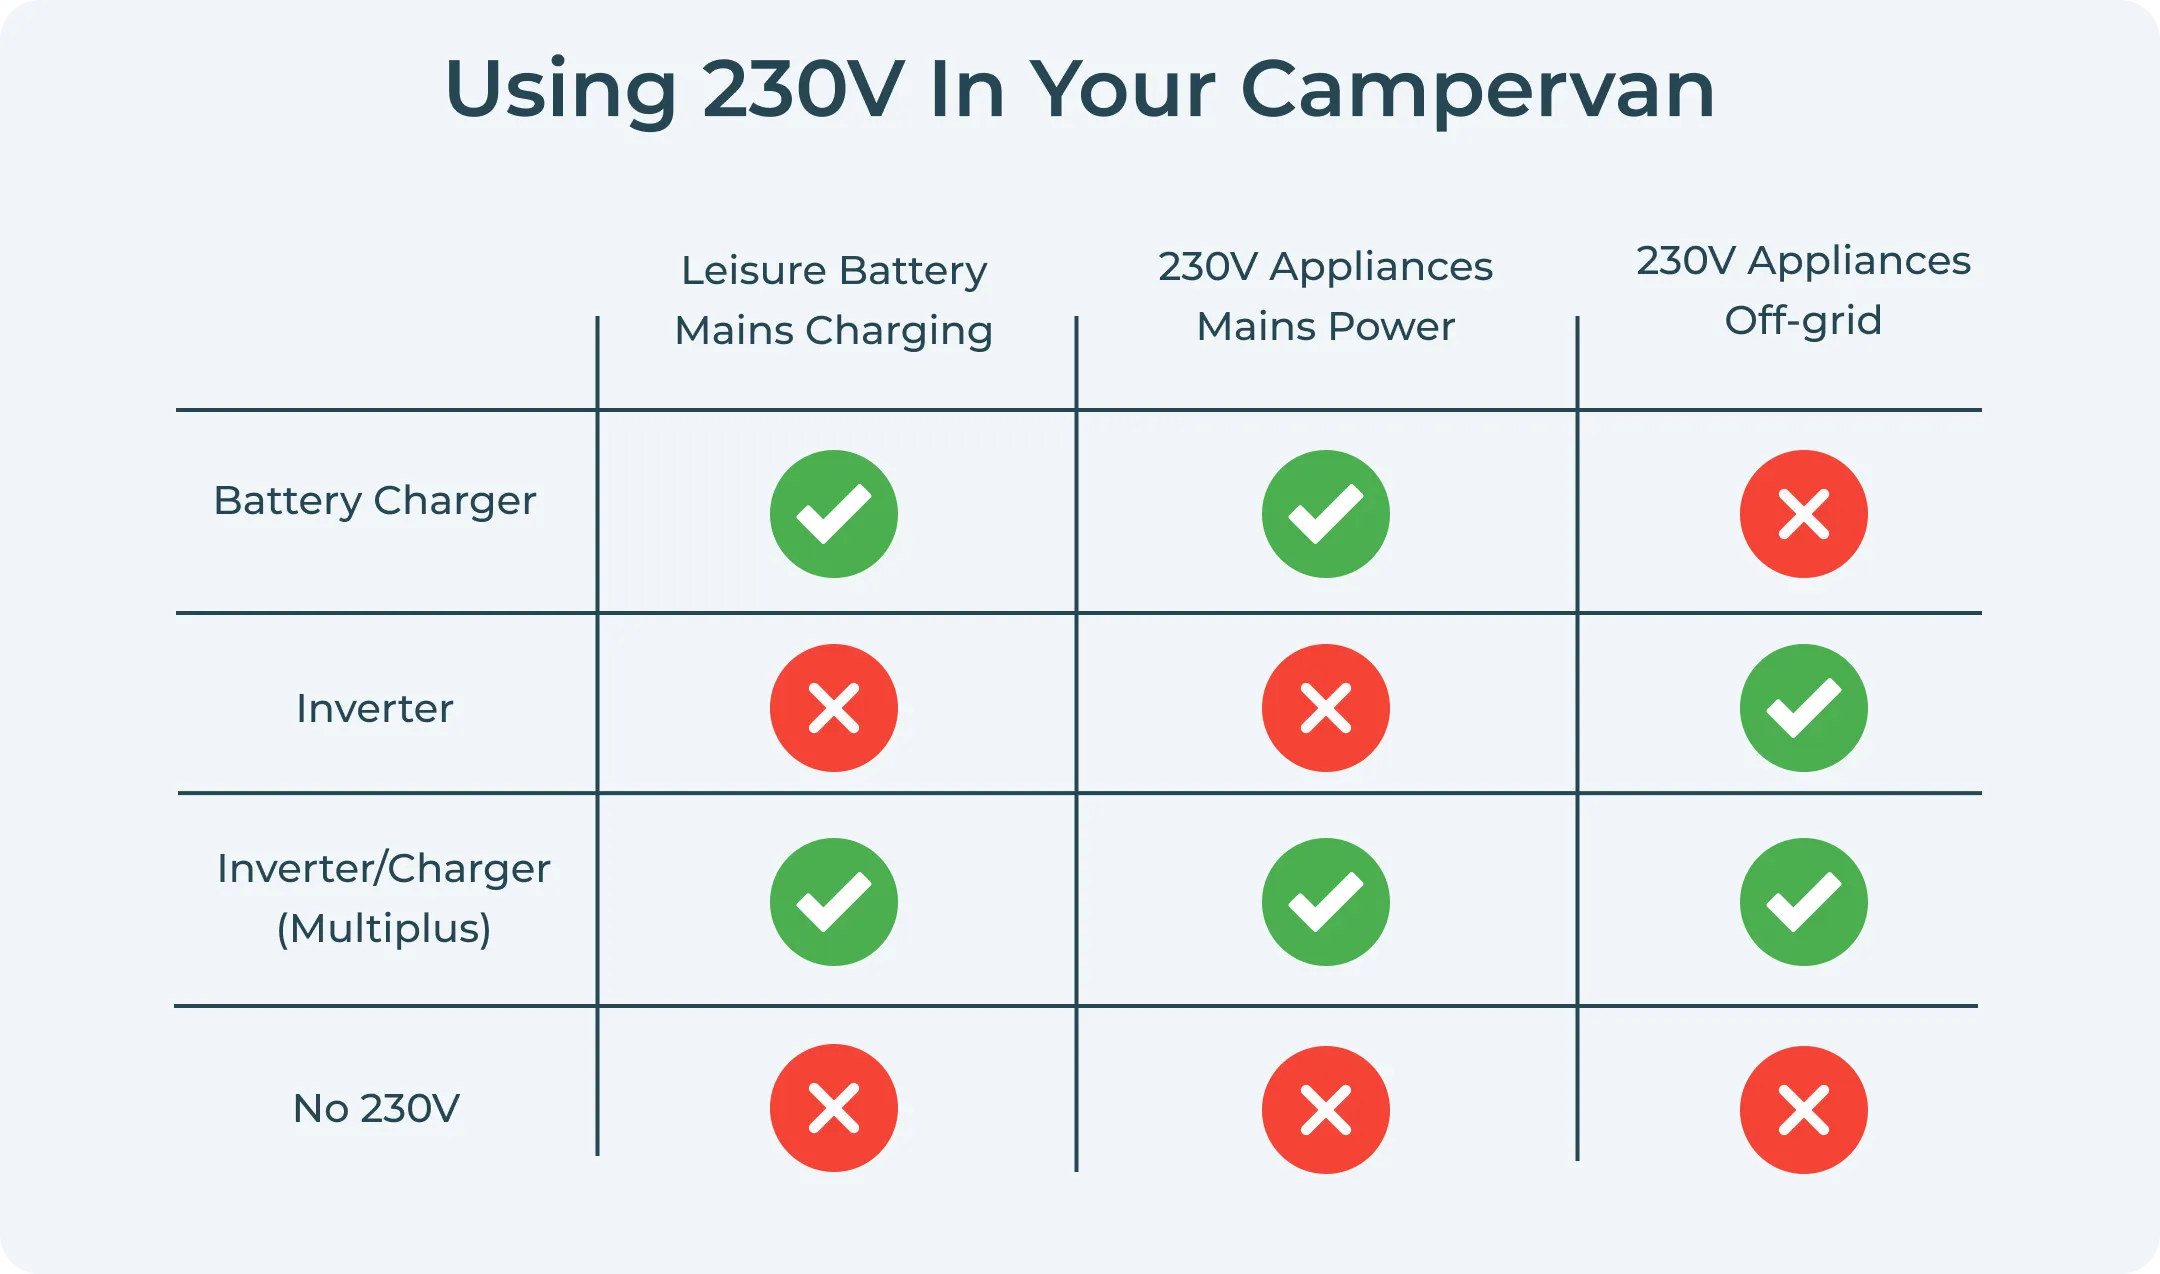
Smart battery chargers vs. inverters for charging
A key note to point out here is that a standard inverter (used to convert 12V to 230V) can't be used to charge a battery. This is because while they are designed to convert the voltage, they don't have functionality built-in for charging functions as well as inverting.
Again, if 230V power outlets inside the van are something you need, then investing in a multiplus inverter/charger set-up is your best bet. These will let you seamlessly switch between recharging your batteries through mains hook-up and powering regular household devices off-grid.
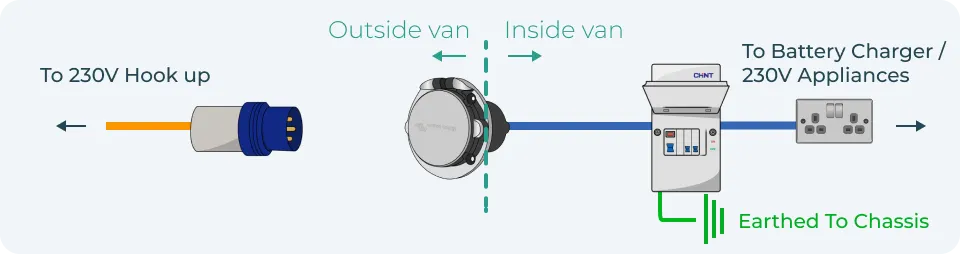
Typical shore power charging set-up
Now we've covered the separate components needed, let's look at a typical shore power charging setup.
It will require connecting the mains hook-up cable to a campsite power pedestal or home socket, with power flowing through the consumer unit.
RCDs will provide protection, and finally, the battery charger will convert the incoming AC voltage into DC to charge the leisure battery.
Here's how this looks in practice:
How to charge a leisure battery from mains hook-up: installation guide and use
Charging your leisure battery from mains hook-up needs the right set-up to ensure everything is properly connected. Here's a step-by-step guide on how to properly install and operate a mains hook-up.
1. Install the shore power inlet
Start with choosing a convenient location for the shore power inlet on the outside of your campervan. Make sure it's somewhere that's easily accessible but away from excessive water and dirt exposure.
Some people fit them around the rear tow bar since this can avoid having to cut into the side of a van, but higher up on the side around the same height as a fuel filler cap is much better from a maintenance and useability perspective.
Once you've marked a position out, cut a hole using a jigsaw or hole saw to the same dimensions as the inlay.
Attach the inlet with the mounting kit it comes with and seal around the edges with waterproof sealant (silicone is fine) to prevent water ingress.
2. Connect the shore power cable to the consumer unit
With your inlet fitted, ensure you have a consumer unit rated appropriately for your set-up. With a suitable consumer unit ready to fit, connect the inside of the inlet to a consumer unit using 3-core arctic cabling, as this feed can also supply internal plug sockets when you're on hook-up.
Use the appropriate lug when connecting the wires to the consumer unit terminals, and make sure all the connections are tight.
3. Connect the consumer unit to the 230V sockets
Measure the distance between your consumer unit and the location of your 230V socket and cut to length (remember, always leave a little bit of margin for error—nobody is perfect). Next, connect the consumer unit's output to your chosen 230V socket, taking care to ensure you match the Live, Neutral, and Earth cables to the correct terminals.
4. Grounding and earth connection
Connect the 6mm earth cable from the consumer unit to the chassis of your van. This ensures that there's a safe path to ground any electrical faults and prevents the risk of electric shock or component damage.
Use a dedicated grounding bolt, and make sure the patch you're bolting to is bare metal, free of all paint and rust.
5. Install the battery charger
Place your battery charger somewhere where it will have a decent amount of airflow to avoid overheating, especially when charging batteries for long periods.
Next, connect the positive red and negative black wires from the output terminals of the battery charger to the corresponding terminals on your leisure battery.
Check out our other article for a full rundown on how to install a leisure battery
Always double-check the polarity and ensure it's right before connecting the second wire, as getting this wrong can damage both the charger and wiring. The correct charger settings depend on your battery type, including sealed batteries.
Also, make sure the wires are an appropriate size for the amperage of the charger (16mm is a safe bet for most chargers) and run them through a midi fuse holder with a fuse rated below the rating of the cable.
6. Test the system
Once all of your connections are secure, plug in your shore power hook-up cable to a mains power source. You can run an extension lead from inside your house for this.
Turn on the consumer unit and make sure the RCD is functioning properly by hitting the built-in test button.
The battery charger should be turned on and you can check the charging indicators on the charger to see the status of the charging process. If you want extra confirmation, voltage readings can show the charger is working properly, especially with a discharged battery.
7. Monitor the charging process
Keep an eye on the charger to monitor the battery's state and make sure it's in the right charging mode if you're using a basic battery charger.
Smart charges will automatically do this for you, meaning you can go and make a tea at this stage. Well done — especially if your setup is based on an integrated weekender campervan electrical system.
Charging times
Charging times will vary based on the specific charger and battery combination of your build. Here's a guide:
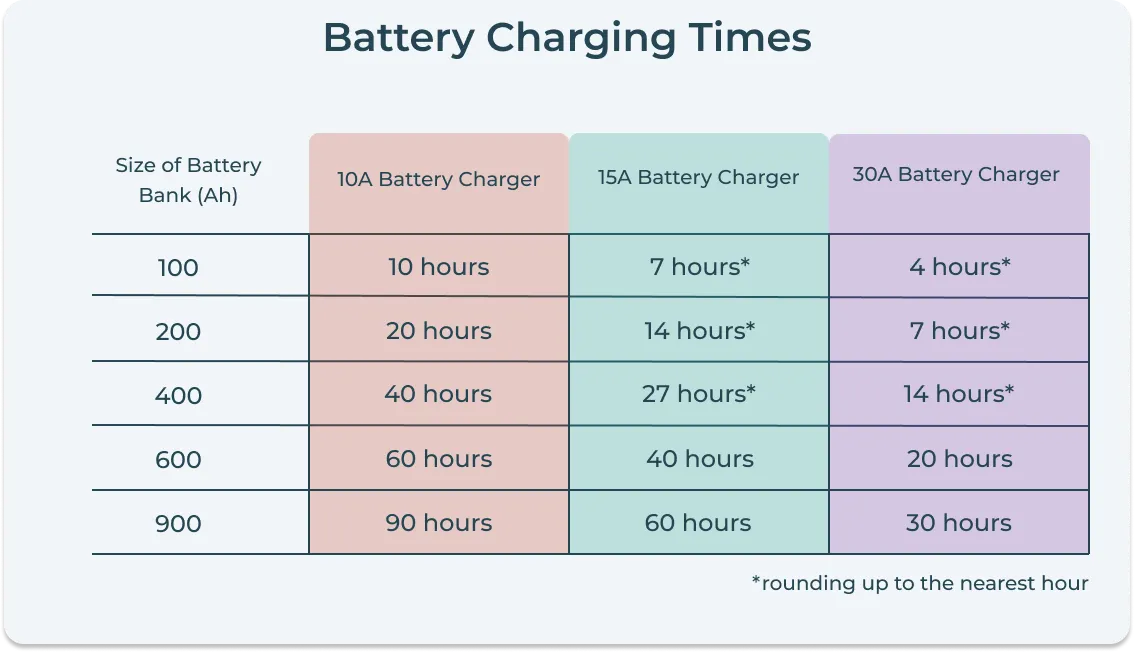
Factors affecting charging times
The main factors affecting charging times are:
- Battery capacity. Larger batteries (meaning a higher amp-hour, or Ah number) will take longer to charge since they store more energy. This works fairly linearly, so a 100h battery will take about twice as long to charge as a 50Ah battery with the same charger.
- Charger output amperage. Chargers with a higher amperage can deliver power to the leisure battery quicker. For example, a 20A charger will charge a battery much quicker than a 10A charger. Just make sure the battery can accept the current.
- Battery state of charge. If the battery is deeply discharged it will take much longer to reach full capacity, and battery voltage also helps indicate how low it is and how long charging is likely to take. Smart chargers will adjust the rate of charging to achieve this in the most efficient way possible and prevent damage.
- Battery type. Different battery types charge at different rates due to their chemical makeup. In general, lithium-ion batteries charge faster than AGM since they can accept higher current during the bulk charging phase, while lead acid batteries usually slow down more as they get close to full.
The importance of multi-stage charging for battery longevity
You've heard us describe phases of charging like bulk, but what do these actually mean? Properly charging a leisure battery requires multiple stages to minimise the lifespan of the battery.
In short, this is because there are different ideal levels of current flowing to the battery depending on how charged it is.
These stages are:
- Bulk stage. This is the most aggressive stage of charging and the one used when a battery is at less than around 80% charge. Maximum current is delivered to quickly increase the state of charge until it is around this 80% mark.
- Absorption stage. Once the battery is charged to around 80%, the current is dropped to prevent overheating or overcharging. This is critical to ensure the battery is steadily topped up to the full 100% in a safe way.
- Float stage. Once the battery is at 100% charge, the charger enters the float stage. This simply maintains the charge at a steady low voltage to keep the battery fully charged without overcharging it.
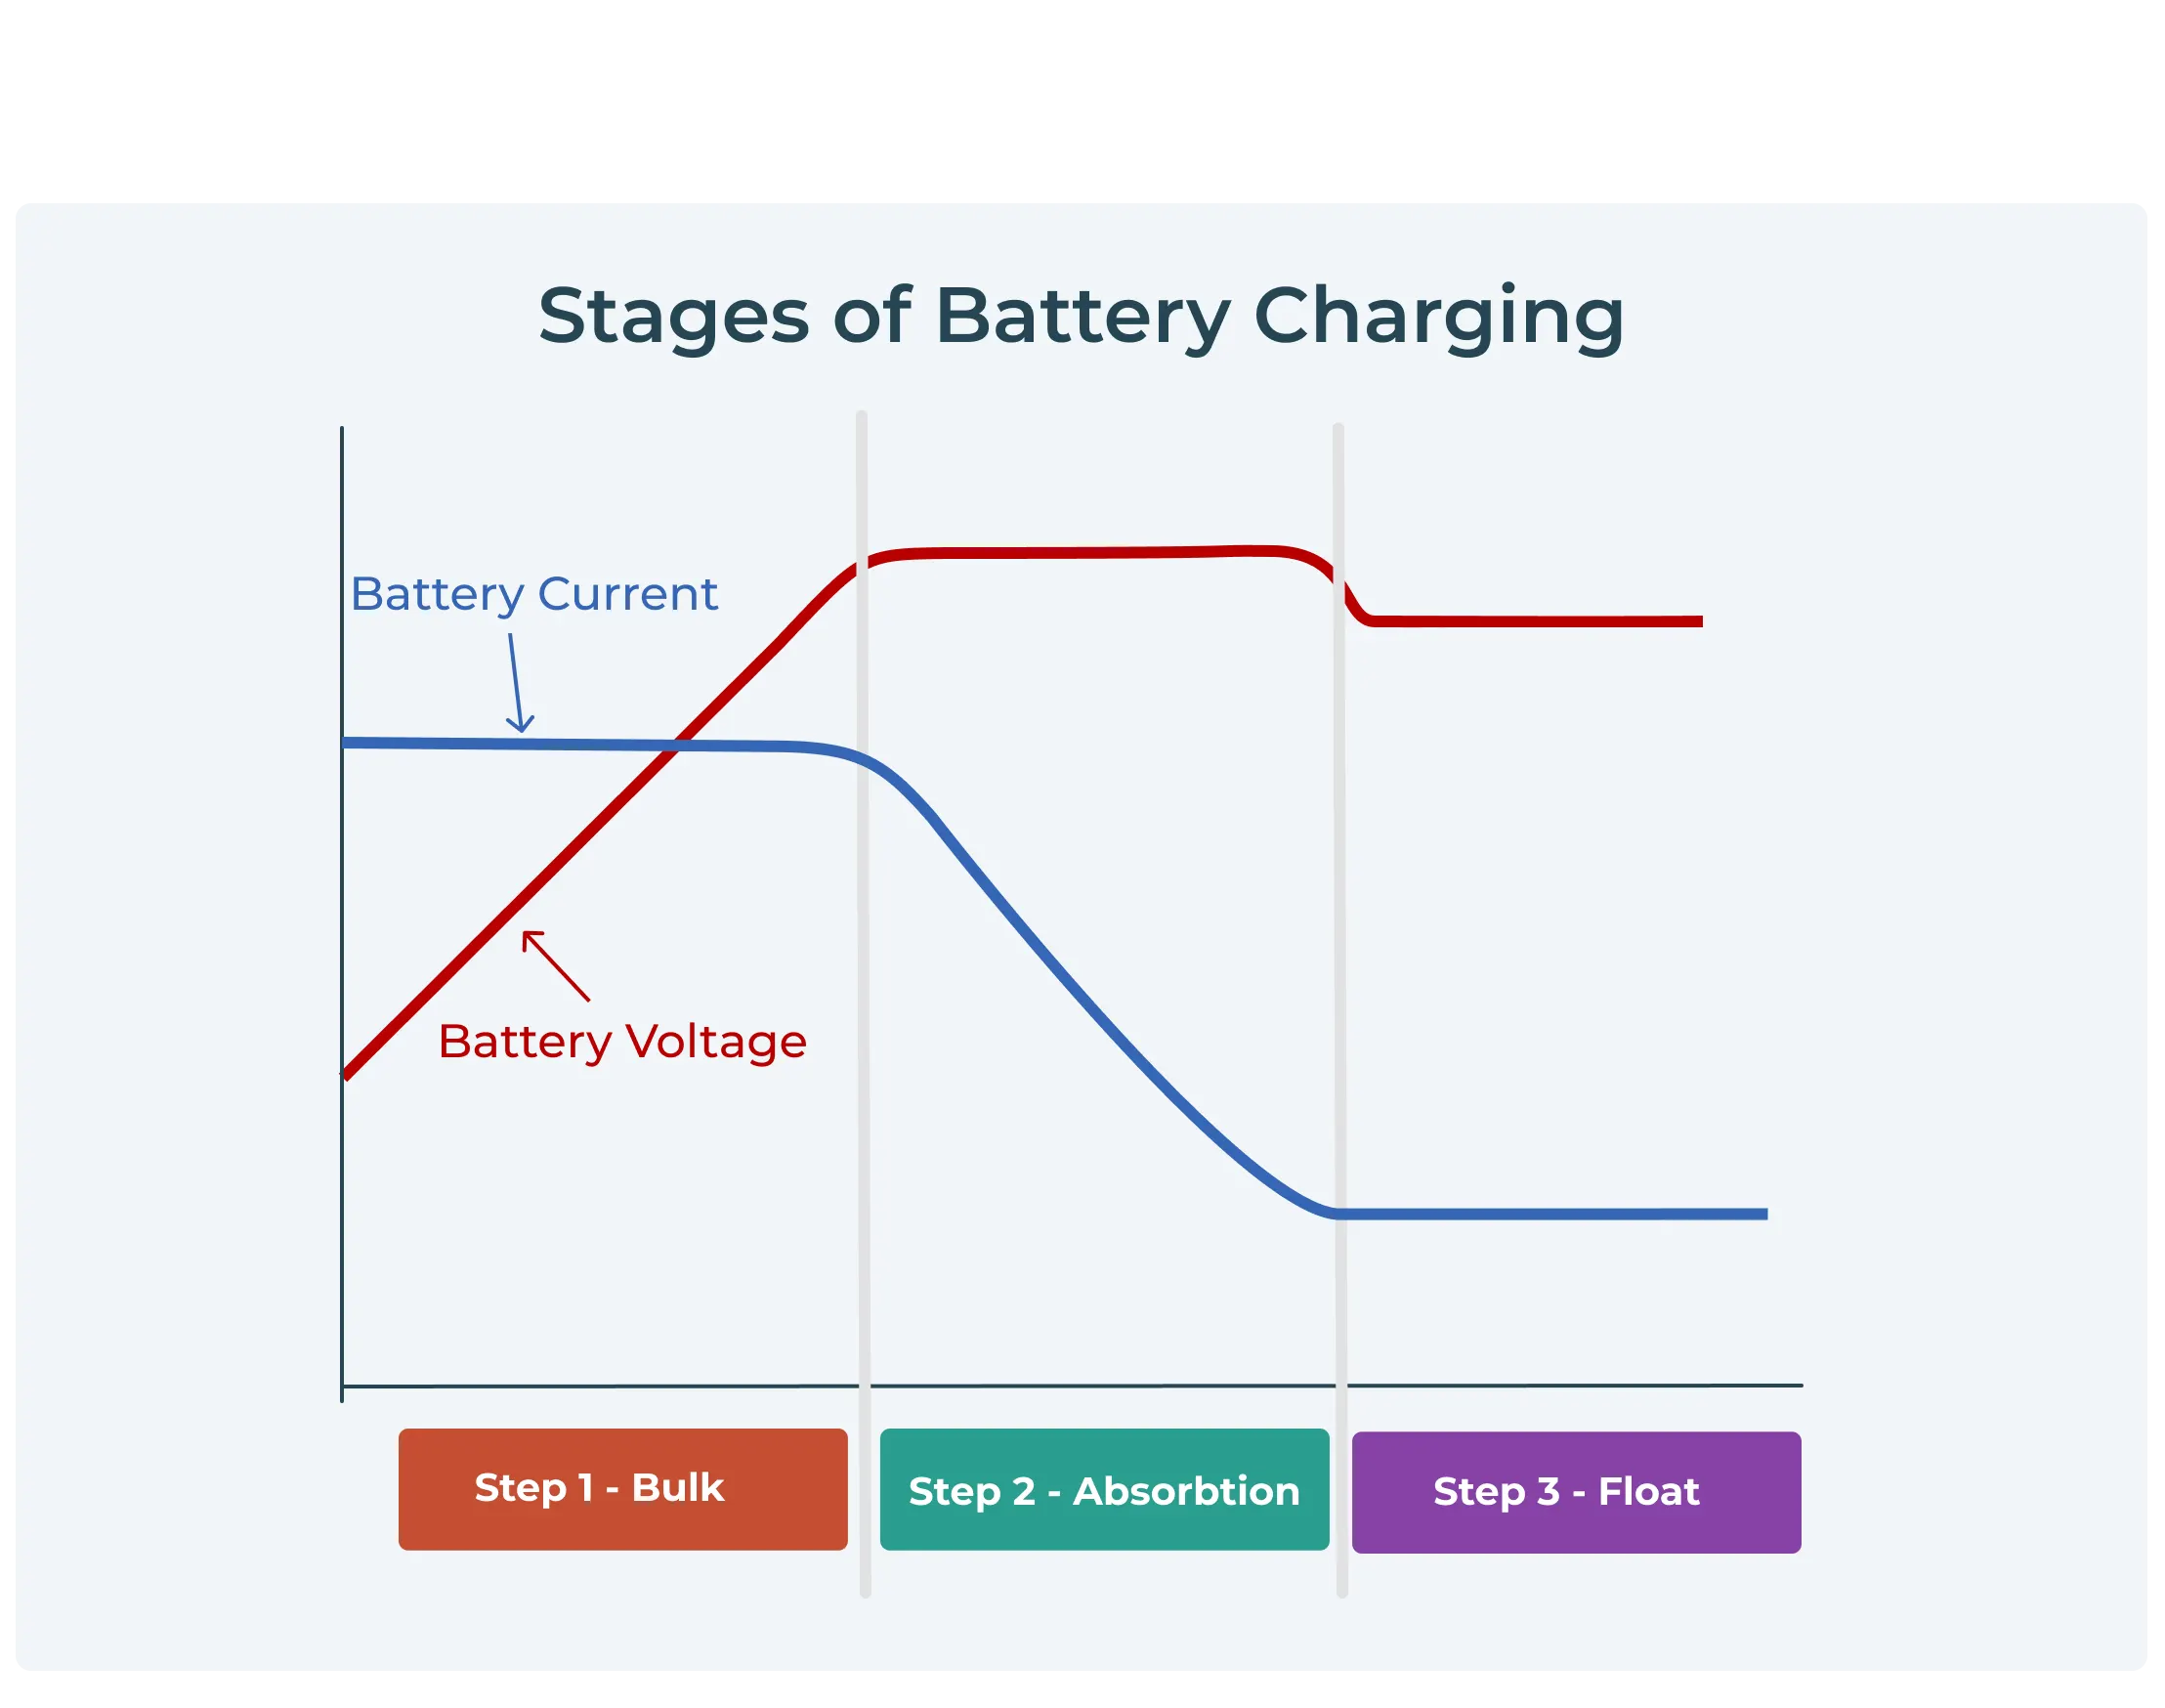
Benefits of multi-stage chargers
Ensuring the right state of charging is critical to avoid overcharging, overheating, and poor battery life. Charging incorrectly can also cause electrolyte loss in traditional AGM batteries.
Smart chargers dynamically switch between these stages at the right time by monitoring your leisure battery and adjusting output accordingly. This significantly extends the life of the battery, making smart chargers a great investment.
Hybrid charger/inverters will also usually come with this functionality built-in, so keep this in mind when comparing their cost to more basic chargers.
Using solar and shore power together
A popular method for ecofriendliness and extending off-grid times is to combine solar and mains hook-up power together. These set-ups mean you can leave for a trip fully charged through shore power and then extend this with solar charging when out in the wild.
Here's what you'll need to keep in mind when balancing these two energy sources.
Automatic switching
We recommend a system that allows for automatic switching between solar and shore power. This means that on a sunny day when there's plenty of solar power, the system can use solar to charge the battery, but will seamlessly switch to shore power if it's cloudy or nighttime. That kind of source switching matters even more if your van also uses solar chargers as a backup source.
Solar charge controller compatibility
Make sure the solar charge controllers, solar controller, and your battery charger are compatible. We recommend an MPPT (Maximum Power Point Tracking) controller to work with the battery charger and maximise the efficiency of solar charging, especially in changing weather.
Monitoring energy usage
Use an energy monitor to keep an eye on how much energy is actually being generated by your solar panels vs how much is being used for charging. This lets you make an informed decision on when to switch to shore power charging if it's available.
In general, a combination of shore power and solar is a great way to set up a campervan electrical system, and Victron campervan electrical systems are a popular way to achieve this. It means you always have a backup option and can reduce your reliance on mains electricity, extending off-grid times and allowing you to focus on the adventure!
Common issues when charging from mains hook-up
Here we explore common issues you might run into when charging a leisure battery through mains hook-up, many of which are also covered in depth in our DIY campervan electrical checklist.
Overcharging
If you're using a basic battery charger without smart functionality, it can be easy to overcharge a battery. Ensure the charger you choose has a good float function, allowing it to drop the voltage once the battery reaches 100% and prevent battery damage or overheating.
Undersized cables
Using cables that are too small for the current passing through them can cause what's called voltage drop. This negatively affects charging efficiency and can lead to overheating and fire hazards. Make sure that all cables are rated for the maximum current expected and add in a good margin of safety by oversizing within reason.
Faulty charging systems
Problems in the charging system like damaged wires or a dodgy RCD can stop the leisure battery from charging properly and pose safety risks. Keep a close eye on the electrical system and make sure all components are in good working order. Replace any worn or corroded parts urgently.
Shore power safety
Here are some key safety considerations to keep in mind when charging a leisure battery through mains hook-up.
RCD protection
Always make sure your system has solid RCD (Residual Current Device) protection. This will quickly disconnect the circuit when there's a fault protecting you from electric shock.
We recommend RCD Type A for a campervan since it can detect both AC and DC currents. Type AC can only detect AC current meaning it won't notice faults with 12V DC systems.
Cable safety
Only use shore hook-up cables that are specifically designed to be used outdoors, like arctic cables. These are flexible even when it's cold and particularly resistant to wear and tear.
Even with the right cables, keep a close eye out for damage, and always fully unwind them when charging to avoid overheating.
Reverse polarity
In some regions, especially parts of Europe, you might find sites with reverse polarity. This means the live and neutral wires are switched which can be dangerous as it means appliances are still live even when turned off.
You can carry a reverse polarity tester to check this, and it's always best to use a double-pole RCD which connects both live and neutral if there's a fault.
Charged up and ready to explore
We hope you've found this guide to shore power charging useful. Connecting to a mains hook-up is a hassle-free way to spend less time worrying about battery levels and more time enjoying the great outdoors.
Do you know what else isn't worth worrying about? Putting together all the right parts to create a seamless electrical system.
Vunked supplies complete campervan electrical systems and conversion kits with everything you need to charge your leisure batteries from a mains hook-up, and you can use our handy online tool to spec a custom system with every piece needed for a clean install. We'll also send you detailed wiring diagrams and fitting instructions.
Get started here or contact us for a free design consultation
Here are some FAQs
Do I need an inverter to charge a leisure battery from mains hook-up?No. A standard inverter only converts 12V DC to 230V AC — it can't charge a battery. When charging while driving, a battery to battery charger redistributes charge from the starter battery rather than using mains hook-up. You need a dedicated battery charger, or an inverter/charger hybrid if you also want 230V power off-grid.
How long does it take to charge a leisure battery from mains hook-up?It depends on battery capacity, charger output amperage, current state of charge, and battery type. Lithium batteries generally charge faster than AGM, and a higher-amp charger will always be quicker, provided your battery can accept that charge rate.
Can you overcharge a leisure battery on mains hook-up?With a basic charger, yes, if it lacks a float stage. Smart chargers and inverter/chargers use multi-stage charging (bulk, absorption, float) to prevent overcharging automatically.
What size cable do I need for mains hook-up charging?A 16A rated arctic cable is standard for most UK campervan setups, paired with appropriately sized wiring between the charger and battery (16mm is a safe bet for most chargers).
Can I charge my leisure battery using an extension lead from home?Yes — running a suitable extension lead from a household socket to your van's shore power inlet works the same way as a campsite hook-up point.
What's the difference between AGM and lithium batteries for shore power charging?AGM batteries are cheaper and durable but shouldn't be discharged too deeply too often. Lithium batteries cost more but charge faster, last longer, are lighter, and can usually accept higher charging currents than AGM.