
MPPT (Maximum Power Point Tracking) is a solar charge controller technology that continuously finds the best voltage and current from your solar panels so more usable power reaches your leisure batteries.
For DIY campervan and van-life builders in the UK and EU, that extra efficiency matters: roof space is limited, sunlight conditions change constantly, and a good controller helps you charge faster, waste less solar input, and keep your battery system working safely off-grid.
In this guide, we'll explain what MPPT is, how MPPT controllers work, and how they affect your ability to maximise solar charging and protect your leisure batteries.
We'll also cover MPPT vs PWM, series vs parallel panel wiring, how to choose and install the right MPPT controller, and how an MPPT controller fits into a real-world campervan electrical system.
What does a solar charge controller do?
Solar charge controllers regulate the voltage and current produced by your solar panels to ensure your leisure batteries charge safely and efficiently.
Let's use a modern 100W solar panel as an example. The panel might output between 18V and 22V in bright sunlight. This is more than enough voltage to recharge your leisure batteries, but there's a problem.
The voltage produced by your solar panels can easily exceed safe charging limits, potentially leading to overheating, battery degradation (especially with modern lithium batteries), and even catastrophic failure.
In addition to safety, there's also efficiency to consider. Without a solar charge controller, the power being fed into your leisure batteries would simply be whatever the sun is producing at any given moment. However, batteries optimally charge in ‘stages'.
These different stages protect the battery while providing maximum safe charging efficiency by not simply ‘dumping' the most electricity available at any given time.
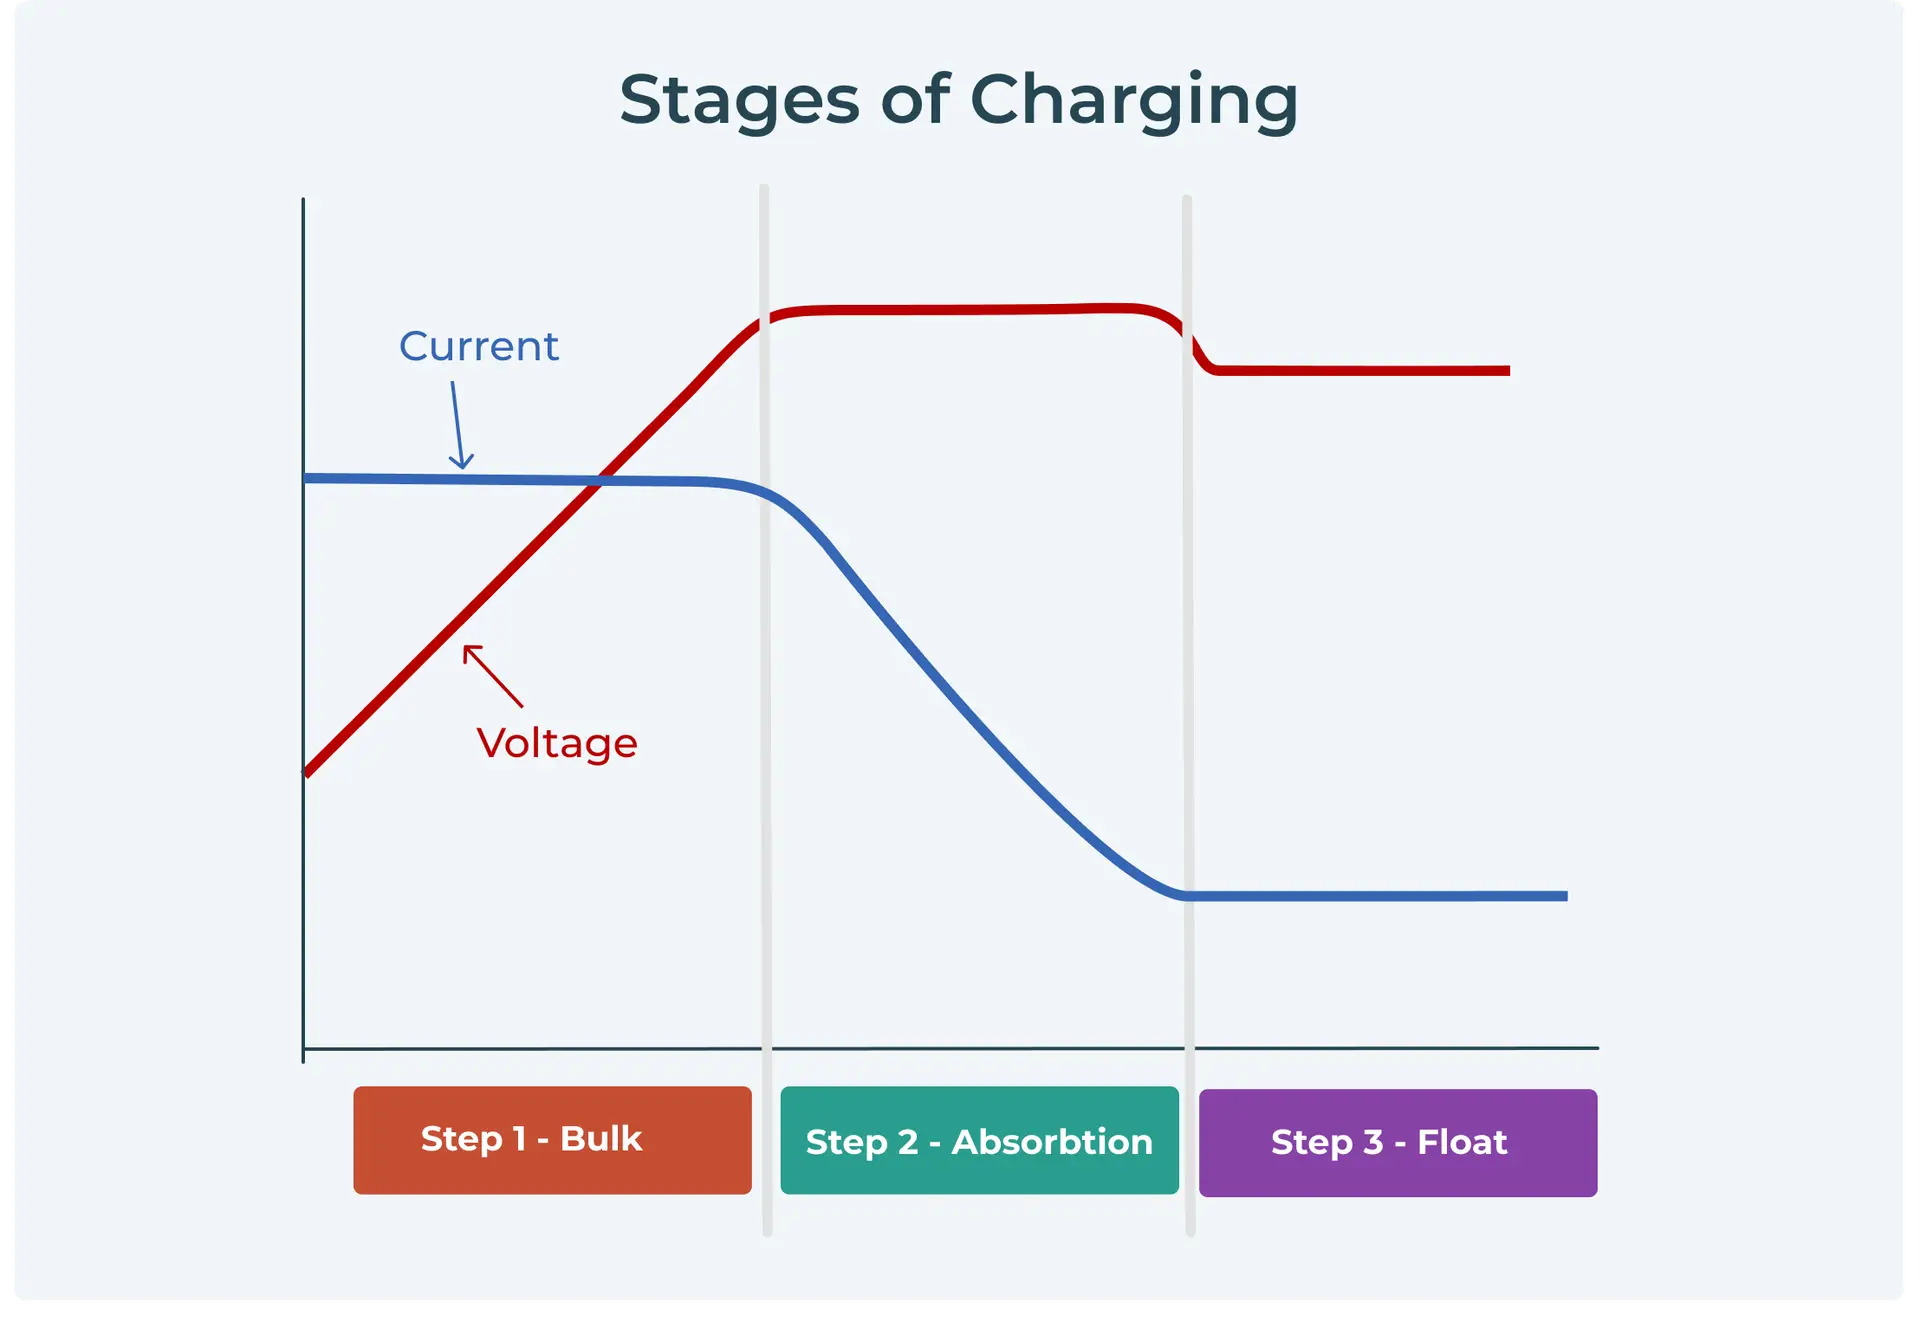
These stages work the same as they do in a modern B2B charger. First, there's the bulk stage. The bulk stage is the fastest stage of charging delivered by a modern MPPT solar charge controller.
The controller delivers as much power as possible to quickly top up a battery with low charge. This power is usually around 14.4V for lead acid batteries or 14.6V for lithium.
With the battery mostly charged, the controller then drops the voltage during what we call the absorption stage. This is essentially topping up that last bit of charge in a safe and controlled way to avoid overcharging the battery.
With the battery full, the controller enters the float stage. The float stage drops the voltage further to a safe ‘maintenance level' of voltage (usually about 13.5V) to ensure the battery stays topped up over time.
Some charge controllers designed to work with lead-acid batteries also have a fourth stage called the equalisation stage. This rebalances charge across individual battery cells to prevent stratification, where the acid in the electrolyte mixture separates from the water and collects at the bottom of the battery.
This increased concentration of acid increases the formation of lead sulfate (sulfation), degrading the battery's performance. This is exclusively an issue with lead-acid batteries and the equalisation feature is a non-issue with other leisure battery chemistries.
Modern charge controllers, particularly high-end MPPT models like the Victron ones in our complete electrical system kits, also have intelligent charging features that actively manage and monitor charging based on real-time conditions.
For example, they can adjust charging output in real-time based on factors like temperature while also offering features like Bluetooth integration for monitoring charge from a smartphone.
Since different battery chemistries have different charging profiles, you'll need to match a charge controller with the battery type you have. Some models have multiple charging profiles built-in for flexibility, whereas others may only allow for certain types.
MPPT vs PWM charge controllers
The two main types of charge controllers you'll find on the market today are Maximum Power Point Tracking (MPPT) and Pulse Width Modulation (PWM)
Feature | PWM charge controllers | MPPT charge controller |
|---|---|---|
Cost | Less expensive | Slightly more expensive |
Panel voltage flexibility | Must match battery (17‑22 V for 12 V system) | Can use higher‑voltage strings (up to 100 V+ on some models) |
Installation | Simple | Simple (some app setup) |
Efficiency | Less efficient (~70%) | More efficient (~95%) |
Best for | Small solar systems | Larger solar systems |
Vunked recommended | No | Yes |
. |
Both types of controllers modulate the output from your solar panels and protect your battery from overcharging. However, they use completely different technologies to achieve this. In short, MPPT is objectively better, but let's look at why.
How PWM controllers work
PWM controllers are an older solar charge-controlling technology which is simpler and cheaper to manufacture than MPPT units. The comparison between the two can be likened in many ways to the difference between split charge relays and modern battery-to-battery chargers.
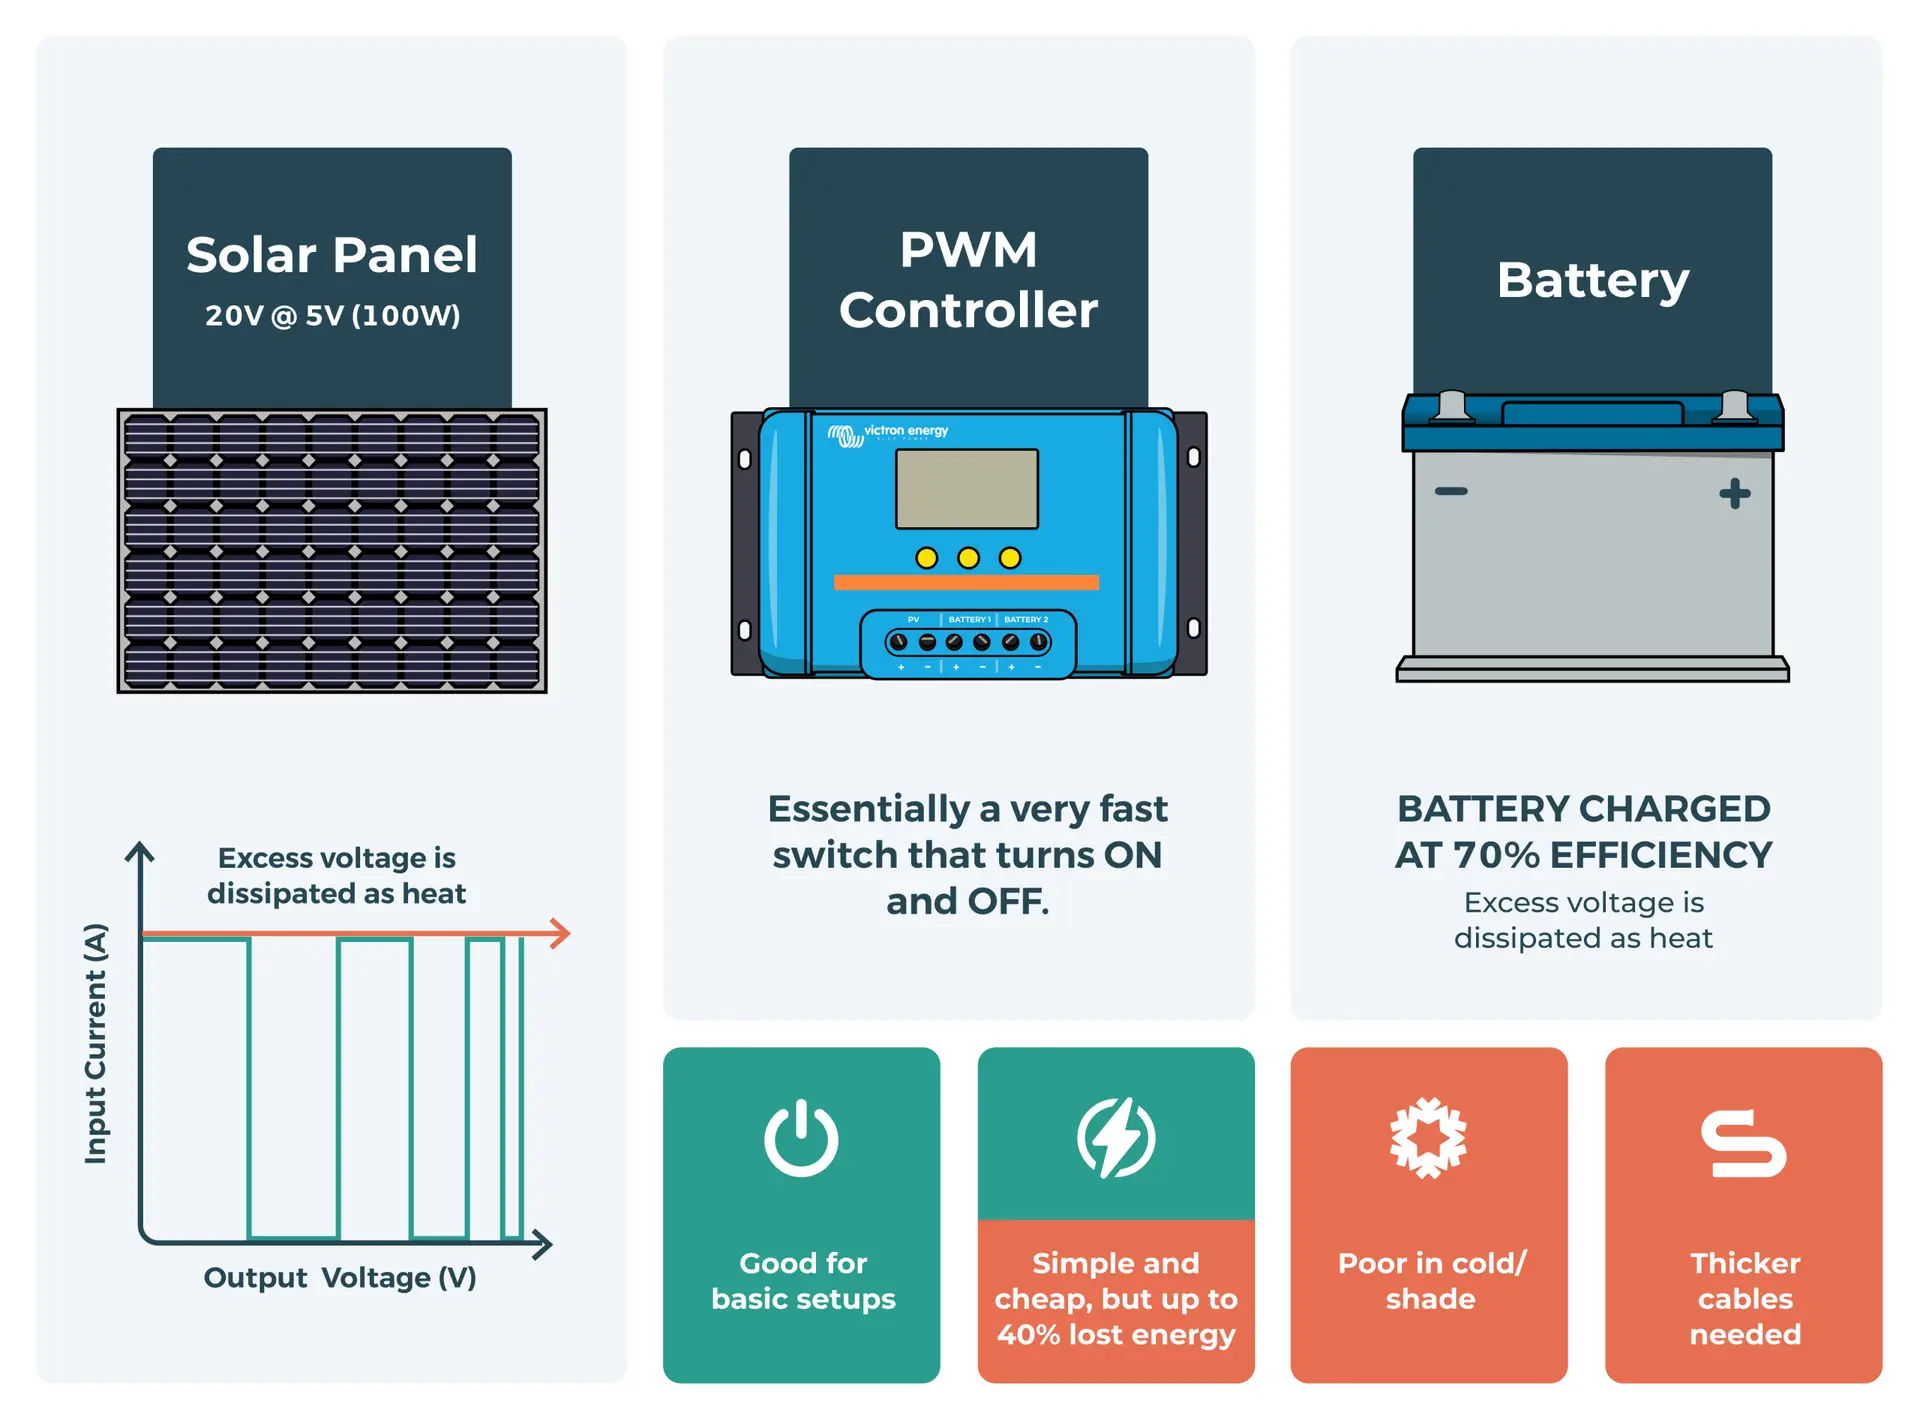
PWM controllers work like an electronic switch. They pulse power to your battery in short bursts, with these bursts becoming shorter and more spaced out as your battery becomes more charged, hence the term ‘pulse width modulation'.
This is essentially a crude version of the charging ‘stages' we just covered, because a PWM controller pulls the panel down close to the battery instead of converting surplus panel voltage into extra charging current at the optimal level for a given state of charge.
This means you aren't getting the full amount of charge possible from the actual sunlight available. For example, let's say you have a 100W solar panel that's producing 18V on a pleasant sunny day (If you're in the UK you'll have to use your imagination in regards to what that would look like).
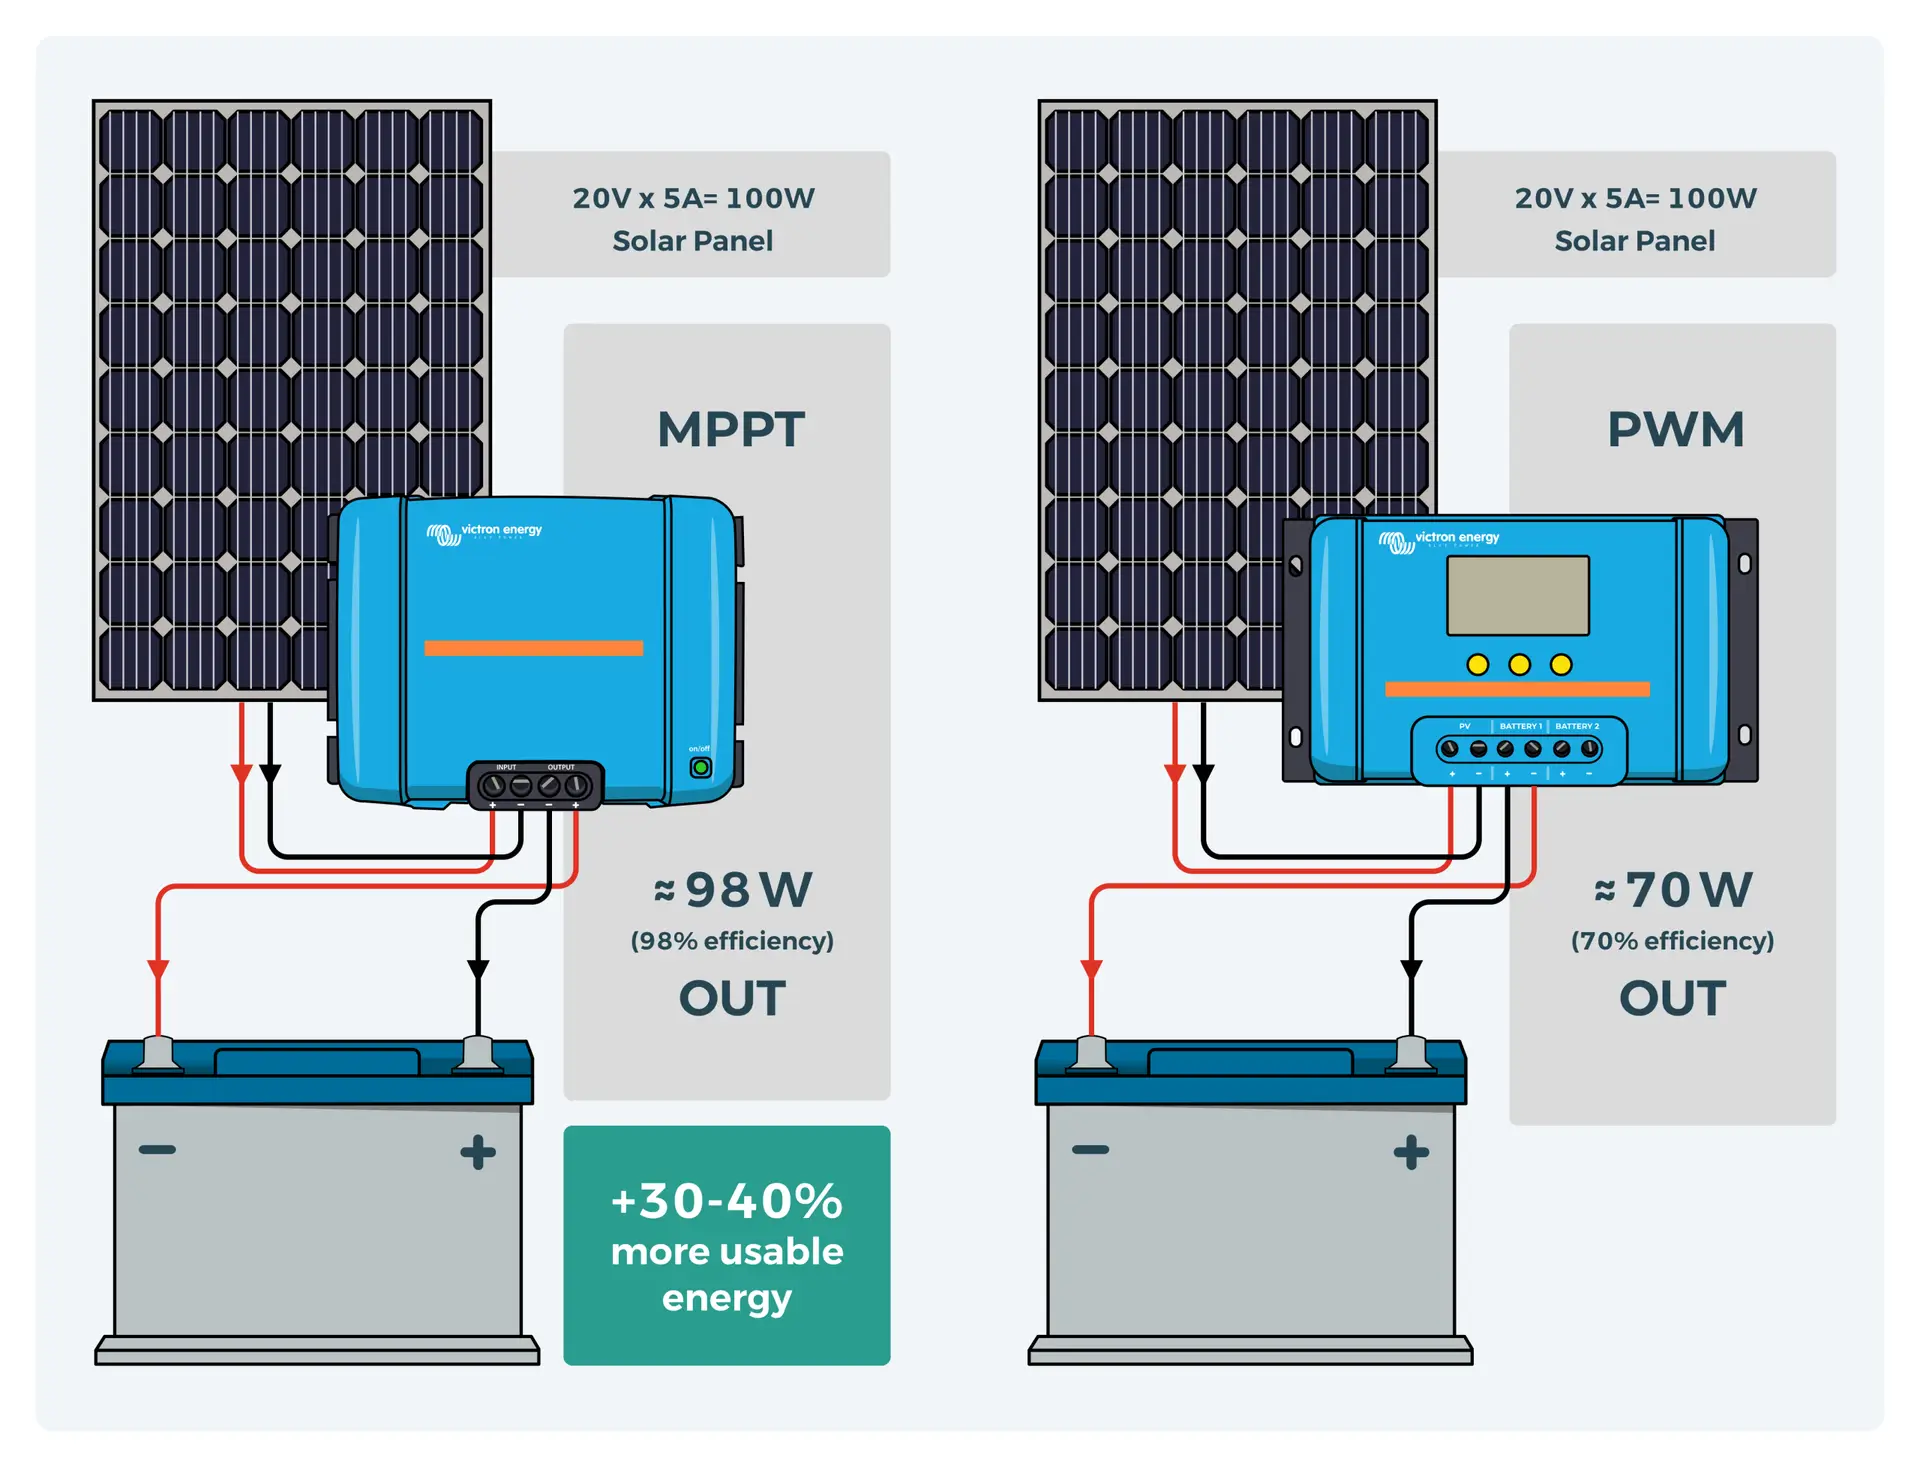
The PWM controller will simply pull the panel down close to your battery voltage, so in an 18V-to-12V setup the excess 6V is effectively wasted rather than turned into more charging current. This means your batteries only receive the amperage associated with 12V, wasting power and hindering charge time.
While they are reliable, cheap, and easy to install, this lack of optimised charging can be an absolute killer for enjoying your time off-grid, especially if you’re trying to build the best campervan electrical system for your travel style, leaving up to 40% of charging power on the table.
They're also less than ideal in cold weather or changing climates, with no way to modulate charging based on environmental factors or sunlight levels.
How maximum power point tracking (MPPT) controllers work
So what is MPPT? The term MPPT stands for Maximum Power Point Tracking, and these controllers keep adjusting the panel’s electrical operating point to stay near the peak power point where your panels can generate the most usable power. This is called the maximum power point, hence the name.
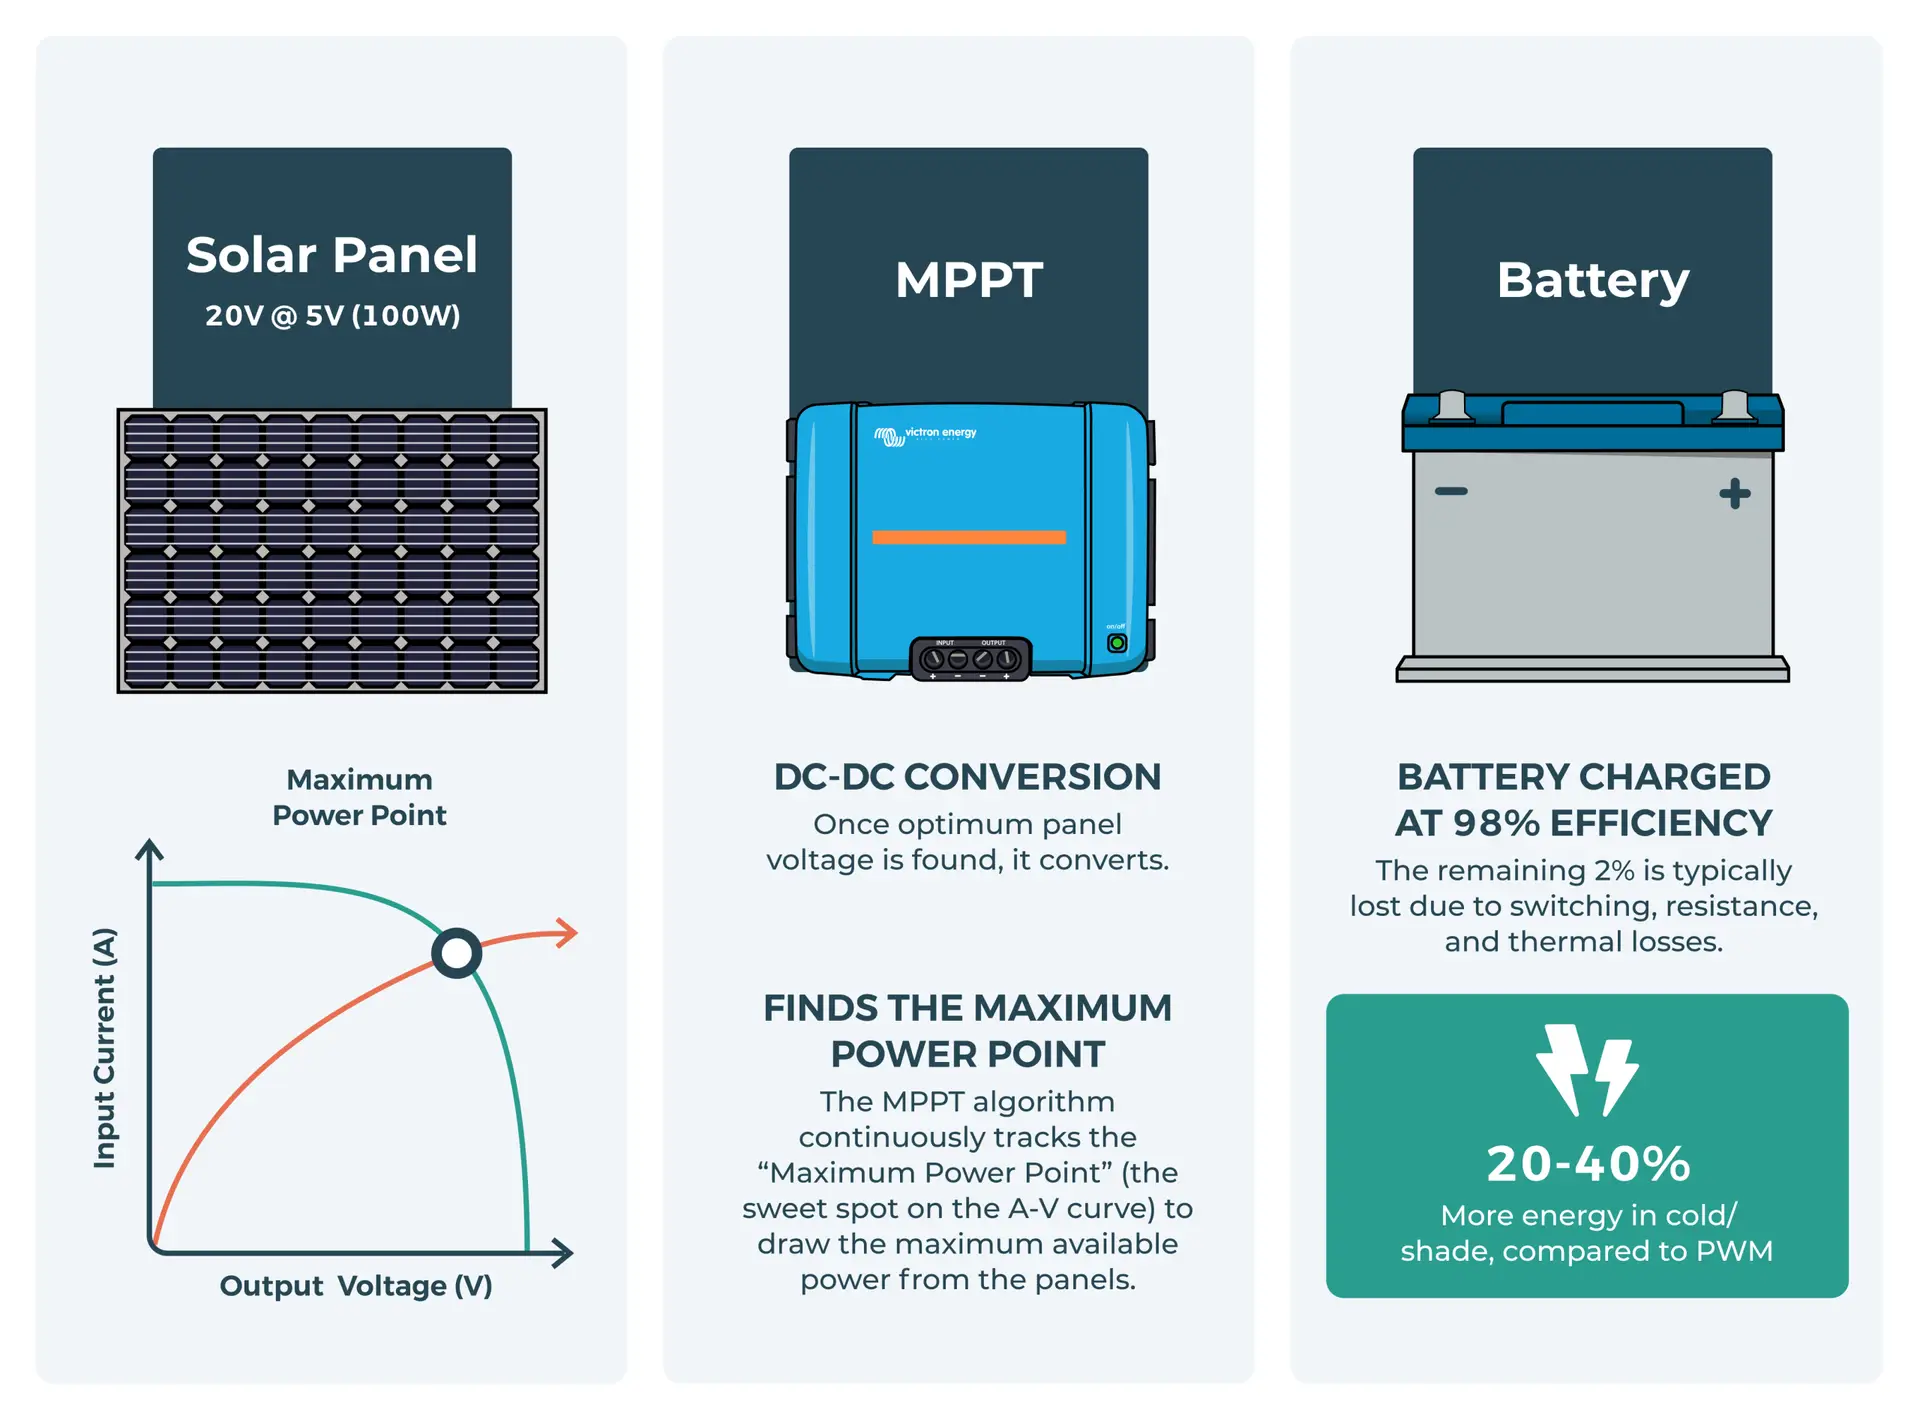
This power is then delivered to your batteries continuously instead of pulses (bursts) in line with the ideal charging profile based on their level of charge. Very clever stuff. That sweet spot is the panel’s peak power voltage on its I-V curve and power curve, and a typical 12V-class panel has a Vmp of about 17V at 25°C.
They do this by using a DC-DC conversion to step down the panel voltage while proportionally increasing current. This preserves the Wattage (as Watts = Volts x Amps) under differing conditions, leading to more consistent and effective charging.
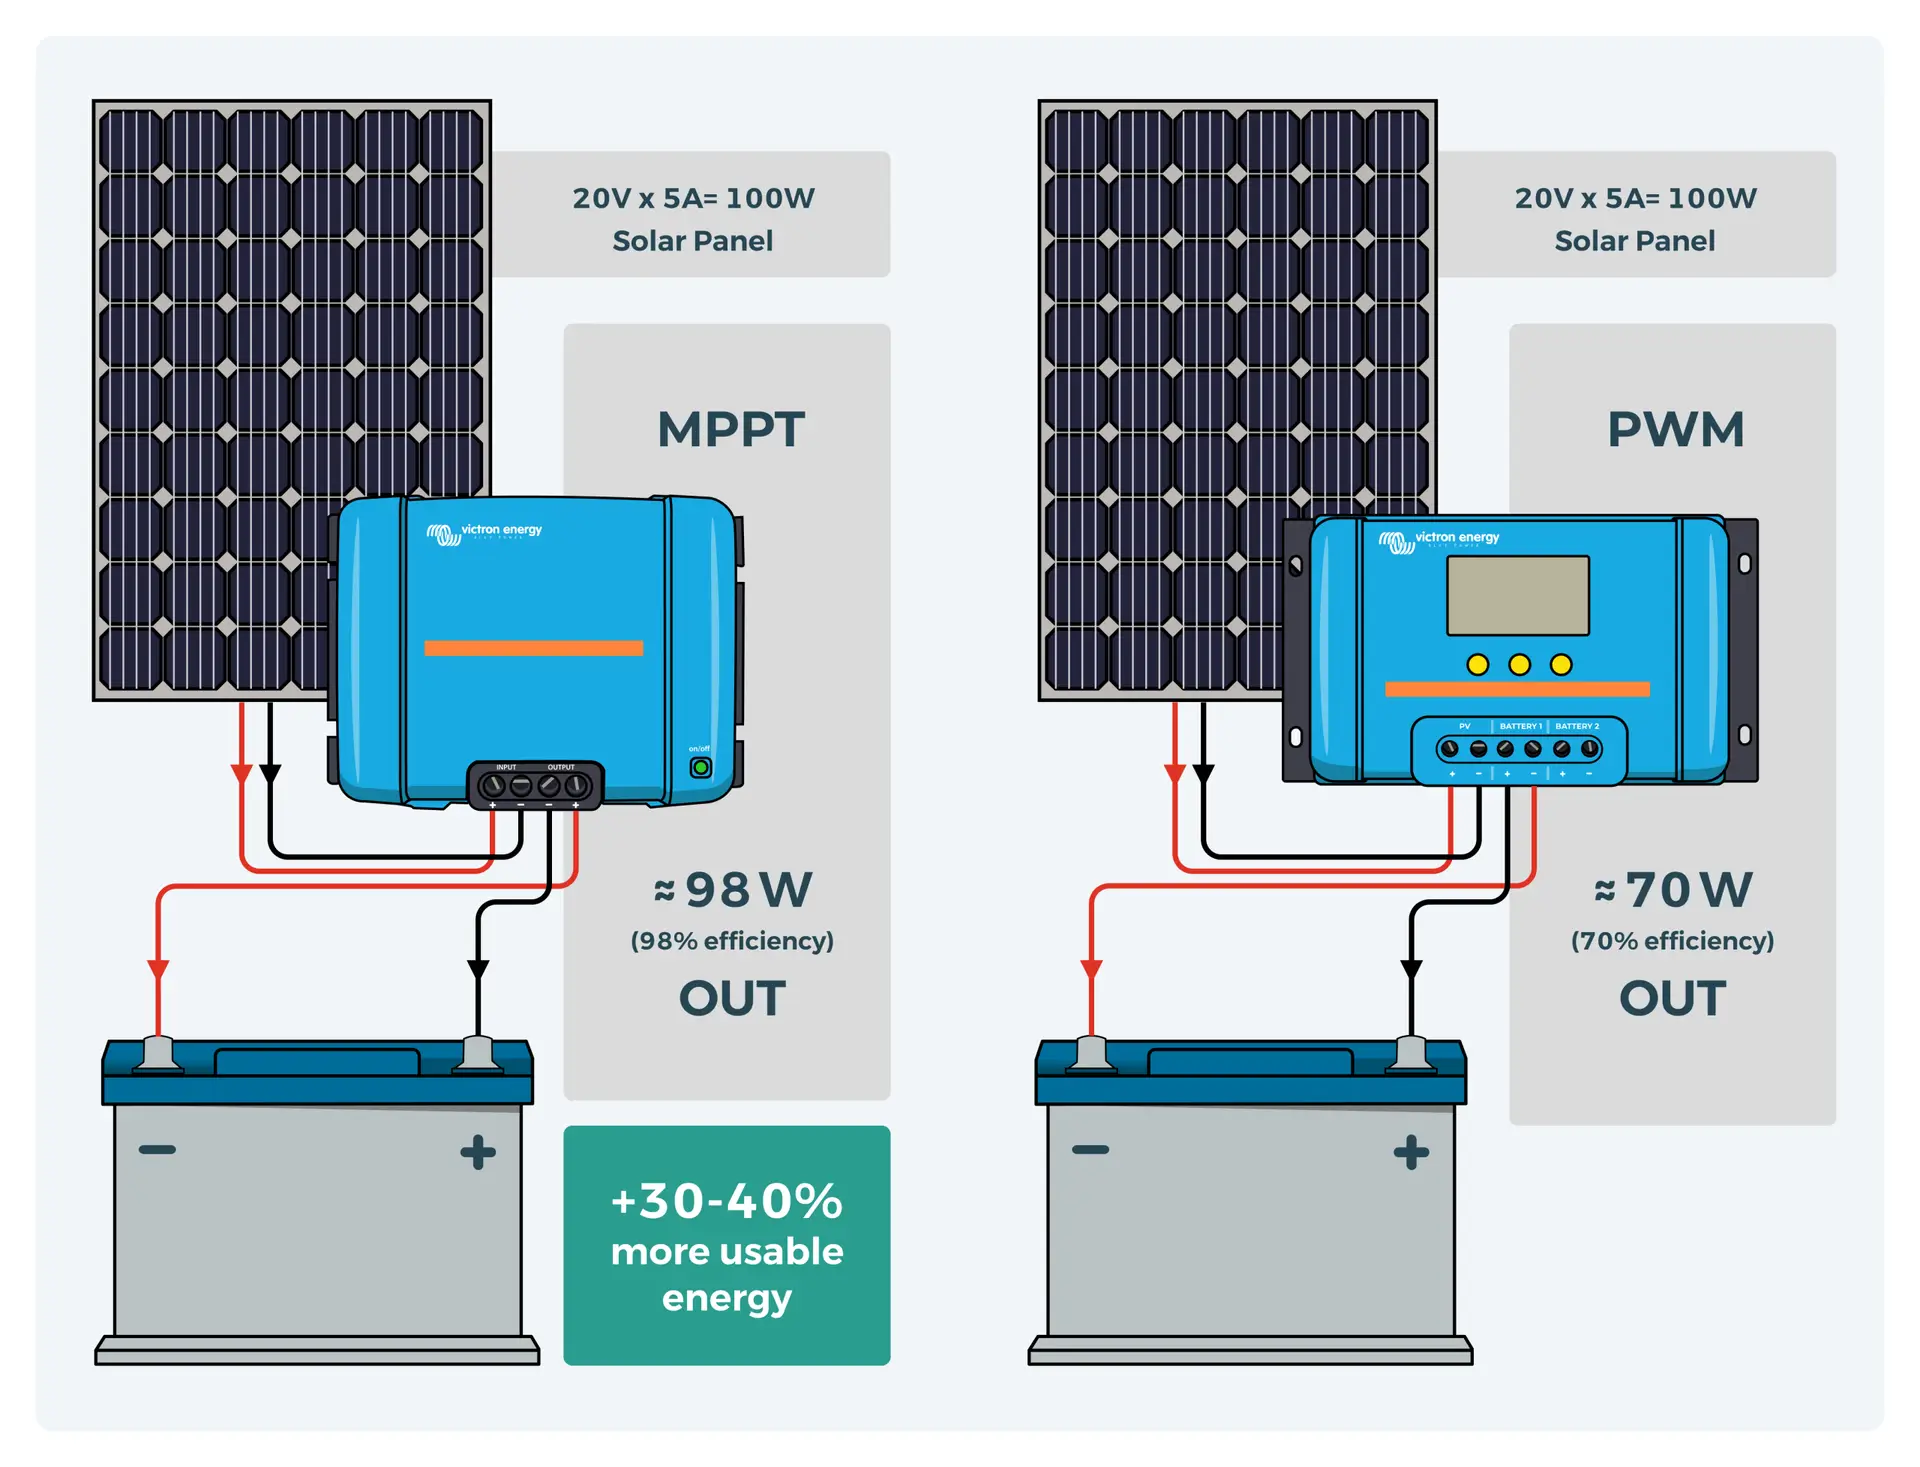
Let's illustrate this with an example using the same 100W panel. On this very sunny day, it's producing 20V at 5A. Since W = V x A, that's the full 100W of available solar power.
Our old PWM controller would reduce this to around 13V to match your leisure battery, but since 13 x 5 = 65, that only gets us a measly 65W of real-world charging power.
However, a modern MPPT controller steps down this 20V to 13V while increasing the current to 7.7A instead of 5A. This preserves almost the full 100W, giving us much more real-world charging power. Perturb and observe is the most common mpp tracking method. Incremental conductance uses more computation, but it can track changing conditions more rapidly with less oscillation around the maximum power point.
This current modulation also helps because MPPT work means the controller keeps retuning as conditions change, including partial shading and other challenging conditions, to improve energy harvest and capture more of the maximum available power.
Overall, you can expect to see MPPT controllers outperform PWM units by about 20-30% in most conditions, and up to 40% when it's cold or shady. In terms of extending your time off-grid, that's massive.
More advanced MPPT controllers also include advanced internal protection against issues like reverse polarity, short circuits, and overheating, making them safer as well as more efficient.
These features do come at a slightly higher cost, but MPPT controllers are still one of the cheaper components in an electrical system.
For most campervan set-ups where you have limited roof space and need every ounce of juice available from the sun, this cost is well worth it and an MPPT controller is a must-have.
What is MPPT installation like?
For an MPPT controller to deliver this full potential, it will need to be installed correctly. While as units they are more complex than PWM options, installation is only marginally more difficult, mainly pertaining to matching the right charging profile with your leisure battery and ensuring your leisure battery installation is safe and well laid out.
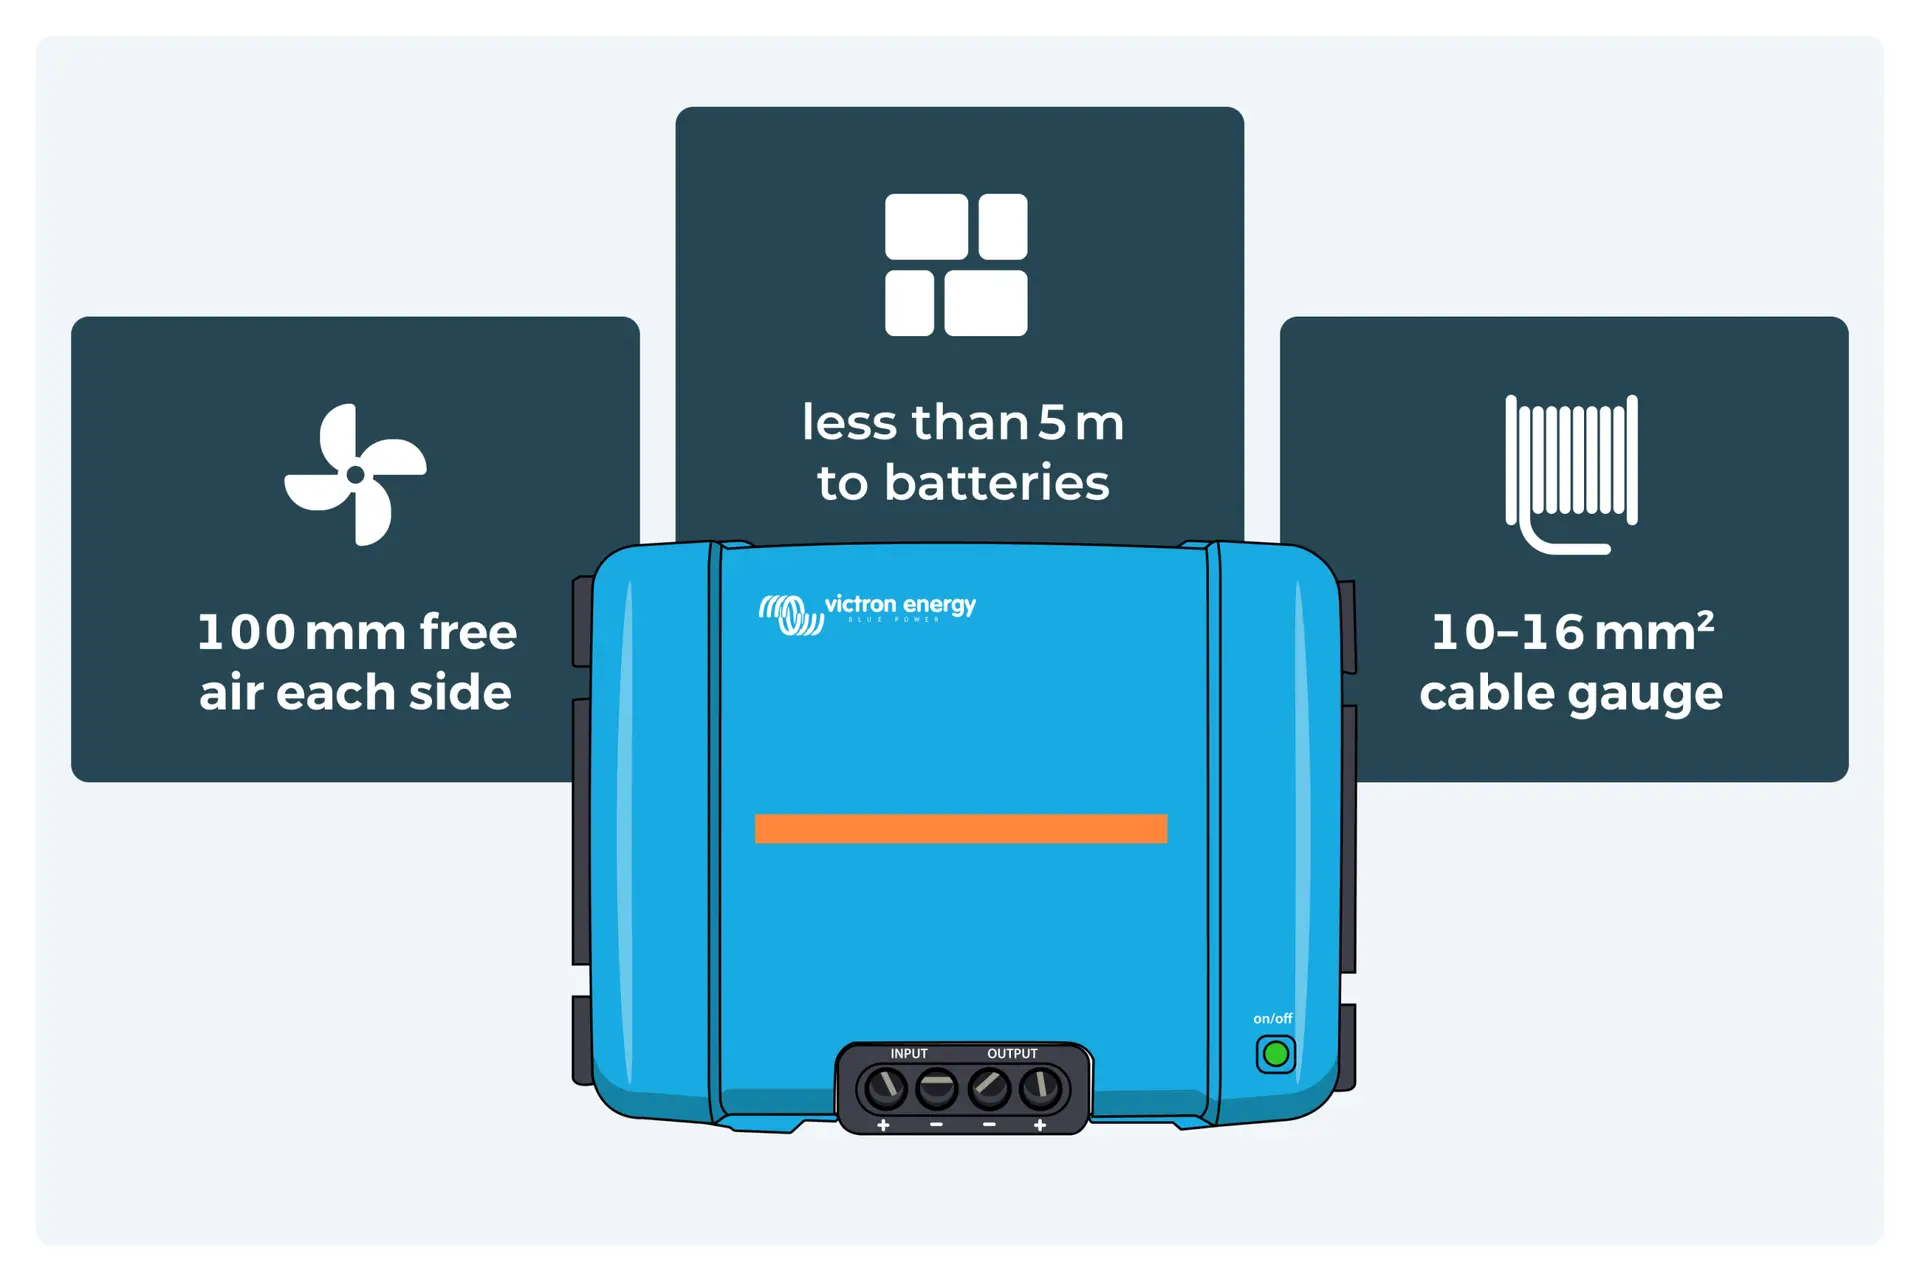
You'll also need to install your controller in a ventilated area away from direct sunlight as they generate some internal heat during the voltage conversion process. A good rule of thumb is to leave at least 100mm around the unit to give them the required airflow.
You'll also want to mount the controller relatively close to the batteries. This means you won't need to run excessively long cables from the controller to the leisure battery bank, reducing voltage drop. You can also mitigate voltage drop by using thicker cabling between the battery and controller. Around 10-16mm² is usually a safe bet, while the higher-voltage solar input on the panel side usually allows thinner, cheaper cable and lower power loss over longer runs.
Series vs parallel solar panel wiring for MPPT
Another excellent advantage of modern MPPT controllers is their compatibility with series wiring across your solar panels. This raises the PV array operating voltage without increasing current, which helps reduce cable losses and can improve performance in cold or low-light conditions.
PWM controllers, on the other hand, require parallel wiring, increasing the current across the system and requiring thicker cables and better fuse protection for safety.
For campervans, series wiring is generally always best. You'll just need to make sure the array’s open circuit voltage stays within your controller's input limit in cold weather, using the panel datasheet and its temperature coefficient to estimate any voltage rise, and to integrate it cleanly into your 12V campervan wiring layout.
Choosing the right MPPT controller for your campervan
To choose the right MPPT unit for your campervan you'll need to match the core electrical parameters of your system with the controller. Good system design means matching not just panel voltage and battery bank voltage, but also the controller’s pv input range and charging current limits.
A mismatch here can lead to poor performance, damaged equipment, and underutilised solar capacity from your panels, which is why many people prefer to start from proven Victron campervan electrical system designs rather than piecing everything together from scratch.
You'll then need to decide what features you're looking for in regard to efficiency, monitoring capability, and potential for expansion, or lean on a complete campervan electrics system kit that’s been pre-designed around typical off-grid use.
For example, consider whether you want smartphone connectivity via Bluetooth to monitor how much charge you're getting, or whether you might want to add more panels down the line; a guided build-your-own campervan electrical kit tool can help you weigh up those options.
Sounds complicated? Don't worry, we've got you — you can also book a free campervan electrics consultation if you’d like expert help matching an MPPT to the rest of your setup.
To make choosing the right controller easier, many leading manufacturers, such as Victron Energy, label their controllers using a two-number system — for example, 100/20, 75/15, or 150/35.
The first number represents the maximum PV input voltage. This is the voltage your solar panels need to stay under for safe operation.
The second number is maximum charging current. This number needs to meet or exceed the combined output of your solar array.
You'll also see units listed by the type of battery voltages they can support. For example, some can only support 12V, while others can support 24V or even 48V set-ups.
The table below should help to demonstrate this using common Victron sizes.
Type | Max Power Output | Max Solar Voltage | Max Solar Current | Max Charging Current |
|---|---|---|---|---|
Victron Energy MPPT 75/15 | 200 | 75 | 15 | 15 |
Victron Energy MPPT 100/20 | 290 | 100 | 20 | 20 |
Victron Energy MPPT 100/30 | 440 | 100 | 35 | 30 |
Victron Energy MPPT 100/50 | 700 | 100 | 60 | 50 |
Victron Energy MPPT 150/85 Tr | 1200 | 150 | 70 | 85 |
What is MPPT: Solar charge controller example setup
To illustrate how a modern MPPT controller functions in a large modern electrical system, let's take a look at an example set-up.
We'll use our Overland Explorer Kit in this case, a ready-to-install electrical system designed for digital nomads or adventurers looking to enjoy extended off-grid stays while using large household appliances in all seasons.
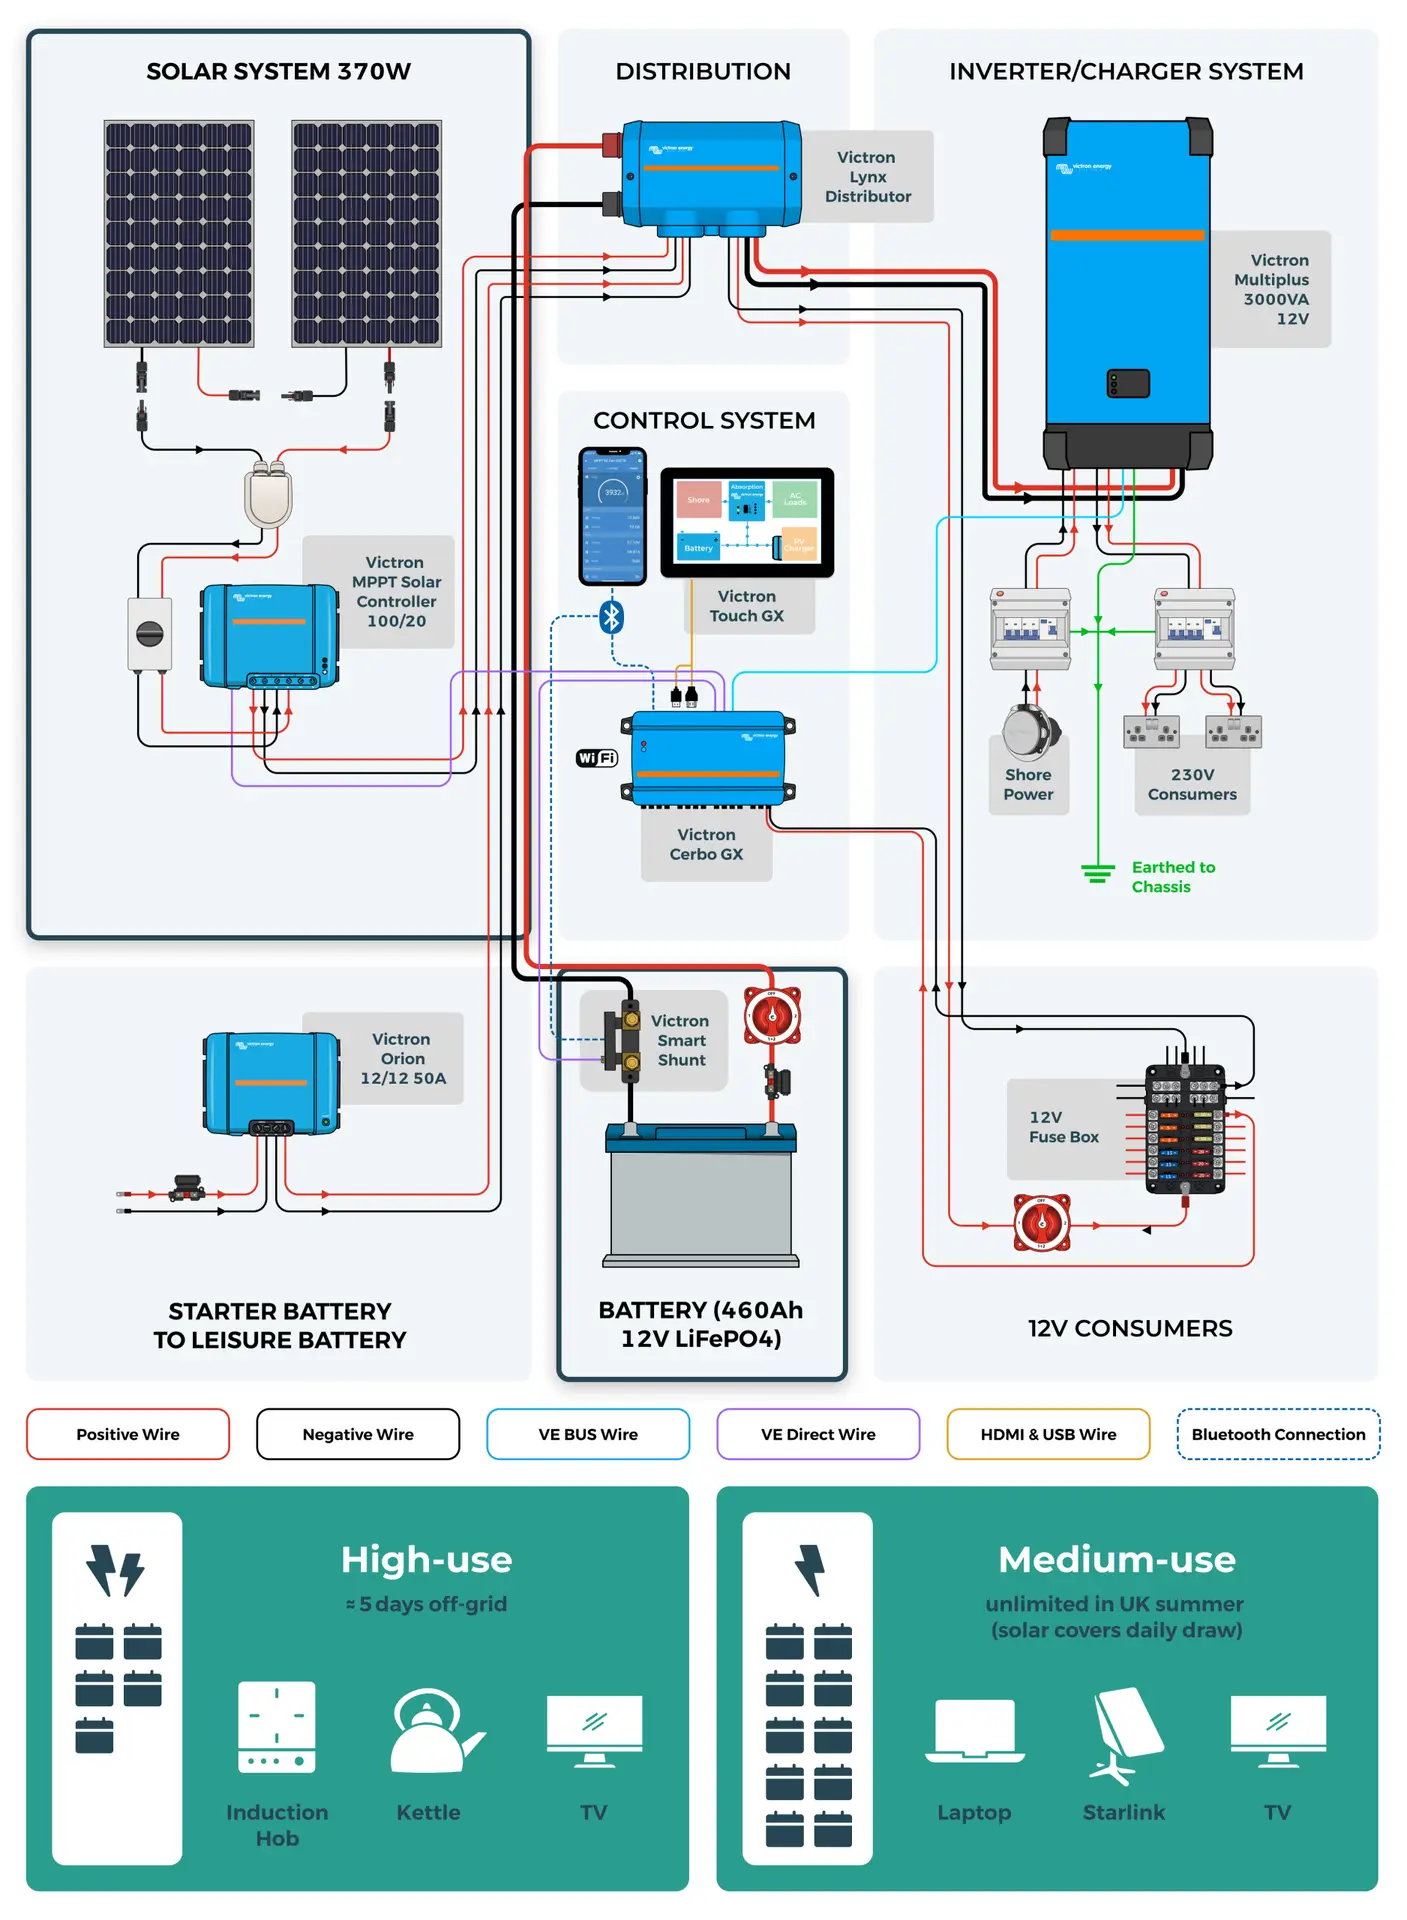
At the heart of the system also contains the Victron SmartSolar 100/20 MPPT, paired with a powerful 370W solar array.
This set up allows the MPPT to operate well within its voltage and current thresholds, converting high panel voltages to usable charging power with around 98% efficiency.
Thanks to the Victron MPPT's adaptive algorithm, the controller continuously finds the most efficient charging point even when light intensity rapidly fluctuates. The advanced charging algorithm then delivers the optimal charging profile based on the type of leisure battery you choose.
The large solar capacity of 370W means the controller is fed with ample headroom even if your orientation to the sun isn't perfect. That means you can quickly recharge batteries after high-use periods as well as steadily maintain float charge during low-demand days.
In addition to the solar set-up, the system also integrates a 50A isolated Victron Orion DC-DC charger. This lets you charge the leisure batteries using the vehicle's alternator while driving meaning you aren't completely dependent on the sun, and is a good example of how charging a leisure battery while driving fits alongside solar in a modern build.
Battery-to-battery chargers like this also use the same three-stage charging method that allows for optimal battery charging, meaning even a short drive can significantly recharge the battery bank (ideal for the winter or on cloudy days).
With your leisure battery fully topped up, power is distributed by a powerful 3000W Victron Multiplus inverter/charger, similar to what you’d find in an integrated campsite hook-up campervan electrical system.
That means you can convert the 12V DC from your leisure battery bank to 230V AC for high-draw mains appliances like hairdryers, laptop chargers, or induction hobs.
It also means you can plug your campervan in at a campsite and recharge the leisure batteries through mains hook-up.
With three ways to recharge the leisure batteries, all of your electrical set-up is then managed and protected through a Victron Lynx Distributor and professionally wired 12V fuse board for safe load distribution and easy diagnostics — and if you’re unsure what that should look like in your own van, you can always get in touch with the Vunked team for tailored guidance.
Finally, all of this can be tracked using the VictronConnect app, allowing you to monitor charging status, look at yield data (how much solar power you're producing), and make configuration changes like temperature compensation directly from a smartphone.
Key benefits of maximising solar power for off-grid adventures
Modern MPPT solar charge controllers allow for smart, flexible solar harvesting, keeping your batteries healthy and extending your off-grid capability significantly. Just be sure to choose the correct size and type for the rest of your system.
Check out our online Vunked system builder tool to create your own custom system in a few clicks, based on your power needs and the features you're looking for.
FAQs
What is an MPPT controller?
An MPPT (Maximum Power Point Tracking) controller constantly monitors how much voltage and current your solar panels put out. They then adjust the load to operate them at the most efficient point and charge your leisure batteries optimally. This maximum power point tracker is one example of mppt technology built into other solar electronics too: a microinverter can give each panel its own mppt, a dc optimizer or dc dc converter can provide module-level tracking before a central inverter, and string inverters track the combined output of a whole string by averaging the i v curve, while power optimisers do a similar panel-level job.
Which is better, MPPT or PWM?
While PWM systems are usable, PWM is tied much more closely to battery voltage, while MPPT can extract more power and improve energy harvest as conditions change. They're more efficient by up to 40% and perform better in shady lighting or cold weather. If all panels behave similarly, one inverter with one mppt can work well, but more than one mppt is better when arrays have different orientations or shading. That's why modern setups may use multiple mppts to maximise output.
Do I need an MPPT or inverter?
MPPT controllers and inverters serve different purposes, although an inverter may be part of either an off-grid or a grid tied system, and the MPPT function can sit in a charge controller, a string inverter, or module-level electronics depending on the setup. MPPT lets you optimally charge a leisure battery through solar power, while an inverter changes to 12V DC output your leisure battery produces into 230V AC to run household appliances from a mains plug socket. You'll want both technologies for the best off-grid set-up possible.
Do I really need an MPPT charge controller?
An MPPT charge controller is the only way to extract maximum charging capability from your solar panels in a wide variety of weather conditions. It’s especially worthwhile when roof space is limited or conditions are variable, because the panel’s most efficient point also shifts with factors like cell temperature. Under partial shading, more advanced tracking can also avoid settling on a local peak and instead find the global maximum. If you're heading off-grid and want to stay charged up for longer, invest in MPPT.