Designing your campervan layout is one of the most critical (and irreversible) bits of a van conversion. Appliances and decorations can always be juggled around, but core layout defines how everything else fits including wiring, plumbing, insulation, and furniture.
Get it right, and your van supports your lifestyle effortlessly. Get it wrong, and you’ll face daily frustrations and expensive mistakes that are hard to undo.

In this guide, we take you through the fundamentals of campervan layouts, from space planning and weight balance to movement and storage strategy.
You’ll also find breakdowns of popular layout styles, practical walkthroughs, and advice on how to choose a design that works for how you actually travel!
Understanding layout fundamentals
Effective van layouts aren’t about replicating someone else’s build. They’re about making the space work for you. That starts with understanding your lifestyle, how space gets used, and how to move through it efficiently.
Defining your vanlife priorities
Before thinking about furniture or appliance placement, start by asking the most important question: how will I actually use this van?
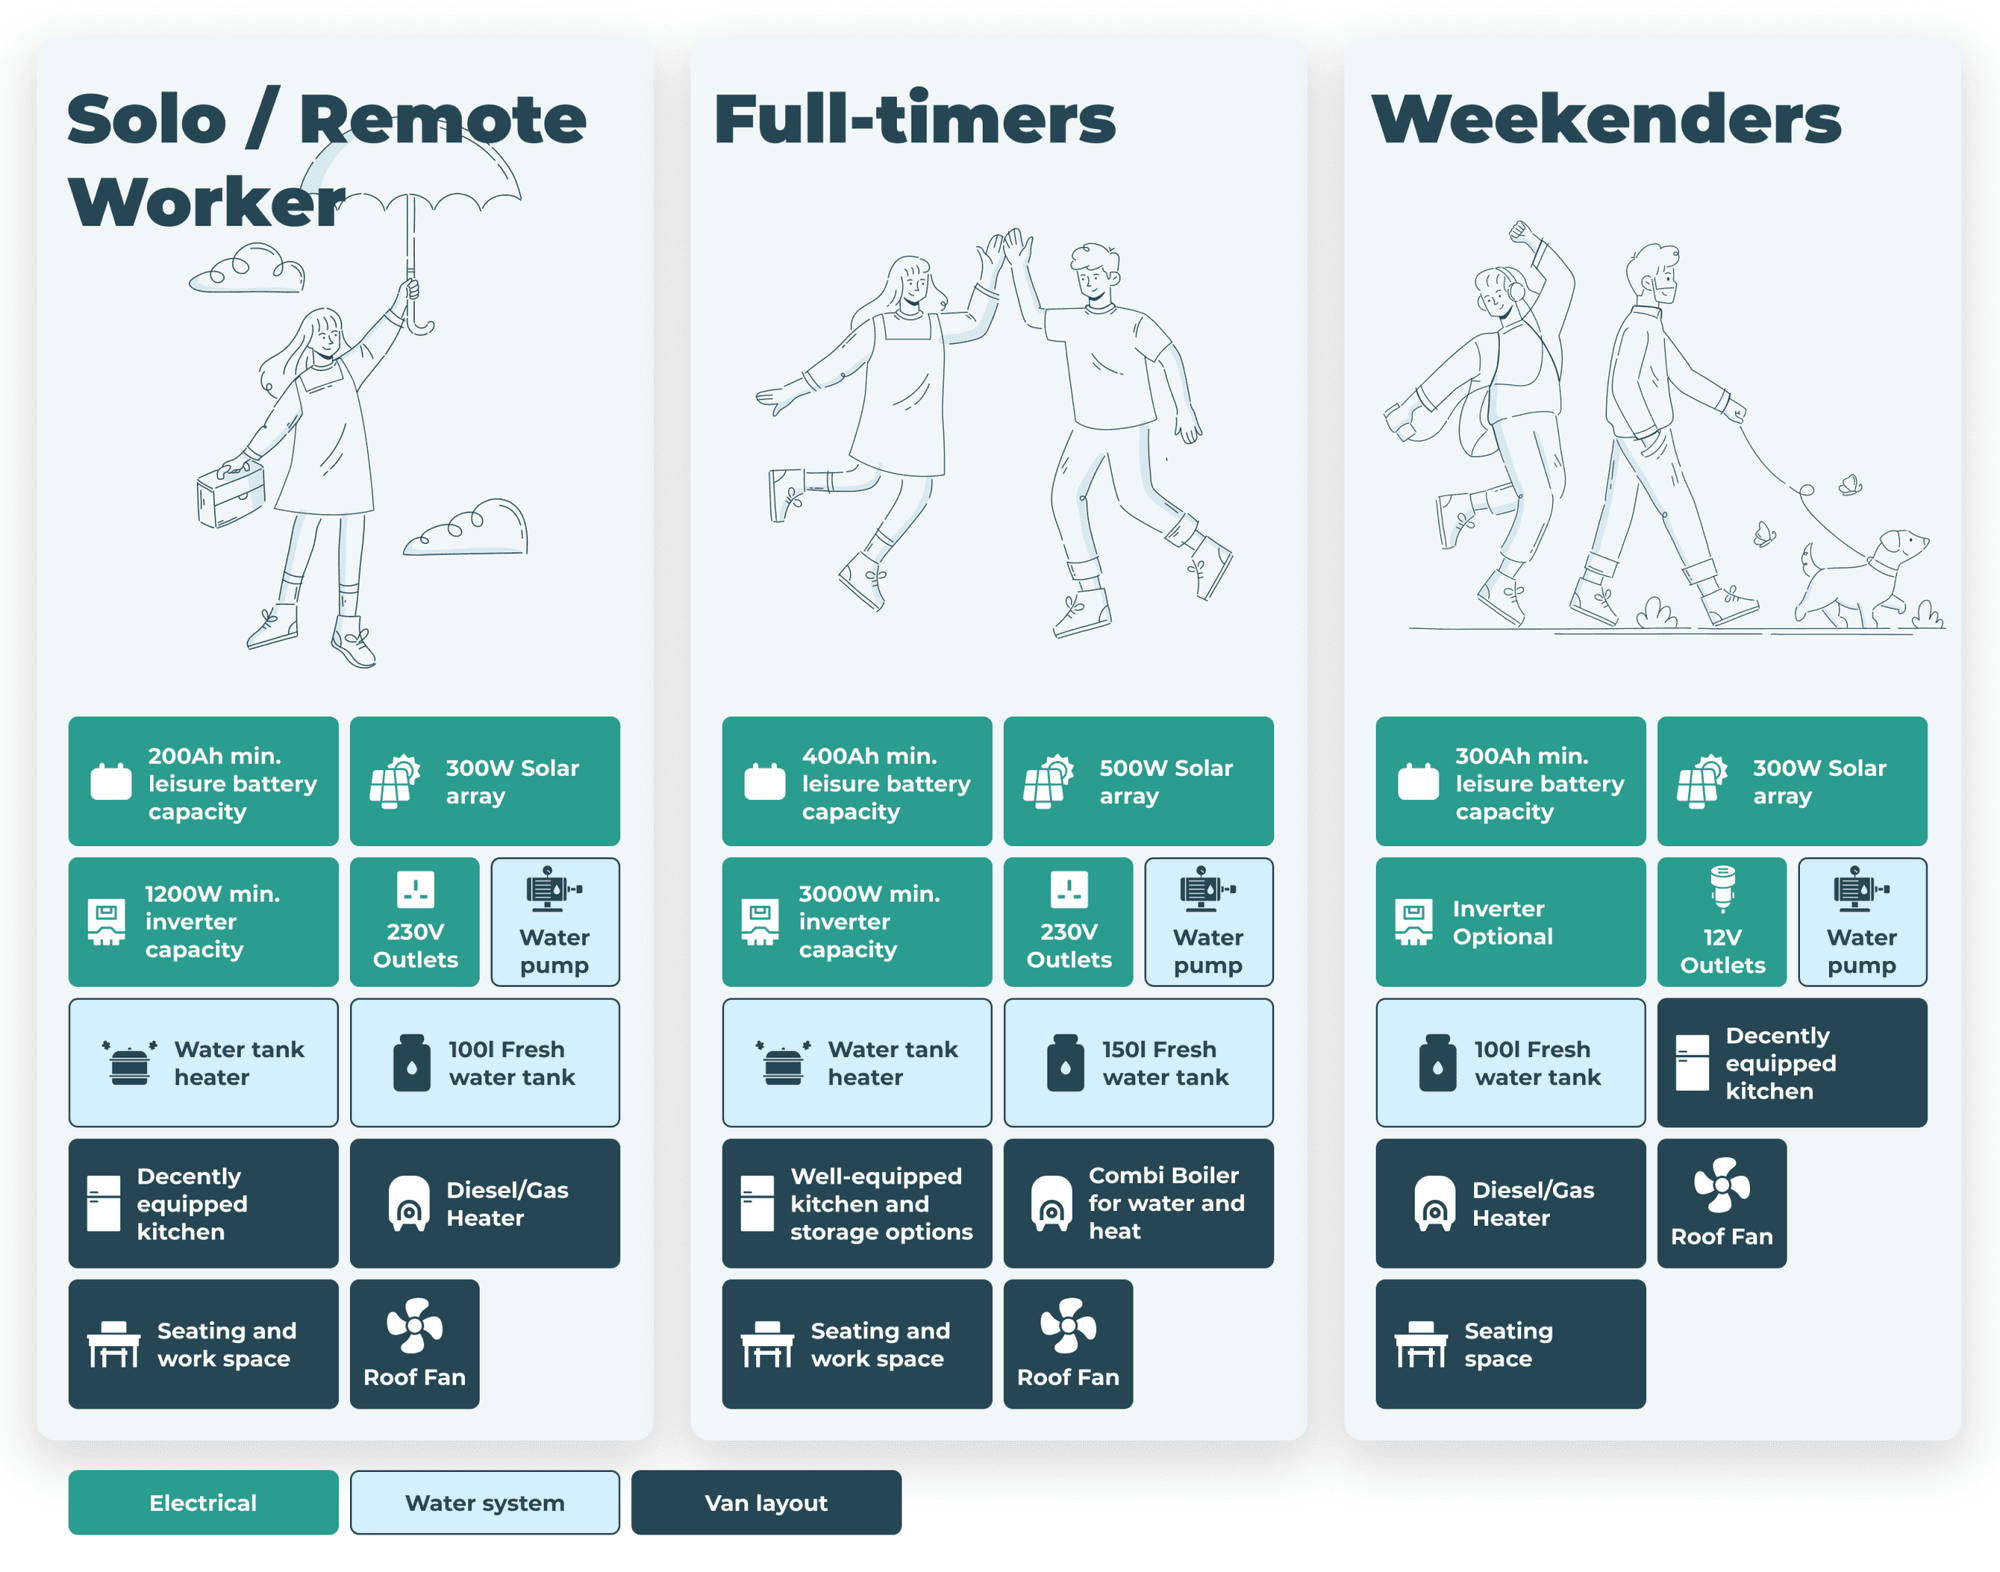
For solo travel, you’ll want a compact layout with flexible, open space. Couples usually need more seating, fixed beds, and gear storage. For family use, you’ll be looking at zoned areas, bunk beds, and enough floor space for multiple people (which usually means long wheelbase or XLWB vans).
The intensity of your use also matters. Full-time vanlifers should prioritise comfort, storage, and permanent beds. Weekend or part-time travellers might be able to get away with lightweight, modular builds that are easier to manage.
Some solid factors to think about include:
- Remote work needs: A desk or dedicated workspace should be non-negotiable.
- Off-grid setups: You’ll need space for large battery banks, water tanks, and solar.
- Hobbies or pets: Whether it’s bikes, dogs, or skis, these all impact layout and storage needs.
- Accessibility: Affects everything from door placement to walkway width and bed height.
Your lifestyle is the blueprint. Everything else should be built around it. If you’re just starting your journey, check out our full guide to UK Vanlife to see what four-wheeled adventures look like in real-world terms.
Living space vs. storage trade-offs
Trade-offs are inevitable when every inch of your van needs to serve a purpose. A fixed bed gives you garage storage, but costs interior space. A full galley kitchen means less room for seating. The trick is choosing what matters most.
A common misconception is that “open space” is inherently valuable. But in reality, floor space in a van is rarely used. What matters more is vertical volume above and below your usable zones.
If you travel with bulky gear, you’ll likely need a high garage and under-bed storage. If comfort is key, a larger lounge area might take priority. The smartest layouts don’t try to do everything; they make conscious trade-offs based on real-world needs.
Movement and flow
A well-designed layout doesn’t just fit, it flows. Movement matters more than most people think. Can you reach the fridge without moving a bench? Is the toilet accessible at night without disturbing your partner? Do kitchen tasks require constant rearranging?
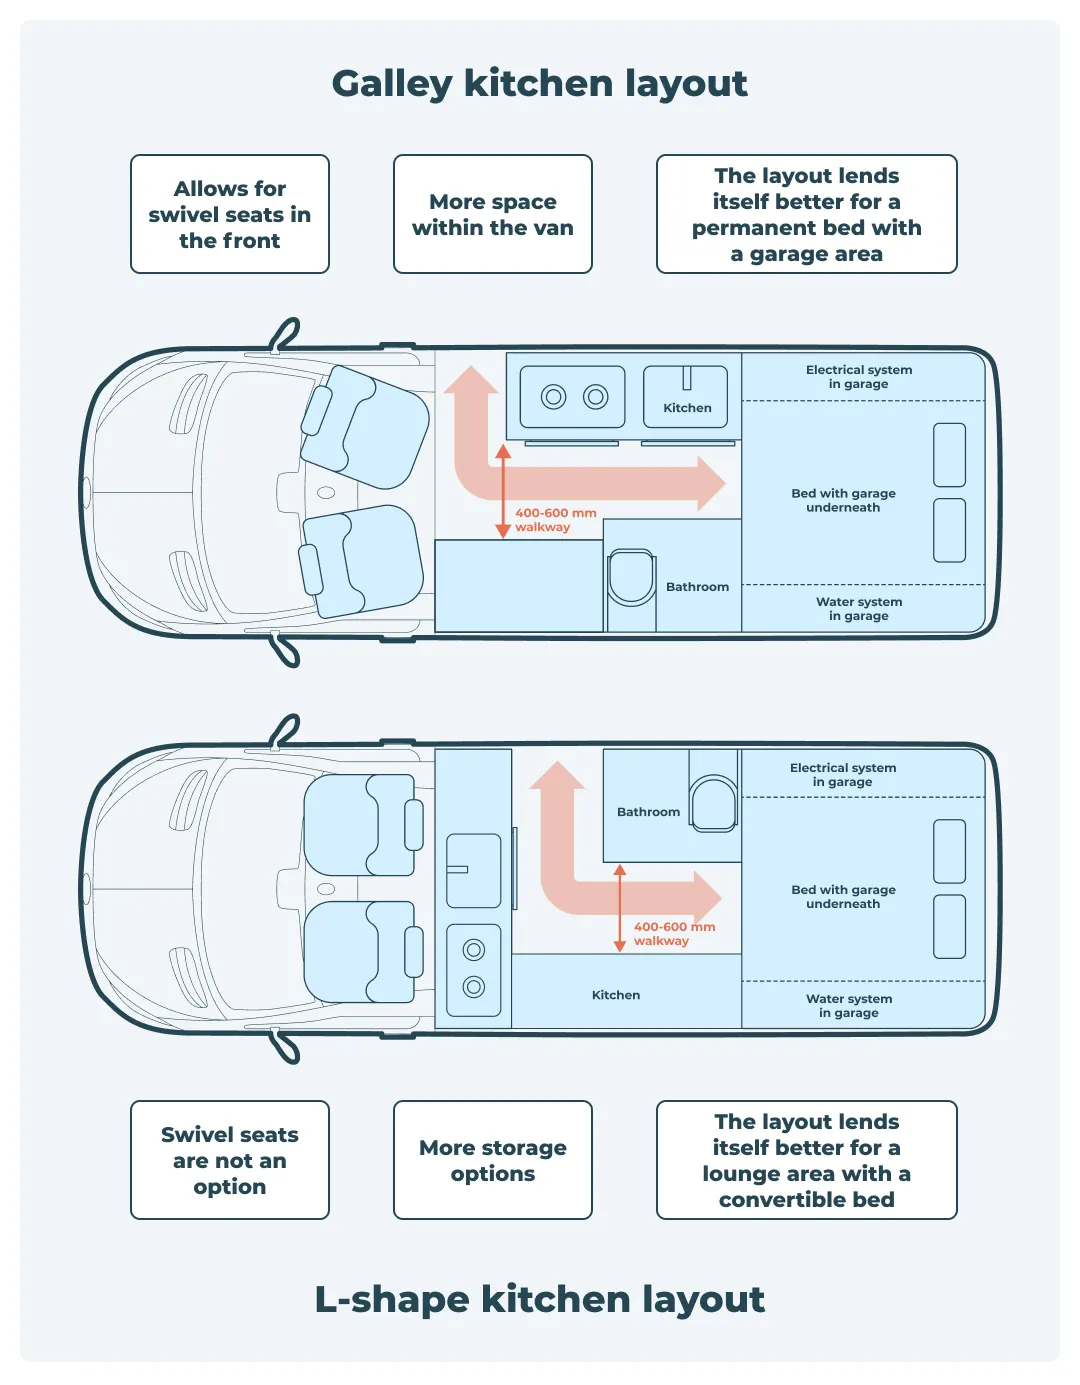
Ideal walkways are at least 400–600mm wide. Think about reach zones, transitions between activities, and how doors affect access. Side kitchens and aisle seating allow smooth front-to-back flow. L-shaped galleys feel open but can block pathways. Rear beds work well for space efficiency, but may limit access to the back doors unless you design around it.
Access points matter too. A toilet by the main sliding door might not be ideal. If your bed blocks garage access, consider adding a hatch or drawer system. In short: your van should work with your body, not against it.
Weight distribution
Layout is about more than just about comfort, it’s also about safe handling and legal compliance. Poor weight balance can cause tyre wear, suspension issues, poor driving dynamics, and even invalidate insurance or MOTs.
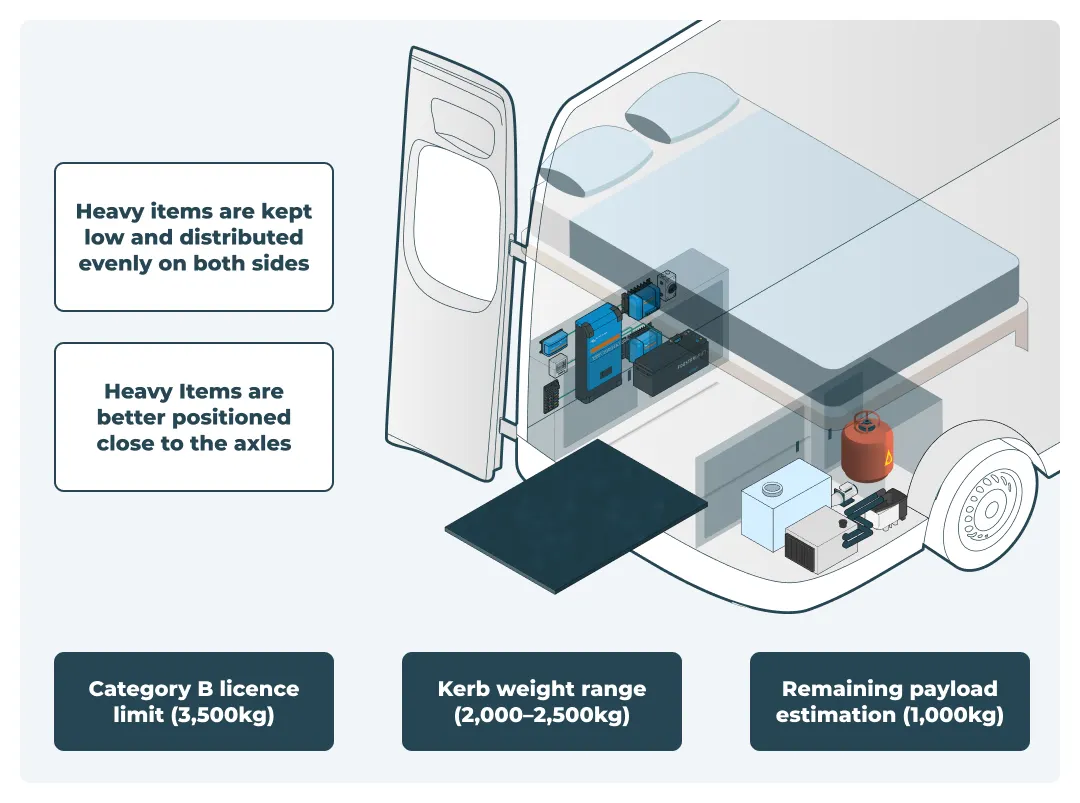
Key principle: keep heavy items low and over the axles. Water tanks, batteries, and gear drawers should never be mounted high or on one side. Asymmetry causes body roll, instability in wind, and stress on components.
Plan around weight:
- Balance appliances across both sides of the van
- Estimate weights during planning
- Use digital scales during installation to stay under limits
Most UK van conversions fall under the standard category B driving licence (limit: 3,500kg). A typical LWB van has a kerb weight of 2,000–2,500kg, which gives you around 1,000kg for everything else (gear, furniture, water, and electrics etc).
Being weight-conscious from the start will help keep you under this limit so you don’t have the hassle of different licensing and insurance classifications.
Layout planning tools
Even with a clear vision, turning layout ideas into a livable space is tougher than it looks. What works on paper can fail in reality due to movement bottlenecks or awkward dimensions. Testing your ideas before committing is essential.

Start with low-tech methods. Cardboard mock-ups and painter’s tape let you simulate van features inside the shell, giving you a hands-on sense of scale and usability. Walk through your campervan layout, test access to “zones,” and look for pinch points.
3D tools like SketchUp or Vanspace 3D offer virtual planning, letting you model furniture, storage, and appliances to scale. These programs are ideal for visualising overhead clearance, bed heights, and walkway flow, and they're also much easier to edit than plywood.
Just be aware that some of these tools do require a base level of understanding around software, so it might require some time investment to fully design every nook and cranny.
While we’re on the subject of natty online tools, we would be remiss not to mention Vunked’s online electrical system builder. No tech wizardry needed, simply input the appliances you want to run and for how long, and we’ll show you what a perfect electrical set-up would look like!
If you’ve already bought your van, it’s also worth spending a few nights using it in a stripped-back setup. Simple camping routines can highlight overlooked issues like reachability, ventilation needs, and storage blind spots before you start sawing.
Bed layout
We all need a decent night's sleep, and your bed will probably shape everything else in your layout. Since beds take up so much space, the type, orientation, and storage integration have major knock-on effects on kitchen, seating, and garage zones.
Fixed rear bed
Ideal for couples and full-timers, a fixed rear bed provides a no-hassle sleep setup and leaves space below for a garage. This under-bed zone is perfect for bulky gear like bikes, tools, or water tanks.
The downside? It dominates interior space, especially in smaller vans, and can make your van feel cramped unless you offset it with smart lighting or windows.
Convertible bed-dinette
Popular in SWBs or solo builds, convertible beds let your lounge become your bedroom. Usually based on U- or L-shaped benches, they convert via slats or tabletops.
These maximise space but require daily setup, which can become tedious. Comfort also depends heavily on cushion design and support structure.
Murphy and slide-out beds
These systems maintain open space by hiding the bed in a wall or under a platform. Great for MWBs or full-time travellers needing flexible interiors.
They demand stronger fixings, smart storage planning, and higher build precision. However, if you can pull it off, they offer a great middle-ground between comfort and space.
Transverse vs. longitudinal
Transverse beds (side-to-side) save space but can be tight for taller sleepers. Most vans offer ~170–185 cm of internal width, so anyone over 6ft may feel squeezed without flares.
Longitudinal beds (front-to-back) suit taller sleepers and couples but require longer vans or clever pull-out platforms. They generally feel more spacious and accessible.
Bunks and family sleeping
Bunks offer vertical sleeping zones, ideal for families or shared builds. Fixed or fold-down, they’re often paired with privacy curtains or soft dividers.
Consider headroom, ladder access, and weight balance, especially if you’re stacking beds over storage or kitchen units.
Bathroom options and considerations
Adding a bathroom gives you independence and comfort, but at the cost of space, weight, and ventilation complexity. Whether you skip it entirely or go full wet room, it’s a defining layout choice.
Bathroomless builds
Perfect for minimalists or weekend campers, bathroom-free layouts maximise interior space and reduce complexity. Relying on campsites or public facilities can work well, but it does limit off-grid range.
Portable toilets and hidden storage
Cassette-style toilets (like Porta Pottis) tuck under benches or into concealed cubbies. They’re compact, don’t require plumbing, and can be moved or stored externally. This makes them a solid hybrid option, but they do offer pretty minimal privacy and need regular emptying.
Toilet-only closets
Dedicated toilet closets strike a middle ground, offering more comfort without the complexity of a full shower room. Many include a handwash sink, towel hooks, and a privacy door.
Plan for proper ventilation and waterproof finishes. Roof fans and moisture-proof panels are also a must to stop the space turning gross.
Kitchen layout and cooking considerations
A functional kitchen shapes how you eat, store, and live day-to-day. A good layout balances safety, power and water access, ventilation, and usable prep space — all within minimal square footage.
You’ll also need to bear in mind that all electrical work in the kitchen area should comply with the BS 7671 Wiring Regulations, especially if you’re installing high-load appliances or combining AC and DC systems with an inverter.
Galley vs. L-shaped vs. split kitchens
- Galley kitchens line one wall and suit narrow vans. They support good movement flow and suit simple layouts.
- L-shaped kitchens wrap into the van interior, creating more counter space and storage. Best in LWB vans where floor space allows.
- Split kitchens place the sink and hob on opposite sides, giving you more prep area but requiring careful thought about traffic flow and usability.
Location in the van
- Sliding door kitchens are great for outdoor cooking and ventilation, but may expose your setup to rain or theft.
- Mid-van setups insulate the kitchen from exterior cold and offer better weight distribution, but need smart planning to avoid clutter.
- Rear kitchens free up central van space but compete with garage storage and can be awkward in bad weather.
Appliances and power demands
- Hobs: LPG is efficient but needs venting and proper installation. Induction is safer and cleaner, but draws heavy current, think 2000W inverter and large battery bank. Read our comparison here.
- Fridges: Upright fridges offer better visibility; drawer fridges save space. Consider airflow, access, and surrounding cabinetry. Learn more.
- Water systems: Plan sink placement around the water tank location. If adding a hot water system, factor in plumbing runs and access for maintenance. Learn more about water heaters.
It’s worth noting that while it’s not a legal requirement to have your gas system signed off if you’re only using the van yourself, it’s strongly recommended. Gas installations can be dangerous if done incorrectly, and under the Gas Safety (Installation & Use) Regulations 1998, anyone working on a gas system must be competent.
That means they have the necessary training, skills, and experience to carry out the work safely. If there were ever an issue or legal challenge, you’d be expected to prove your competence. For those planning to rent out their campervan, a gas safety certificate becomes a legal obligation, as you’re effectively a landlord.
In all cases, getting your system checked and signed off by a certified professional is a relatively inexpensive safeguard against major risks. You can find a qualified engineer via the Gas Safe Register.
Seating, dining, and workspace setups
In a small space, seating zones often need to handle multiple jobs, i.e eating, working, relaxing, and even sleeping. Designing this area well can massively improve comfort and daily flow.

Fixed bench and table
A fixed bench paired with a table is ideal for remote workers or full-time travellers who spend long hours inside. These setups often integrate storage below, add structure to the van, and support stable insulation around seating areas.
They’re less flexible in tight spaces but reward consistency and comfort.
Swivel seat setups
Swivels (driver and passenger) are a vanlife favourite, especially for stealth or micro builds. They let you reuse existing space, create instant lounges, and avoid the need for extra bench seating.
They work particularly well in short wheelbase vans or when paired with fold-out desks or Lagun tables.
Removable or collapsible tables
Wall-mounted drop-leaf tables or Lagun-style arms allow quick access to work or dining space, then tuck away when not in use. These are ideal for maintaining clear walkways and movement paths, especially in kitchens or near sliding doors.
Ensure stable mounting and use locking mechanisms to avoid collapse in transit.
Multi-use workspaces
Modern vanlife often requires laptops, charging cables, and concentration. Combining your dining area with a desk saves space but requires planning: add cable routing holes, storage for work gear, good lighting, and sound insulation if you’ll be on calls.
If working full-time, prioritise comfort: proper seat cushions, back support, and 12V USB-C charging points should be factored in from the start.
Storage strategy by zone
Smart layout planning is only half the battle. Effective storage integration is what transforms a functional van into a comfortable, liveable space. Every layout choice affects your ability to store daily essentials, gear, and utilities in a way that’s accessible, balanced, and safe during transit.
Each zone of the van offers different opportunities: under-bed spaces make excellent storage for bulky or seasonal items, while bench seating often hides tools, batteries, or water tanks. Overhead lockers can house clothing and pantry goods, and garage areas are ideal for bikes, recovery gear, or off-grid kit.
The most efficient layouts treat storage as an integral design element, not an afterthought. For a comprehensive breakdown of strategies by zone, including kitchens, bathrooms, lounges, and the cab, check out our full campervan storage guide.
Windows, light and ventilation
Beyond making your van feel open and airy, thoughtful window and lighting choices are essential for comfort, privacy, and safety. Light and airflow management can make the difference between a van that feels like a home and one that feels like a metal box.
Window placement and sizing
Window choice is one of the earliest layout decisions, as cutting into the van’s structure is permanent. Placement should balance light, airflow, and privacy. You’ll want windows in your sleeping and living areas to reduce claustrophobia and provide natural light, but too many openings can compromise stealth and insulation.
Front windows near seating or kitchen areas are great for light and visibility, while rear-side windows near the bed can feel too exposed unless carefully managed with blackout blinds, curtains, or thermal window covers. For winter builds, consider double-glazed or thermal-rated windows to prevent heat loss.
Side windows that open for airflow (typically with sliding or louvre mechanisms) are especially useful in kitchens and bedrooms, just make sure they’re lockable and flyscreen-compatible.
Skylights and roof vents
Roof-mounted openings are essential for managing heat, condensation, and smells, especially in compact layouts where cooking, sleeping, and sometimes washing all happen in a confined space.
Skylights over beds provide daylight and stargazing potential, while roof fans or vent hatches over kitchens and bathrooms are crucial for clearing steam and cooking fumes. Models like the Maxxair or Fiamma Turbo Vent combine air extraction with intake and often include rain covers so they can be used in any weather.
Ideally, roof ventilation should create a push-pull airflow system: one vent draws air out, and an open window allows cool air to flow in.
Lighting design
After sunset, your van should remain functional, warm, and inviting. That’s where layered lighting comes in: use task lighting for cooking or working zones, and ambient lighting for mood and relaxation. Adding dimmer switches and controlling different circuits by zone offers maximum flexibility.
12V LED strip lights are popular for their low power use, ease of installation, and ability to snake around awkward corners. Place them under cabinets, in footwells, or behind soft diffusers for gentle illumination. Add reading lights or switched downlights at beds or desks for better functionality.
For a deeper dive into lighting plans, check out our full 12V campervan lighting guide.
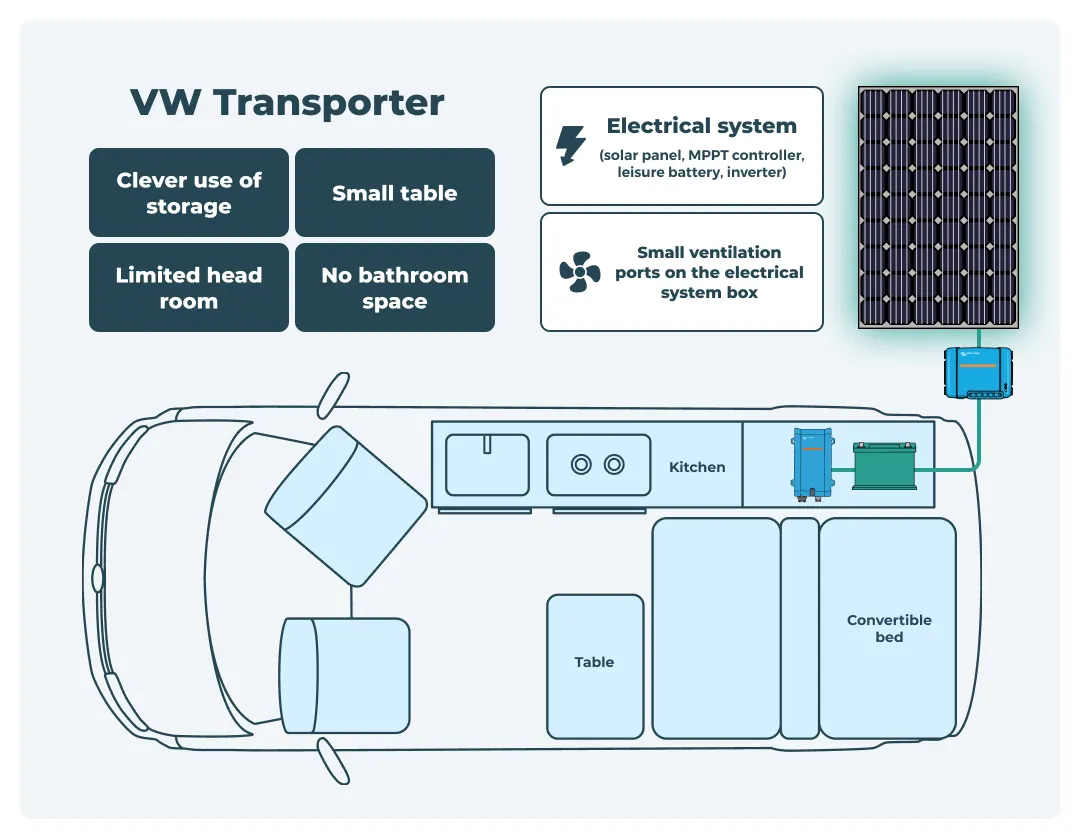
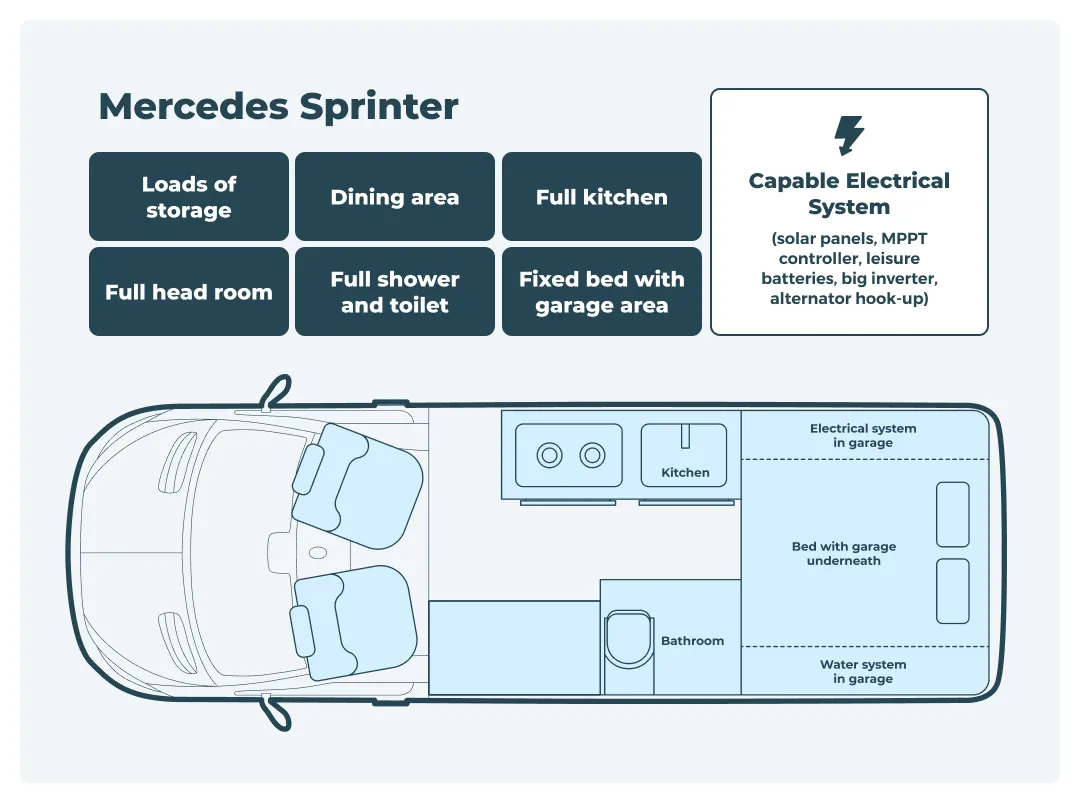
Campervan layout examples
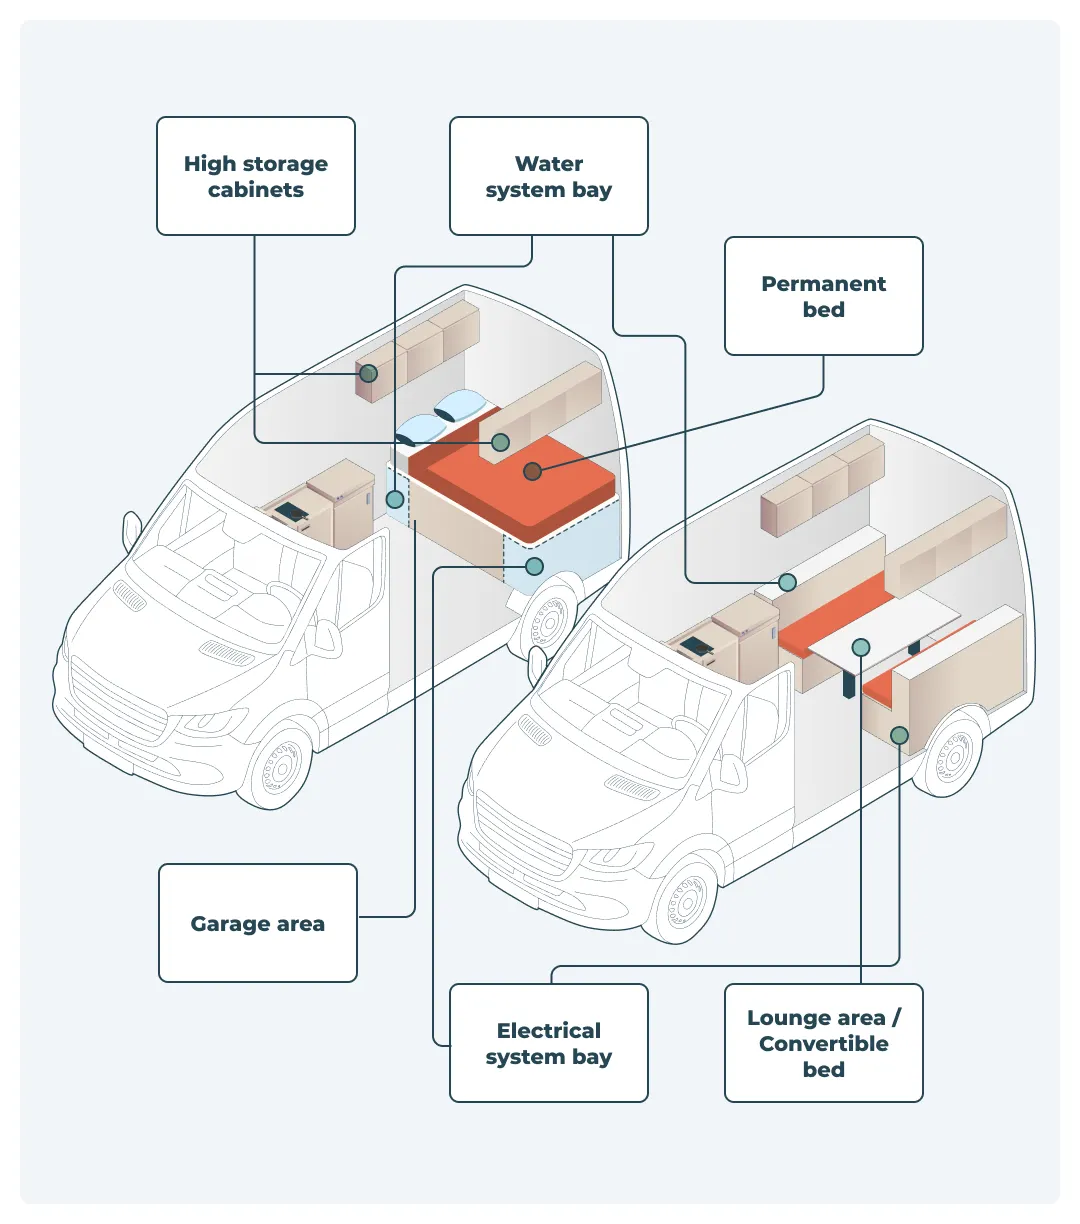
Designing your layout is one thing, but seeing it come to life in a real van is mega satisfying. Below, we’ve included three example layouts built around some of the most popular base vans, each tailored to a different style of travel.
These visuals highlight how core principles like bed placement, kitchen location, and storage strategy play out in practice, giving you a solid starting point for your own design.
VW Transporter
Mercedes Sprinter
Common mistakes and how to avoid them
A beautiful layout on paper doesn’t always translate into a practical, comfortable home on wheels. These are some of the most common errors we’ve seen and how to steer clear of them.
- Under-sizing the workspace: Remote workers often underestimate how much room, power, and lighting a comfortable workstation needs. Plan for storage, charging, and insulation up front if working from the van is a priority.
- Poor utility placement: Stuffing the fridge behind the bed, or hiding the toilet under four layers of storage, can make daily life frustrating. Ensure essential items are easy to access.
- Neglecting battery and tank placement: Water tanks and batteries are heavy and bulky. Don’t lock them into awkward corners where servicing is difficult and never cram them all on one side of the van.
- Ignoring weight balance: Unbalanced builds cause handling problems, premature wear, and legal issues. Always spread weight across axles and avoid heavy clustering in one corner.
- Overdesigning without flexibility: A van with every possible feature but no open floor space can quickly feel claustrophobic. Build in breathing room and leave options for future upgrades.
Campervan layout 101
Designing a campervan layout is where creativity meets constraint. Every decision you make, whether it’s bed style, storage type, window placement, affects how comfortable, functional, and sustainable your van will be in daily use.
Once it’s built, many of those decisions are particularly hard (or expensive) to undo.
That’s why realistic, experience-based planning is so important. The right layout isn’t just about squeezing in features. It’s about creating a space that supports your actual life on the road, whether that means working remotely, adventuring with kids, or weekend coastal escapes.