Living in a van requires a different mindset towards storage than you’re probably used to at home. Outside of inherently limited space, you need to consider the dynamics of a moving vehicle, as well as day-to-day comfort, accessibility, and safety.

(Nobody needs plates flying at them when they hit the brakes).
This sounds like an easy hurdle to jump on paper, but shoving things in cupboards and hoping for the best quickly gets irritating when you're living on the road, the realities of vanlife set in.
Conversely, truly clever campervan storage ideas can unlock space you didn’t know you had, reduce your overall gear load, and make your van genuinely feel like home.
We have seen roughly 1,625 van conversions (to date) so we have our fair share of genius storage hacks and questionable storage ideas. Here, we’ll cover the mindset you need to take towards storage while also providing a detailed breakdown for every area of your van, focusing on practical ideas that actually work in real-world builds.
Core storage principles for campervan conversions
Before you start knocking up expanding shelves that fold out into a helicopter pad, start with the planning stage. Designing with intent from the get-go is much easier than trying to retrofit later or realising there’s no space left for a crucial item you forgot about.

Let’s start with the basics: weight.
Weight distribution
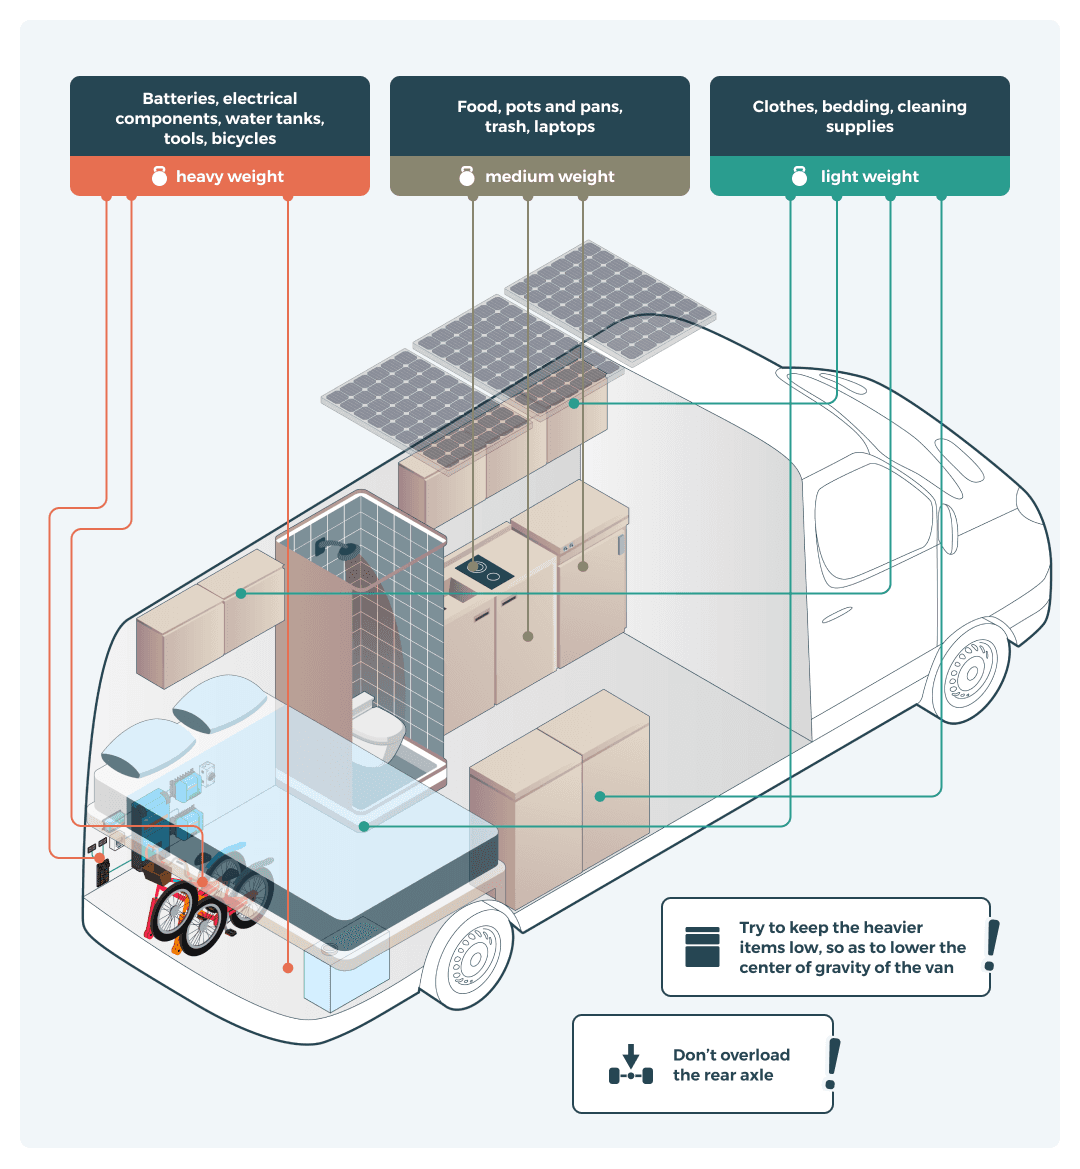
Now, you probably aren’t a motorsport engineer (it’s okay, neither are we), but there’s one core principle in vehicle design that’s the same whether we’re building a Formula 1 car or a campervan: the lower the centre of gravity, the better.
Physics is hard, so let’s imagine being on the top deck of a double-decker bus. Every time you turn a corner, you feel a big pull from side to side because of how far from the ground you are.
Now, imagine a double-decker bus with 30 people on the top deck versus 30 people on the bottom deck. It’s easy to visualise how the bus with 30 people on the top deck would topple over more easily than the bus with the lower CoG (centre of gravity).
That effect (though magnified) is the same as stacking heavy items high up in your campervan. It unbalances your weight distribution, affecting handling, MPG, and even things like tyre wear as you turn corners due to the higher forces placed on the outside of the tyres.
As a general principle, store your heavier items as low as possible, leaving vertical storage for lighter items like clothes and foodstuffs.
You’ll also need to consider your gross vehicle weight when planning your storage. A regular driving licence only covers a van weighing up to 3500kg in the UK. Any more than that and you’ll have to mess around getting a Cat B licence. It’s unlikely you should go over, but worth bearing in mind when cramming storage space into every nook and cranny.
In addition to day-to-day items, you’ll also need to think about equipment. Most modern campervans will have a complete electrical system, with components like batteries and inverters being rather hefty. Keep these down low and securely attached to the floor.
Batteries weigh roughly 1kg for every 10Ah of storage they provide. A 105Ah Fogstar battery weighs 10kg, which isn’t too bad, but for those looking to install an induction hob electrical system will need at least one 460Ah Fogstar battery and maybe two if looking to spend a lot of time off-grid. Two of those puppies will weigh 76kg so remember to lift with your legs!

To help out, here’s a handy list of popular vans, how much they can carry, how much they weigh when empty (kerb weight) and the resulting available weight.
Van (post-2015) | Max Authorised Mass (MAM) / GVW (kg) | Kerb weight (kg) | Payload available (kg) |
Citroën Relay (X290) | 3,500 | 2,000–2,520 | 980–1,500 |
Mercedes Sprinter (907/910) | 3,500 | 2,480–2,715 | 785–1,020 |
VW Crafter (2nd gen) | 3,500 | 2,360–2,620 | 880–1,140 |
Ford Transit (V363) | 3,500 | 2,080–2,380 | 1,120–1,420 |
VW Transporter T6/T6.1 (T32) | 3,200 | 1,950–2,210 | 990–1,250 |
It’s also a good idea to think laterally. Overweighting the rear of the van can impact handling as well since there’s less force pushing the front tyres into the road. This is especially relevant for rear-engined vans like the classic VW camper.
Speaking of storing things up high…
Verticality
While it’s important to maintain low weight distribution, you’ll need to think vertically to maximise the space available and live a comfortable life with everything you need accessible.
Depending on what van you choose, you’ll have varying degrees of verticality you can play with! Here are some rough numbers for internal space.
Roof code | Average Height (mm) | Height Range (mm) |
H1 | ~1,550 | ~1,410–1,660 |
H2 | ~1,960 | ~1,886–2,009 |
H3 | ~2,180 | ~2,125–2,243 |
Wall-mounted cabinets, shelves, or hanging nets are all ideal to unlock valuable storage without eating into your precious floorplan space. Ceiling nets, in particular, are a great way to store light but bulky items like blankets or clothing, and employing them uses an often wasted space to save valuable room in cabinets and boxes.
Material choice
Lightweight materials matter. Every kilogram added to your build eats into fuel efficiency and payload. This is crucial to remember in larger builds, as if your total weight exceeds 3500KG you’ll need to mess around getting a Cat C (C1) license to legally drive the vehicle.
Opt for lightweight plywood, aluminium framing, or even composite materials wherever possible as opposed to denser, heavier materials. For example, areas like draw fronts should be made as thin as is practical, and you can use extra thin lightweight ply for internal organisers.
Daily access
If you have to move three things to reach your kettle, you’ll resent it within a week. Everyday items that you use frequently should always be stored in the most accessible locations. For small essentials this might be near entryways or in the top drawer of a set — anywhere that requires little effort to access.
Conversely, it’s a good idea to reserve harder-to-reach spaces like under benches or in high lockers for seasonal or infrequently used items.
This can get tricky when you have multiple things that seem essential (as is often the case). A good place to start is to consider what you use most at home in daily life and work outwards from there, encompassing items critical to driving or life on the road.
Everybody has little vanlife doo-dads they couldn’t live without, so it’s also a good idea to talk to other members of the community and get a good understanding of what’s really essential.
Modularity and use
The more jobs you can get one thing to do, the better. Multi-purpose furniture like benches with lift-up lids or tables that double as a cooler are an amazing way to store more without expanding your layout. Do you really need a picnic table or could the table from your van clip out and be used outside? This isn’t practical for every item, but it’s worth analysing each area and seeing what can be made dual-purpose.
Also, unless you're living in your van permanently with no fixed address, you probably don’t need everything you plan on carrying all of the time. There might be sports and recreational equipment you only use sometimes, or even winter gear that gets shut away for 9 months of the year.
In these cases, having multiple identical copies of things like storage boxes in the garage at home can be a great way to quickly swap things out. Since they're the same size, they’ll slot into the same spaces, and it can be a great way to reduce redundant weight at any given time.
Movement and safety
Unless your house is cursed, you never need to worry about items rattling around in drawers or plates flying off of shelves, but in a moving vehicle, these problems can range from annoying and loud to downright safety hazards.
Anything loose needs to be securely stored while you’re driving. Elastic webbing, tie-down points, and even bungee cords are all ideal to keep things in place, and you can also look at adding anti-rattle tape or padding to metal fixtures or dividers to reduce the effect of vibration and movement even more.
Similarly, you’ll need to think about the storage spaces themselves as moving items. Latching mechanisms are essential on any drawers or cupboards to keep them from clattering and opening as you turn corners.
So, we’ve covered the basics and some solid best practices. Now let’s look at some clever campervan storage ideas for each area of your build.
Campervan storage ideas for kitchen and food
Your kitchen is likely to be one of the most storage-intensive zones of the campervan. It’s a small area, and you’ll need to maximise the room available to store food, appliances, cookware, utensils, and more.
To work freely, you’ll need layered storage options that align with your cooking habits and the space available.
Drawer and cabinet planning
Start with deep base drawers for heavy cookware and bulkier items. Soft-close runners are a must in a moving vehicle, as they reduce wear and stop drawers from flying open on bumps. Integrate heavy-duty latching handles or positive-locking mechanisms for road safety.
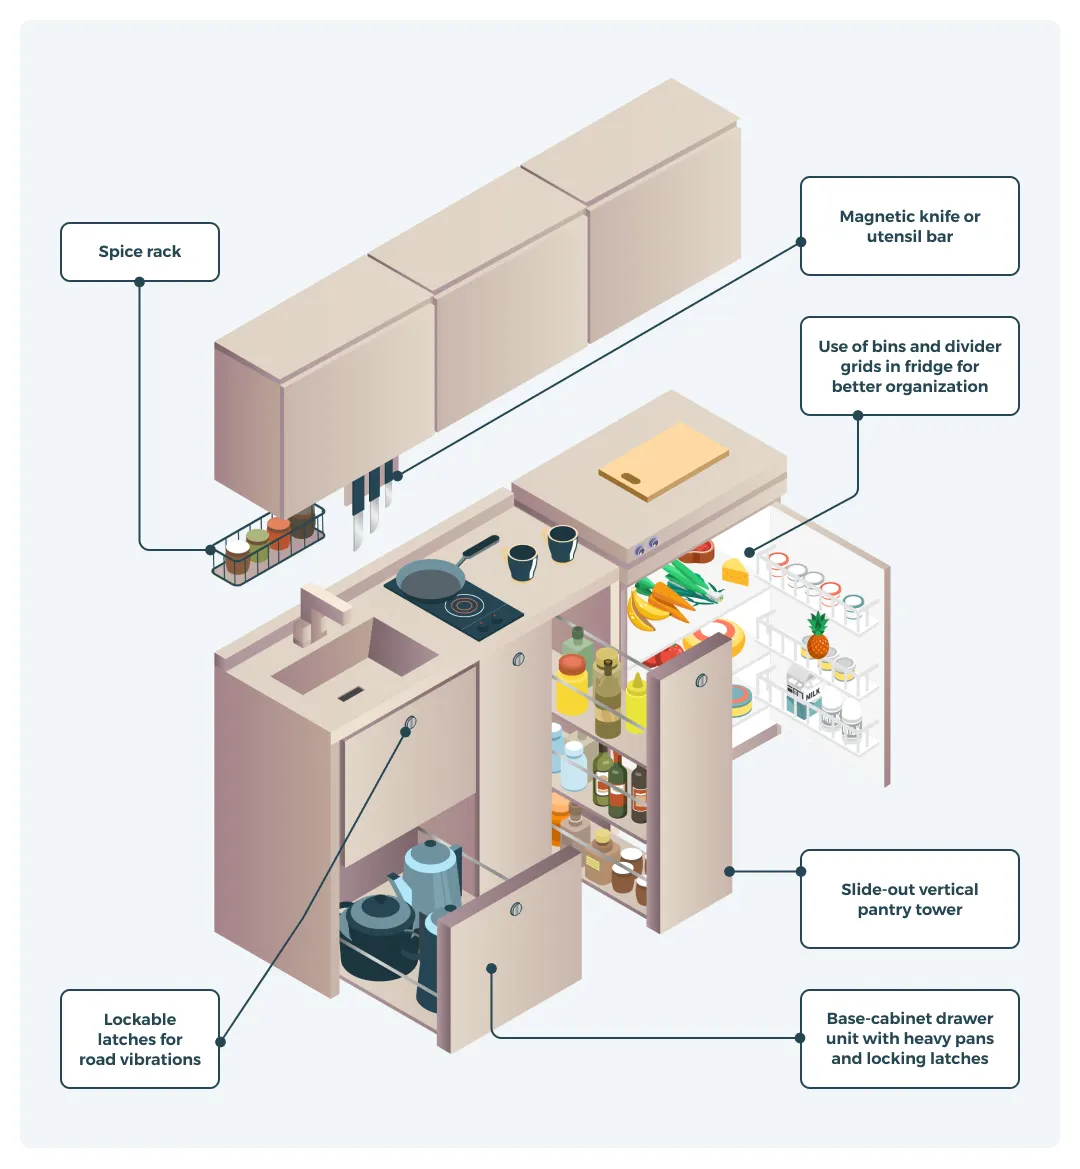
Consider vertical drawer units (like slim pull-outs beside the cooker) for narrow items like chopping boards, baking trays, or spice racks. These can be built into otherwise wasted nooks.
Use dividers to separate categories: i.e pans from lids, and cutlery from cooking utensils. Foam inserts or adjustable wooden sections can stop rattling and make every item easier to grab.
Upper cabinets work well for lighter items like mugs, Tupperware, and dry food. Just make sure you add gas struts or magnetic catches to keep doors closed while driving. Don’t overfill upper units to avoid shifting weight or awkward unloading.
Pantry systems
Slide-out pantry towers offer one of the best ways to store dry goods in a small footprint. These vertical units use a narrow cabinet width but multiple layers of pull-out shelves which are ideal for pasta, tins, and snacks. They're especially useful in galley-style kitchens or beside fridges.
Overhead cabinets make good use of vertical space for lighter pantry items. Stackable baskets, collapsible containers, or soft bins help you avoid food avalanches every time you open a door.
Magnetic spice racks can attach to any spare metal surface or be built into cabinet walls. Magnetic jars or tins keep things tidy while using otherwise wasted wall space.
Don’t forget hanging storage: collapsible mesh baskets or bags can hold fruit and veg that don’t need refrigerating and free up valuable cabinet space.
Fridge and cold storage
Regardless of whether you use a chest-style or front-loading fridge, internal organisation is key. Use stackable silicone containers to create layers inside the fridge and avoid dead space. Vacuum-sealing leftovers or bulk foods also saves volume and prevents smells.
Designate zones in the fridge: meats, dairy, leftovers, snacks. Using fridge bins or plastic baskets creates physical boundaries so items don’t shift during driving. For chest fridges, stacking dividers or hanging shelves are particularly useful to avoid digging through layers.
Soft mesh hanging baskets above or beside the fridge can hold bread, avocados, or produce that does better outside the cold without taking up valuable counter space.
Consider fridge accessibility too. A slide-out drawer or pull-out platform makes it easier to reach inside top-opening models, especially those mounted low.
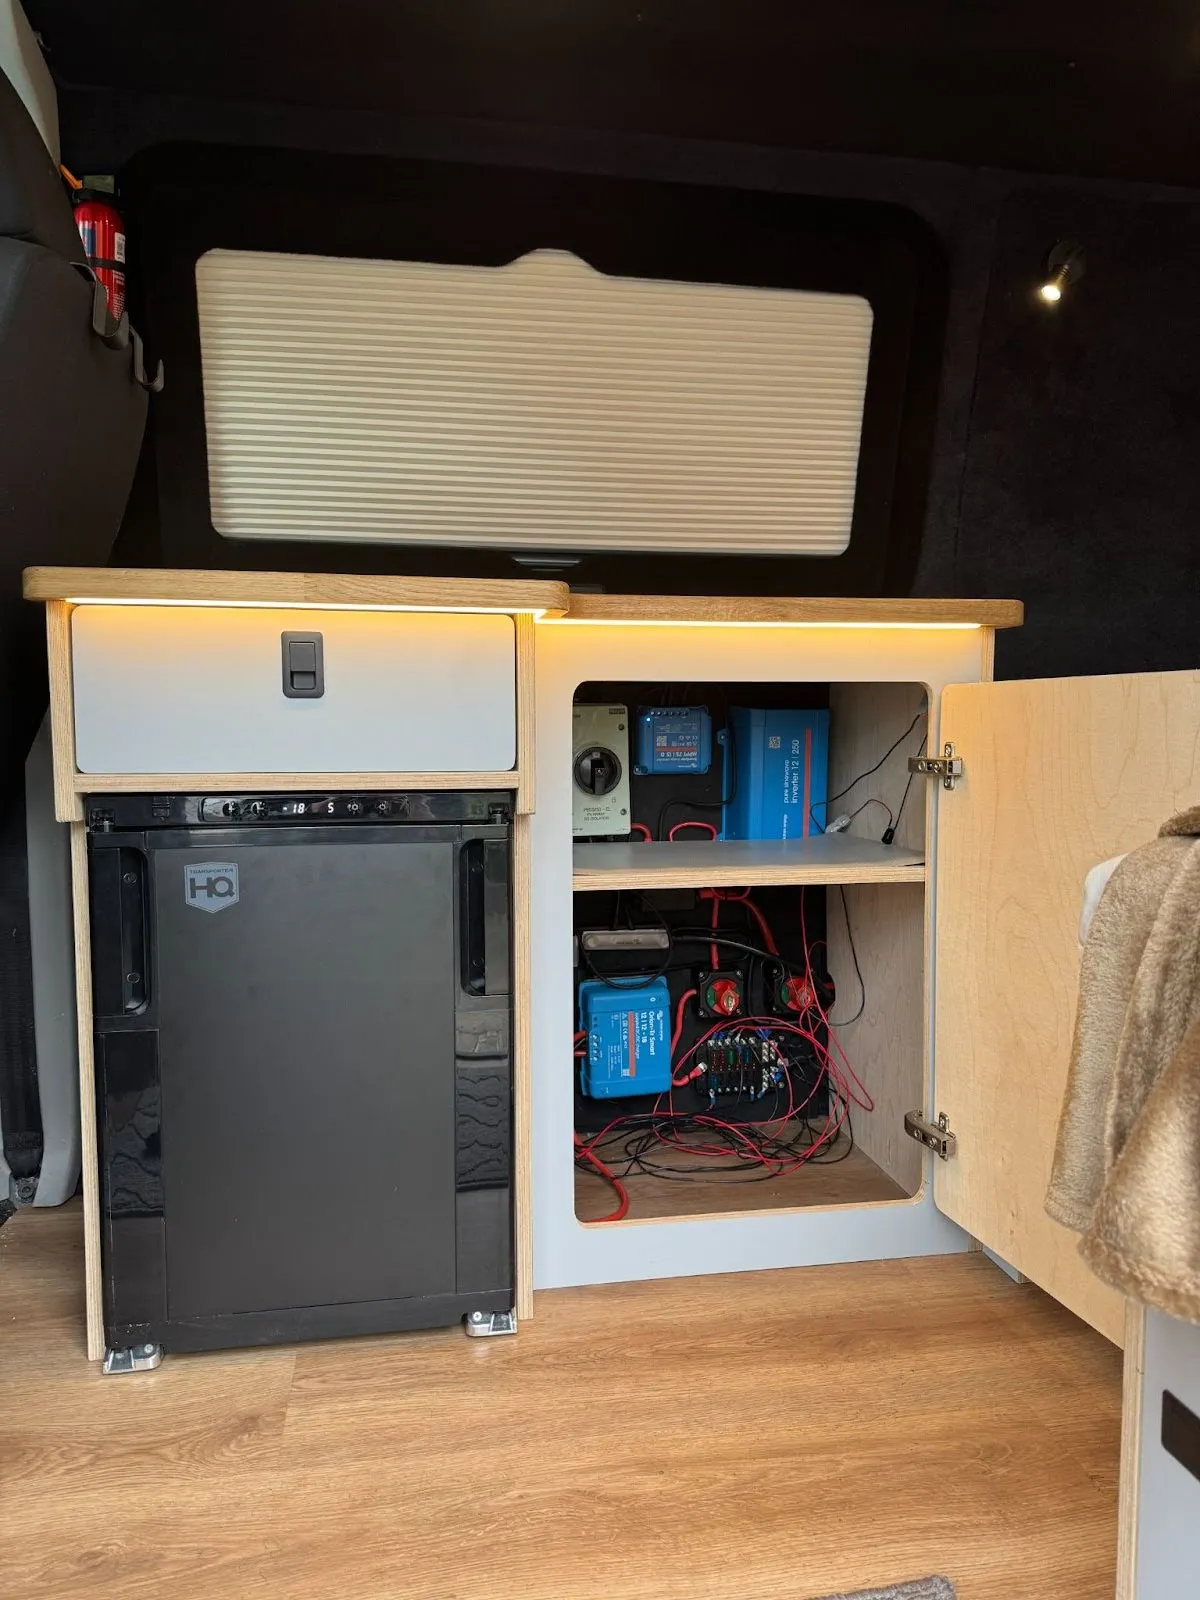
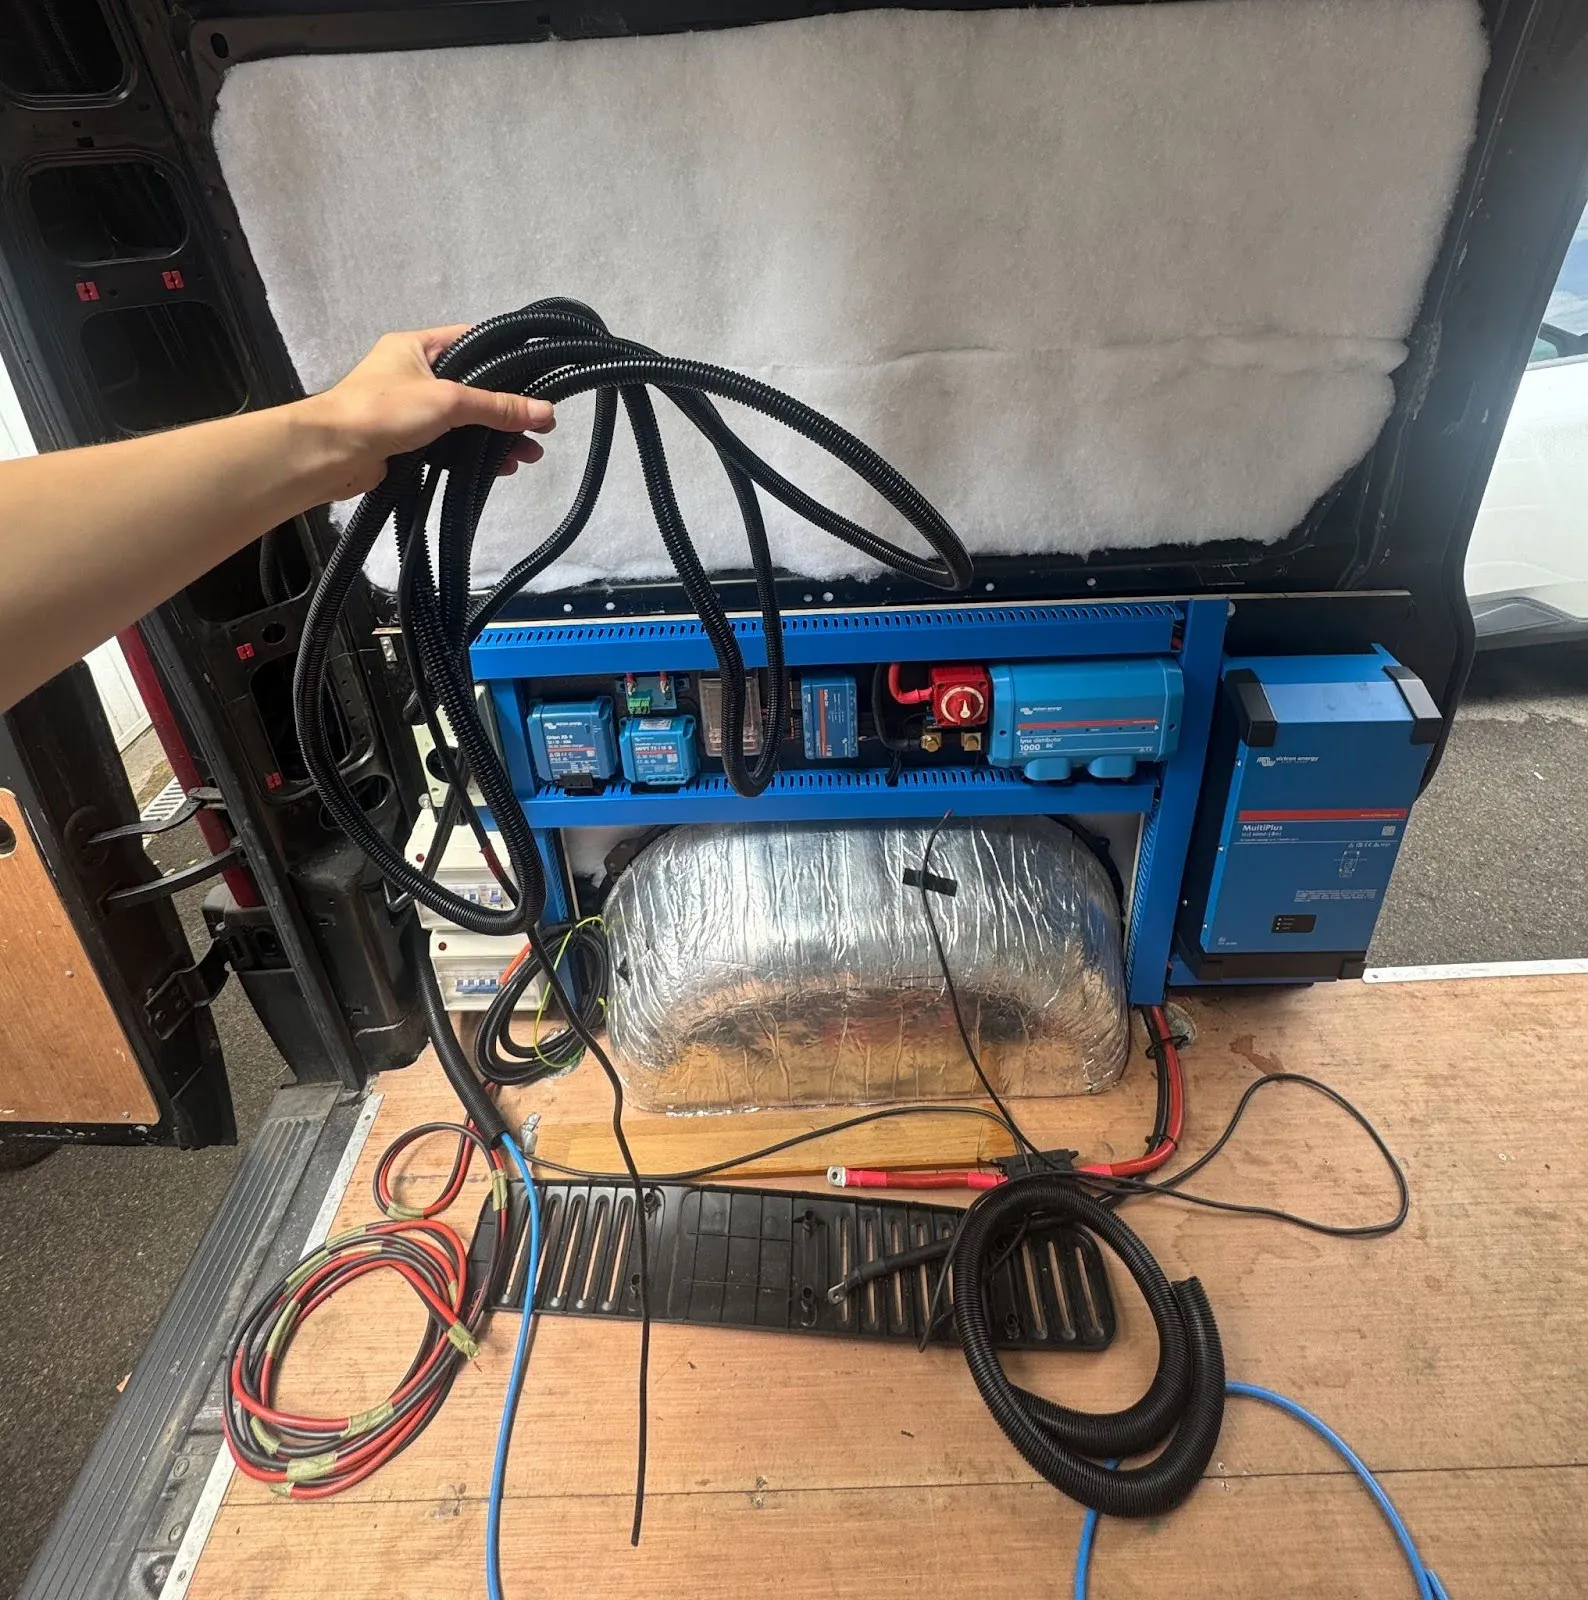
Remember, there's no hard and fast rules, it's all about building a solution that works for you. One creative customer in https://www.instagram.com/joexplorez/ used their kitchen cupboard space for easy access to their electrics!
Cooking equipment
Cooking gear takes up more space than you think, especially things like pots, pans, and utensils. Invest in nesting cookware sets that stack neatly into one another. Collapsible bowls and silicone colanders also save space without sacrificing functionality.
Magnetic strips or pegboards mounted on splashbacks or cupboard walls are excellent for storing metal utensils and knives and they also keep tools within arm’s reach while you’re cooking. Just make sure the magnets are strong enough to hold items during transit!
Drawer inserts or adjustable bamboo dividers keep knives, cutlery, and gadgets organised. Avoid tossing everything into a single drawer. This wastes time, makes noise while driving, and leads to damage.
If you carry bulkier appliances like a blender or coffee grinder, build specific cut-outs or storage compartments that stop them from moving in transit.
Campervan storage ideas for bathroom and toiletries
If you’re building a standalone bathroom, it’s usually one of the smallest and most awkwardly shaped areas in the whole campervan. Whether you go for a full wet room or a compact toilet cubby, clever storage is key to keeping this space clean, organised, and functional. Everything needs to be moisture-resistant, securely stowed, and easy to access in tight quarters.
Shower and wet room storage
Storage in a wet room needs to survive both steam and direct water exposure. That rules out most wood and many fabric organisers, making stainless steel or plastic the materials of choice. Plastic is usually lighter and cheaper, but often not as durable.
Wall-mounted baskets or caddies with drainage holes are essential for holding shampoo, conditioner, and soap. Mount them high enough to avoid standing water but low enough to reach easily. Some van builders embed these baskets into shower wall recesses to avoid protrusions and improve waterproofing.
Mesh pouches or waterproof zip bags can be mounted to the walls or ceilings with suction hooks or adhesive clips and they’re ideal for storing razors, loofahs, or travel bottles. Behind-panel cavities can also be used to hide dry-bag storage for less frequently used items.
If you're building your own shower space, you can also check out our hot water guide for a full rundown of the different technologies available and which is right for you.
Toiletries and daily-use items
For day-to-day grooming supplies like toothbrushes, razors, and skincare, keeping things dry and accessible is critical. Wall-mounted holders are excellent for toothbrushes, keeping them upright and ventilated. Silicone or magnetic mounts can be added to tiles, walls, or mirrors.
Hanging toiletry kits with built-in compartments work well in small spaces. These can be hung from towel rails or hooks and easily removed for use outside the van or in campsite showers.
If your van includes a small vanity or sink, micro-drawers or tilt-out bins underneath can store small bottles, floss, creams, and other essentials. Labelled organisers help reduce rummaging and spillage.
Laundry and dirty clothes
Dirty laundry is one of the most annoying space hogs in a campervan, especially if left to pile up. Integrating smart laundry storage avoids mess and makes laundry day simpler.
Tilt-out hampers or under-sink pull-outs allow you to stash clothes discreetly. Collapsible laundry baskets made of silicone or fabric save space when not in use and can double as shower totes or storage bins.
Some vanlifers use removable laundry bags that attach via Velcro or clips to the inside of closet doors or the backs of seats. Others opt for under-seat laundry storage: a hidden compartment beneath a bench seat or within a step can house a hamper that slides or lifts out.
Bedroom and clothing campervan storage ideas
Whether it’s a fixed bed, fold-down setup, or convertible seating, your ‘bedroom’ is often also your wardrobe. That means bedding, seasonal clothing, and accessories all need to fit in a tight footprint without making your sleeping space feel cramped or cluttered.
Under-bed storage
The space underneath fixed beds provides one of the largest single storage zones in a campervan. This “garage” can then be divided into sections or used for sliding drawers, bins, or trays.
Pull-out drawers are ideal for everyday items like shoes, tool kits, or pantry overflow. Ensure the drawers are built on solid runners and include latches to prevent accidental opening in transit.
Sliding trays can help organise long items such as snow boots, yoga mats, or folding chairs. Use partitioned trays to keep things in place during bumpy rides.
For larger items like off-season clothes, extra bedding, or sports gear, use vacuum-seal bags or stackable crates. If you plan to access these often, consider installing rear-door access drawers or a lift-up bed frame.
Wardrobe and folded clothes
Storing clothes requires a balance of foldability, accessibility, and organisation. Modular cubby systems or open shelves divided by vertical panels are perfect for storing packing cubes or fabric boxes.
Packing cubes help segment clothing by type (e.g. tops, underwear, workout gear) and prevent drawer chaos. They can be lifted out entirely to access specific items, and their shape prevents dead space in closets.
If your layout allows, install a small hanging rail behind a bulkhead or inside a wardrobe for wrinkle-prone garments. Alternatively, use vertical hanging organisers that fold flat when not in use.
Overhead lockers in areas like above the bed are great for lighter garments, hats, scarves, or accessories. Just make sure they’re secured with strong latches and gas struts to prevent surprise door swings mid-journey.
Bedding and blankets
Duvets, pillows, and blankets are bulky by nature. If you’re not using them daily (like spares for guests or seasonal swaps) then vacuum storage bags are a massive help. They compress to a fraction of their original size and protect from moisture and dust.
Dedicated compartments under the bed, in-wall cubbies, or inside bench seating are ideal for storing bedding. Even overhead lockers can be used for pillows or folded throws if sized correctly.
Some vanlifers build hidden compartments within fold-down beds or sofa frames to store linens and spare covers, keeping them accessible but out of sight.
Campervan storage ideas for living space and lounge
The lounge or seating area of a campervan pulls double duty. It’s your office, your dining room, and your relaxation zone. That means a wide range of storage needs: laptops, work supplies, board games, magazines, craft projects, cables, and cushions all need a home.

Bench seating and sofas
Bench seats are prime real estate for hidden storage. Install lift-up seat lids with strong hinges and gas struts for easy access. Divide the interior space using wooden or fabric partitions to separate gear and avoid rattling in transit.
For larger builds, rear-access drawers can be built into the bench base, letting you pull items out from inside or outside the van. This is perfect for storing shoes, outdoor gear, or utility items like tools and cables.
Table and workspaces
Most vanlife work setups are compact, but that doesn’t mean they can’t be smart. Install slide-out laptop trays beneath countertops or drawer lips, offering a quick way to transform your galley into a workstation.
Wall-mounted fold-down tables (like Murphy desks) are great space savers. Behind the folding panel, include slim shelves for notebooks, chargers, or stationery. Magnetic closures or friction stays help them stay put while driving.
Books, games, and hobbies
If your idea of vanlife includes evenings with books, sketchpads, or board games, you’ll want secure but accessible storage options.
Install shelf ledges with elastic cords or netting to stop books from falling during motion. Wall-mounted magazine racks or flexible hammocks are great for light reading materials.
Multi-functional ottomans with internal cavities can store knitting supplies, cards, or journals. These also work well as spare seating or footrests.
Campervan rear garage storage ideas
If your van has a rear-mounted fixed bed or high platform at the back, the space underneath is often called the ‘garage’. This is usually the single biggest enclosed storage space in the van and is ideal for adventure gear, bulky equipment, and other items you don’t need to access often.
Rear garage
A well-designed garage starts with modularity. Stackable crates or slide-out drawers mounted on heavy-duty runners make accessing stored gear far easier, especially when reaching from the back doors.
Many vanlifers build custom drawer systems sized to common storage containers like Euroboxes or folding bins. These can separate items like shoes, sports equipment, recovery gear, and laundry.
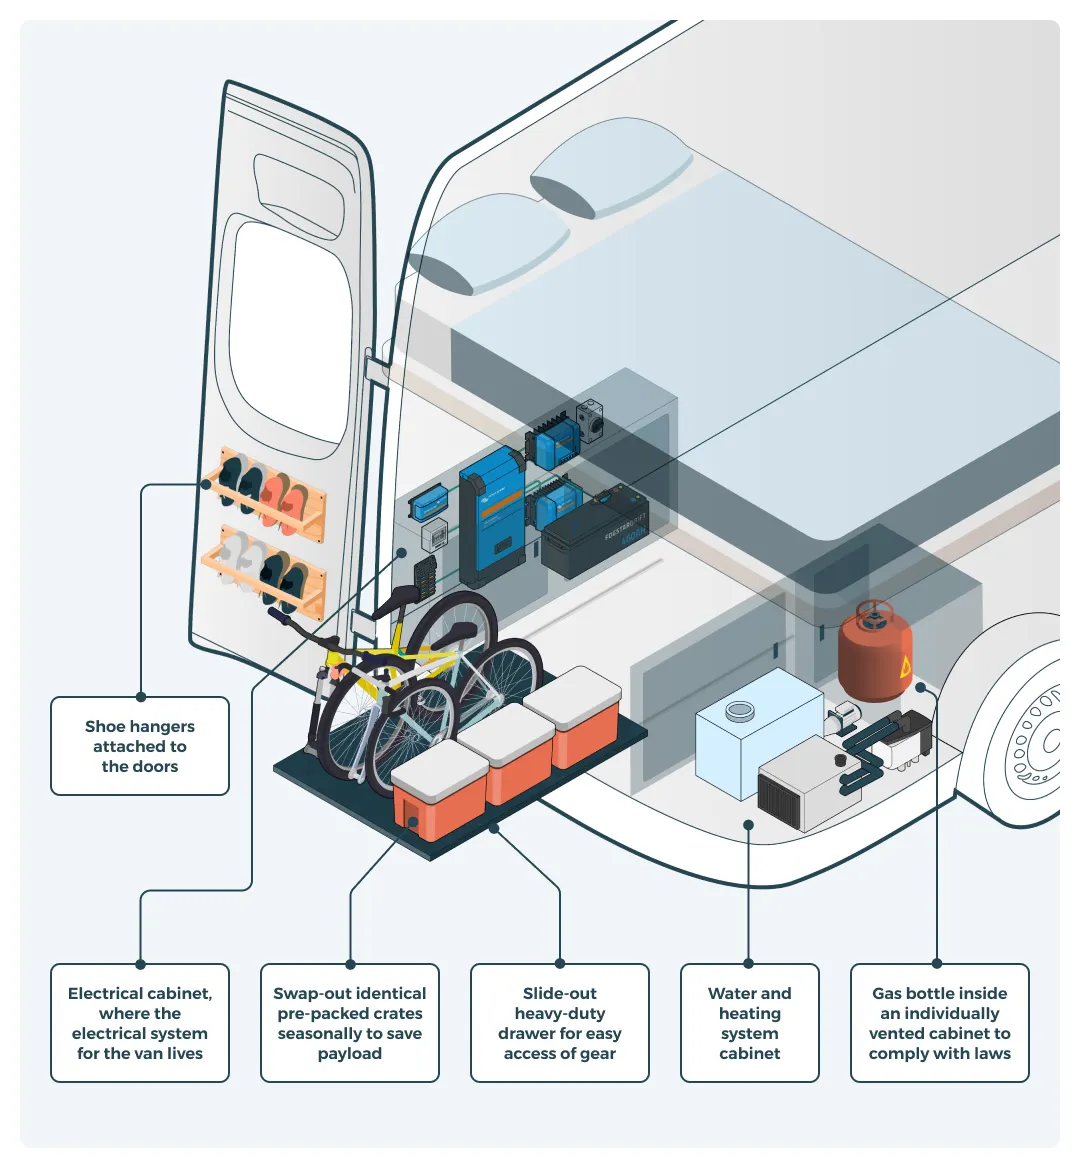
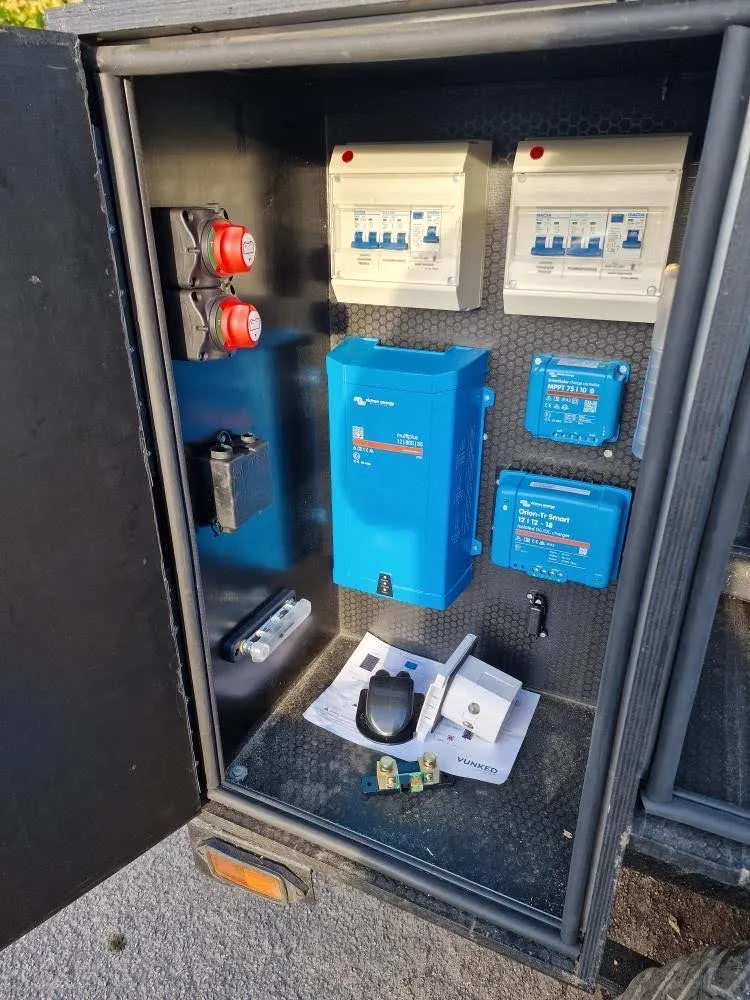
If you’re building a van with a modern electrical system, the garage is usually also the best place to house key components such as:
- Inverters
- Battery chargers
- Solar charge controllers (MPPTs)
- Distribution systems
- Busbars and fuses
- Leisure battery banks (AGM or lithium)
These components are usually expensive so it’s crucial to look after them. Mount on fire-retardant boards and ensure items like inverters have plenty of ventilation. Use labelled wiring, secure all connections, and route cables using routing clips to keep everything neat and tidy.
https://www.instagram.com/jourdaninthemountains/ is a great example of how to install one of our Vunked campervan electrical systems. Installed across the back wheel arch, on a fire-resistant board, with trunking. Looks very neat indeed if you ask us!
If you don’t have these components yet or plan on buying them bit-by-bit it can be difficult to gauge how much space they’ll take up.
Vunked supplies complete industry-leading kits that include everything you need to self-install, including components, solar, wiring, connectors, and even detailed fitting instructions and wiring diagrams.
Check out our complete electrical systems for everything from the budget Nomad Basecamp all the way up to our premium Overland Explorer kit.
Roof racks and boxes
If you need additional storage, your van's roof offers valuable real estate that’s perfect for bulky or lightweight items that can handle exposure to the elements. Lockable hard-shell cargo boxes offer weatherproof protection and security for items like tents, tarps, or winter clothing. Soft roof bags are another option, especially for light gear that can compress.
Mount recovery boards, traction pads, or shovels directly to the side or top of a cargo box using clamps or MOLLE-style brackets. Ski racks and surfboard cradles can also be added if seasonal gear is part of your lifestyle. Just keep in mind that roof storage adds weight up high, so balance carefully.
External utility storage
For builds that frequently involve wild camping or off-grid setups, exterior-mounted utility boxes are incredibly useful. Secure lockboxes fitted to tow bar receivers or rear bumpers can house tool kits, power cables, levelling blocks, and pegs, keeping them separate from living gear and easily accessible without entering the van.
https://www.instagram.com/wilson_the_90/ even installed their electrics in external storage on their off-grid trailer - very cool.
Dedicated gas lockers, particularly for propane cylinders, are required by safety regulations in the UK. These should be vented to the outside and fully sealed from the living space.
For self-built campervans you should build the locker to BS EN 1949:2021 (gas systems in leisure vehicles). In the UK, Liquid Gas UK CoP 32 (which supersedes NCC CoP 306) is the practical guidance many engineers follow.
Condensed gas-locker checklist for UK campers
- Build to BS EN 1949:2021 (+ Liquid Gas UK CoP 32 guidance).
- Gas-tight to the living area — only vents to outside; seal all penetrations.
- Low-level vent: free area ≥ 2% of locker floor & ≥ 10,000 mm².
- If you use both high & low vents: each ≥ 1% & ≥ 5,000 mm².
- Quick calc: min_low_vent_mm2 = max(0.02 × floor_mm2, 10000).
- If you use both high & low vents: each ≥ 1% & ≥ 5,000 mm².
- Door lip (upstand): ≥ 50 mm above locker floor.
- Cylinders: max 2 × 16 kg, strapped top & bottom, removable without tools.
- Regulator 30 mbar in the locker; after it, rigid copper/SS pipework only.
- No unprotected electrics inside; any necessary wiring in sealed conduit.
- Accessible & lockable: easy reach to valves, straps, regulator.
- External LPG warning label on the locker.
- Underslung refillable tanks: follow CoP 32 (mounting, shielding, filling, crash protection).
Similarly, spare water carriers or wastewater storage tanks can be mounted externally in weather-resistant compartments.
Campervan storage ideas for cab and driving areas
While the cab is primarily for driving, it's also your first point of access, usually becoming a catch-all for phones, documents, snacks, and gear you’ll need en route. Organising this area reduces clutter and helps prevent distractions behind the wheel.
Overhead cab shelf
Most vans come with an overhead shelf above the driver and passenger seats. This space is ideal for stowing jackets, sunshades, hats, and rolled-up rain gear. It’s also a handy place for storing paper maps, guidebooks, or a logbook of fuel stops and maintenance notes.
Use fabric bins or mesh organisers to prevent loose items from sliding around. Some builders add bungee cords across the shelf lip or soft netting to hold bulkier items in place.
Door pockets and dash storage
Most cab doors include storage trays that are often underused. Expand their function with clip-in bottle holders, small mesh pouches for phone cords, or padded organisers for tools or gloves. Just avoid overloading them with items that could spill or rattle during driving.
The dashboard is another opportunity: some vans have deep gloveboxes, hidden upper storage trays, or dedicated phone docks. Add nonslip mats or dividers to keep things from sliding. This is the perfect spot for keeping chargers, spare cables, and parking change within easy reach.
Between-seat or seatback organisers
The space between or behind the front seats can serve multiple storage roles. A slim centre console or hanging organiser between the seats can hold snacks, sunglasses, hand sanitiser, or even a small bin.
Seatback organisers, especially those with MOLLE systems or clear pockets, provide vertical storage for tablets, notepads, chargers, tissues, and more. Choose ones with zip pockets for valuables and quick-access pouches for daily-use gear.
Final planning tips
Building or refining your campervan storage system is more than just finding places to put things. It’s about creating a layout that supports your lifestyle, travel patterns, and day-to-day comfort.
Hopefully, this guide has given you a solid foundation to plan your layout and integrate some clever campervan storage ideas into your build. Getting it right will mean a hassle-free time when exploring the great outdoors.
Know what else you’ll need when heading off-grid? Power! Check out our complete campervan electrical systems for a range of natty ready-to-install kits designed to suit everybody from weekend warriors to full-time vanlifers,
If you aren’t sure what electrics you need, you can also use our easy online electrical system builder tool. Simply input what appliances you plan to run and we’ll put together the ideal electrical system for your needs.
FAQs
How do you maximise storage in a campervan?
Design with intent and keep the fundamentals we’ve outlined in this article in mind. Maximise your vertical space while keeping weight low, build multi-purpose furniture, and prioritise accessible areas for daily use items. You can also leverage lightweight materials and modular components to cut down on clutter.
What is the best way to store food in a van?
For items like meats and dairy, you’ll want to invest in a 12V campervan fridge. It’s also a good idea to use deep drawers for cookware, slide-out pantries for dry goods, and stackable containers in fridges. Magnetic spice racks and hanging mesh baskets are also ideal if you’re trying to optimise wall and ceiling space.
How do you keep things secure while driving?
Secure loose items with latches, bungee cords, and anti-rattle fittings. Use locking mechanisms on drawers and cupboards, and avoid placing heavy gear in high-up cabinets.
What’s the best way to store bedding in a van?
Vacuum bags help compress bulky bedding. Store under fixed beds, inside bench seating, or use overhead lockers for light blankets and pillows.