Having helped hundreds of vanlifers design and install electrical systems, we've learned what works—and what doesn't. This checklist for DIY campervan electrical installations simplifies the process, breaking it down into clear steps.
From planning your power needs to selecting the right components like batteries, inverters, and solar panels, we'll guide you through building a reliable, efficient system tailored to your van and lifestyle.

We also include a checklist for tools, safety, winter-proofing, and testing—critical essentials vanlifers often overlook when building an electrical system. Everything starts with a solid plan, and that's where we begin this article.
BUILD YOUR DIY CAMPERVAN ELECTRICS SYSTEM IN MINUTES
Planning Your System
You'll risk overspending, underpowering, or missing key components without a solid electrical plan for your van build. This section will guide you through defining your power needs, sticking to a budget, and understanding basic design options.
Defining your power needs
Start by listing everything you want to power in your van, for example:
- Lights
- Fridge
- Ventilation fans
- Phone and laptop chargers
- Water pump
- Small appliances like a kettle or blender
- WiFi system
Once you have listed everything, look for ways to reduce electrical devices. Reducing your electrical load saves money and complexity.
For example, a WiFi system may be unnecessary if you can use your phone's hotspot. A TV mounted on the wall may be a fun feature, but could you get the same enjoyment by watching on your laptop?
Estimate your daily power consumption in Ah
Calculate the consumption in Ah (amp-hours) for each device which consumes power in watts. Check labels or manuals to find these. Here's how you estimate your daily power consumption:
Ah = Appliance Wattage ÷ Leisure Battery Voltage x Quantity x Daily hours used
For example:
- Four LED lights: 4W ÷ 12V × 4 x 5 hours = 8h/day
- One Laptop: 80W ÷ 12V × 2 hours = 14.8Ah/day
Add up the Ah for all devices. This total is your daily consumption. It's the foundation for sizing your batteries and solar panels.

Budget considerations
Your budget will shape your system. Plan intelligently to avoid cutting corners on essentials or overspending where it's not needed.
Electrical systems have key components—batteries, inverters, and solar panels. While these can be expensive, cutting corners leads to short lifespans and failures.
For example:
- Invest in a quality lithium battery if you'll rely heavily on power.
- Save by choosing a modified sine wave inverter if you only need basic AC devices.
Focus your spending where reliability matters most. Prioritise essentials over nice-to-haves. We recommend ranking ordering your appliances and devices to allocate your budget accordingly, for example:
- Essential: fridge, lights, fan, phone charger.
- Luxury: microwave, coffee machine, projector.
Build your system to handle the essentials first, and add luxury items when your budget allows.
Campervan Electrical System Design Basics
Choosing the right design keeps your system efficient and safe. These basics help you decide what fits your needs.
12V vs. 24V systems
- 12V: Most common for campervans. Matches most appliances and vehicle alternators. Best for small to medium setups.
- 24V: More efficient for larger systems with high power demands. Requires specific appliances and converters.
We recommend sticking to a 12V. It's simpler and widely compatible.
{ross get 12V vs 24V battery Image}
Grid-tied vs. fully off-grid systems
- Grid-Tied: Includes shore power capability. Ideal if you'll park at campsites with hookups. Simplifies battery charging.
- Fully Off-Grid: Solar and alternator charging are the primary energy generators. Suits remote adventurers. Requires a larger battery capacity and solar panels.
Many setups combine both. Adding a shore power plug gives flexibility to use hookups when available.
Planning your campervan's electrical system is about choices. Define your needs, set a budget, and pick the right design for your lifestyle.
Once you have completed the planning stage, you can use our van electrics builder tool to do the rest. Answer a few questions about your devices, appliances, and vanlife lifestyle, and the Vunked builder tool will produce a complete list of everything you need, down to the wiring, nuts, and bolts.
Once you've outlined your power needs and budget, it's time to focus on the core components that will bring your system to life.
Core Van Electrical Components Checklist
Use your list of devices and appliances to assess the core components needed to make your vanlife dreams a reality. We're going to explore the following:
- ✅ Battery bank
- ✅ Solar panels
- ✅ Inverter
- ✅ Charge controllers
- ✅ Shore power
- ✅ Alternator charging
Battery bank
The battery bank is your power reservoir. It stores energy from solar panels, shore power, or the alternator to keep your devices running when the van isn't charging. Let's compare the two most recommended options: Deep Cycle AGM and Lithium-Ion.
Lithium-ion batteries:
- Long lifespan: 2,000–5,000 cycles.
- Lightweight, efficient, and ideal for high-demand systems.
- Best for full-time vanlifers or heavy energy users.
AGM batteries (Absorbed Glass Mat):
- Shorter lifespan: ~500 cycles.
- Affordable and maintenance-free.
- Best for weekend travellers or budget-conscious builds.

Tip: Avoid lead-acid batteries; they're high maintenance, have a short lifespan, are bulky, and heavy.
Battery Capacity
- Measure in amp-hours (Ah) to match your energy needs—see how to choose a campervan leisure battery.
- Add a 20% margin for inefficiencies and unexpected demands.
Decision Tips
- Choose lithium if you need reliability, efficiency, and long-term performance.
- Choose AGM for occasional use and lighter power needs.
Choosing solar panels
Campervan solar panels are your primary source of renewable energy when off-grid, converting sunlight into electricity to recharge your batteries.
Types of solar panels:
- Rigid panels: Durable, efficient, and cost-effective. Best for flat roofs and permanent installations.
- Flexible panels: Lightweight and adaptable to curved surfaces. Ideal for tight or unconventional spaces but less durable.
Sizing your solar system:
- Calculate daily power needs in watt-hours (Wh)—see our guide on solar panels for campervans.
Panel efficiency:
- Monocrystalline panels: Highly efficient and ideal for limited roof space.
- Polycrystalline panels: Less efficient but more affordable for larger roofs.
Recommended solar panel reading:
- How To Choose A Battery And Solar Panel Kit For Your Campervan
- Campervan Off-Grid Calculations
- Solar Panels For Campervans
- The Ultimate Guide to Solar Power Flexible Panels for Campervans
Inverter
An inverter converts DC power from your batteries into AC power for appliances like laptops, microwaves, and other household devices.
Your Inverter must handle at least the total wattage of all AC devices you might use simultaneously. These appliance wattages are on labels, power cables, or online product specs.
For example, for a laptop (100W), blender (500W), and e-bike charger (600W), you'll need a 1,440W inverter (1,200W + 20%).
For more examples, including single vs simultaneous use, we recommend reading our comprehensive guide: What Inverter Size Do I Need?
Modified sine wave vs. pure sine wave
- Modified Sine Wave: Cheaper but incompatible with sensitive electronics. Best for basic devices like fans or lights.
- Pure Sine Wave: Ideal for all appliances, especially laptops and fridges. Worth the extra cost for reliability.
Inverter efficiency and cost
Larger inverters cost more and draw more power. If cost-saving is a priority, opt for a smaller inverter and limit simultaneous appliance use.
Charge controllers
Charge controllers regulate the electricity flowing from your solar panels to the battery bank. Without one, overcharging could damage your batteries.
MPPT (Maximum Power Point Tracking)
- Highly efficient. Extracts more energy from your solar panels, especially in low-light conditions.
- Ideal for larger systems or setups with variable sunlight.
PWM (Pulse Width Modulation)
- Simpler and cheaper than MPPT. Works well for smaller setups with consistent sunlight.
- Less efficient but sufficient for budget-friendly builds.
Shore power
Shore power is a must-have if you want to visit campsites. This hookup is also useful when parked at home, with friends, or wherever electricity is nearby. It's a minor expense that offers many benefits.
When plugging into shore power, you have a few options:
- Hook up only
- Hook up with a battery charger
- Hook up with an Inverter charger

All three options use mains to power your 230V appliances but differ slightly depending on your off-grid needs.
Shore Power - Hook Up Only
The hook-up-only shore power option is the most budget-friendly and will suit those who only visit campsites—meaning you never intend to use your van off grid. It's important to emphasise that you will only have power when you use mains electricity and only 230V appliances. You must have a leisure battery to run 12V appliances.
Shore Power - Hook Up with Battery Charger
- Adds a plug-in connection to charge your batteries using grid electricity. Perfect for stays at campsites with power hookups.
Shore power with hook-up and battery charger is a must-have for living semi-off-grid. You can plug your 230V appliances into campsite mains and use your leisure battery to run 12V devices. The battery will charge and run all 12V appliances during hookups.
The 230V system won't work when you're off-grid, but your 12V appliances will still run while the battery has charge.
Shore Power - Hook Up with Inverter Charger
The shore power with hook-up and inverter charge is the best of the three options for all you off-grid warriors. With this setup, you can:
- Charge leisure battery hooked up at a campsite
- Use shore power to run your 230V and 12V appliances
- Power 230V appliances using your inverter and leisure battery
Recommended reading:
Alternator charging
To assist your off-grid adventures, you can charge your leisure battery while you drive using a battery-to-battery charger.
- Also known as B2B, battery-to-battery and DC-DC charging.
- Taps into your vehicle's alternator to charge the battery bank while driving.
- Use a DC-DC charger to protect your alternator and batteries and ensure efficient charging without overloading the system.
- A relatively cost-effective way of charging
- You will need to pair this with solar or shore power charging for larger systems.
These core electrical components are just the first step. You must also factor in the tools needed to install and maintain your electrical system.
CREATE YOUR CUSTOM CAMPERVAN CHECKLIST IN MINUTES
Essential Tool Checklist for a DIY Van Build
The right tools make a DIY campervan electrical installation safer, faster, and more reliable. Below are the essential tools you need, whether for one-time use during installation or ongoing maintenance.
Multimeter
- Purpose: Measures voltage, current, and resistance. Essential for diagnosing electrical issues, testing circuits, and ensuring connections are safe.
- Usage:
- Installation: Verify correct voltage from batteries, solar panels, and charge controllers.
- Maintenance: Troubleshoot faulty circuits or monitor system performance.
- Lifespan: Long-term tool for both installation and maintenance.
Wire strippers/crimpers
- Purpose: Strip insulation from wires and crimp connectors for secure electrical connections.
- Usage:
- Installation: Prep wires to attach fuses, terminals, and connectors.
- Maintenance: Occasionally repair or replace damaged wiring.
- Lifespan: Long-term tool, though high-quality strippers/crimpers last longer and work more reliably.
Heat shrink tubing
- Purpose: Insulates and protects exposed connections. Shrinks with heat to seal wires, preventing short circuits and corrosion.
- Usage:
- Installation: Cover and insulate all connections to secure your system.
- Maintenance: Replace tubing when repairing wires or terminals.
- Lifespan: One-time for installation, but keep extra tubing for future repairs.
Drill and bits
- Purpose: Create holes for mounting components like inverters, fuse boxes, or solar panel brackets.
- Usage:
- Installation: Drill mounting points on walls, ceilings, or roofs.
- Maintenance: Rarely used after installation unless you add new components.
- Lifespan: Mostly a one-time tool but handy for upgrades or repairs.
Screwdrivers and wrenches
- Purpose: Tighten screws and bolts for securing electrical components and ensuring stable connections.
- Usage:
- Installation: Attach terminals, brackets, and panels.
- Maintenance: Check and tighten any loose screws or bolts during routine inspections.
- Lifespan: Long-term tools for both installation and ongoing use.
Heatgun (or hairdryer as a budget option) - to shrink the heatshrink
Invest in durable tools for reliable results. Some tools, like multimeters or wire strippers, will be useful in the long term, while others, like drills, are mainly needed for installation but are essential when required.
Consider renting or borrowing non-essential tools for your van build to save money and reduce storage space.
These tools only cover the essentials. Depending on the level of DIY and customisation, you may need specialist tools and equipment or a specialised workshop. For example, custom wooden cabinetry requires a circular saw, clamps, wood glue, a power drill, and a sander.
Important tip: Consider the level of DIY and customisation carefully during planning. EVERY vanlifer will tell you the build usually takes double the time you thought it would. The more customisation and building from scratch, the longer it'll take. Weigh the cost of prefab or professionally built items against the time and resources to do it yourself.
Safety Equipment Checklist
Safety equipment protects you from shocks, burns, or worse. Here's what you need for a safe DIY campervan electrical installation, whether for one-time use or ongoing system checks.

Insulated gloves
- Purpose: Protects your hands from electrical shocks when working with live circuits.
- Usage:
- Installation: Use when handling batteries, wiring, or fuses.
- Maintenance: Essential when testing live systems or replacing components.
- Lifespan: Long-term use if kept clean and undamaged.
Safety goggles
- Purpose: Shields your eyes from sparks, debris, or accidental splashes from battery acid.
- Usage:
- Installation: Use while drilling, cutting wires, or connecting batteries.
- Maintenance: Wear during battery inspections or repairs.
- Lifespan: Long-term, as long as lenses remain clear and scratch-free.
Fire extinguisher
- Purpose: Handles electrical fires, which can occur from short circuits or overheating components. Look for a fire extinguisher rated for electrical fires (Class C or multi-class).
- Usage:
- Installation: Keep nearby when working on electrical components.
- Maintenance: Store in an easily accessible location in your van. May be required by law in certain jurisdictions.
- Lifespan: Replace as recommended by the manufacturer or after use.
Voltage tester/non-contact tester
- Purpose: Detects live wires without direct contact, ensuring circuits are de-energised before work begins.
- Usage:
- Installation: Verify circuits are safe to handle.
- Maintenance: Double-check circuits before repairs or adjustments.
- Lifespan: Long-term if stored properly and you replace batteries periodically.
First aid kit
- Purpose: Provides immediate care for cuts, burns, or other minor injuries. Include supplies specific to electrical work, like burn ointment and sterile dressings.
- Usage:
- Installation: Keep within reach during work.
- Maintenance: Restock as you use.
- Lifespan: Long-term if regularly replenished.
Hearing protection
- Purpose: Protects your hearing during loud tasks like drilling or cutting.
- Usage:
- Installation: Use during noisy activities, especially in enclosed spaces.
- Maintenance: Rarely needed unless you install new equipment.
- Lifespan: Long-term, depending on the type and frequency of use.
Safety is essential year-round, but winter adds unique challenges to your van's electrical system. Here's how to prepare for colder climates.
Winter-proofing a van (optional where needed)
Winter-proofing your van ensures comfort, safety, and efficiency in cold weather. Below are common items to keep your van warm, your systems functional, and your adventures on track during winter.
While most winter-proofing items don't use electricity, they affect your budget, weight, space, and other factors critical to your van's electrical installation.

Insulation materials
- Purpose: Prevents heat loss and keeps your van warm, particularly below 5°C (41°F).
- Examples: Rigid foam boards, spray foam or sheep's wool.
- Usage: Install on walls, floors, and ceiling to create a thermal barrier. Essential when temperatures drop below 0°C (32°F) to prevent heat from escaping.
- Impact on electrical installation: Proper insulation reduces the load on your diesel or propane heater and your electrical system by minimising the energy required to maintain a comfortable temperature.
Thermal curtains
- Purpose: Blocks cold drafts and insulates windows and doors. Particularly useful in climates with temperatures below 10°C (50°F).
- Examples: Insulated blackout curtains or reflective window covers (e.g., Reflectix).
- Usage: Attach to windows and doorframes to retain warmth and reduce condensation.
- Impact on electrical installation: Insulated window covers prevent heat loss, reducing energy demands.
Diesel or Propane Heater
- Purpose: Provides consistent heat for living spaces in sub-zero temperatures, essential below 0°C (32°F) for safe and comfortable living.
- Examples: Diesel heaters (e.g., Webasto, Eberspacher) or propane heaters (e.g., Mr. Heater).
- Usage: Install a safe, vented system to avoid condensation and maintain warmth. Use a carbon monoxide detector for safety.
- Impact on electrical installation: Even fuel-powered heaters require a small amount of electricity. Ensure your battery bank can handle the additional load, particularly overnight use. For example, a diesel heater might draw 1-2 amps per hour.
Heated water tank or pipe insulation
- Purpose: Prevents water systems from freezing, crucial below 0°C (32°F).
- Examples: Heat pads for tanks, foam pipe insulation, or heating cables.
- Usage: Wrap pipes and water tanks in insulated or heated materials to avoid frozen water systems in extreme cold.
- Impact on electrical installation: Your battery bank will power the heating pads or cables to protect water systems. Consider their wattage and ensure your system has enough capacity. For instance, a 12V heating pad for a water tank might draw 30-60 watts.
Condensation control
- Purpose: Prevents moisture buildup that leads to mould and dampness, especially in humid conditions or temperatures below 5°C (41°F).
- Examples: Roof vent with a fan, moisture absorbers, or a dehumidifier.
- Usage: Ensure proper ventilation to avoid dampness, which is more likely to develop in cold or rainy weather.
- Impact on electrical installation: Ensure your fan is energy-efficient, as prolonged use can drain your battery. For example, a 12V vent fan may draw 1-3 amps.
After preparing for all conditions, including winter, the final step is ensuring your system works as intended. Here's how to test and verify every part of your setup.
Checklist for Testing and Final Checks
Testing is the final step in your campervan electrical journey, ensuring your system is safe, reliable, and ready for off-grid adventures. With everything checked and functioning, you can enjoy the freedom of vanlife with peace of mind.

- Inspect All Connections
- Ensure all wires are correctly connected and secured.
- Check for loose screws or bolts in terminals, inverters, and other components.
- Test Circuit Continuity
- Use a multimeter to confirm there are no breaks in your wiring.
- Test fuses and breakers to ensure they are functional.
- Check Voltage Levels
- Measure battery voltage to ensure it is fully charged and within the recommended range (e.g., 12.6V for a fully charged 12V battery).
- Verify input from solar panels and alternator.
- Simulate a Typical Day
- Turn on lights, fans, and appliances to mimic daily use.
- Monitor battery performance to ensure sufficient capacity.
- Test Safety Equipment
- Confirm that your fire extinguisher, CO detector, and smoke alarm are installed and functional.
- Test your circuit breakers and RCDs (Residual Current Devices) to ensure they trip as expected.
- Monitor for Heat or Odour
- Check for overheating components or burning smells during testing.
- Inspect high-load devices like inverters and battery connections.
- Create Documentation
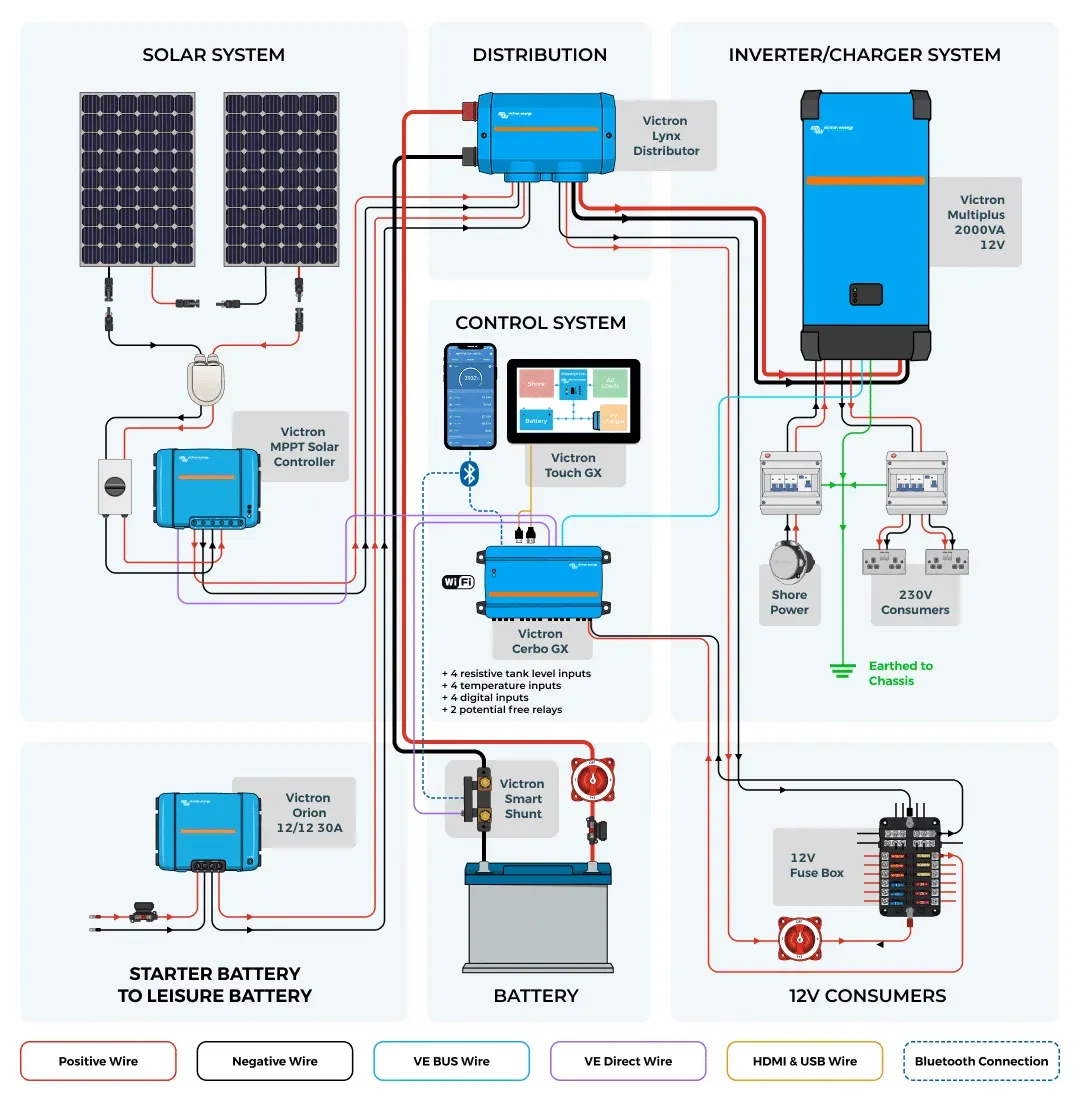
- Create a system diagram showing all components and wiring routes for future reference. This diagram will also help with maintenance and troubleshooting.
- Record test results (e.g., voltage levels) to establish a baseline for troubleshooting down the line.
Closing Thoughts
While this checklist won't fulfil every vanlifer's needs, it will hopefully give you a framework for approaching your van build. You must approach van electrics holistically to consider all aspects of your intended lifestyle. The key is to reduce complexity wherever possible—especially if you have limited or no electrical experience and a tight budget.
Instead of building everything from scratch, you can use a complete campervan electrical system to simplify the process and avoid common installation mistakes.
Vunked has helped hundreds of vanlifers install electrical systems. Our helpful builder tool removes the guesswork by providing a detailed list of everything you need for installation, down to the exact wiring, nuts, and bolts. We also provide a wiring diagram and aftersales support to get you powered and on the road as quickly and safely as possible.
TAKE THE GUESS WORK OUT OF CAMPERVAN ELECTRICS