

Rain is running down the windscreen, the motorway is throwing spray over the van, and the new panel on the roof is already taking more punishment than most domestic solar arrays see in weeks. You may be choosing between adhesive corner mounts, stainless fixings, rails or a low-profile solar panel mount while also trying to avoid roof ribs, roof lights and the cable route into the electrical cupboard.
A van roof isn't a house roof with wheels underneath it. It vibrates, flexes, heats up in summer, chills overnight and meets moving air at motorway speed. A reliable installation has to stay secure, remain watertight and leave the panel, cable entry and surrounding roof serviceable. The principles behind flexible solar panels can work well for particular layouts, but the mounting decision still has to match the roof structure and how the vehicle is used.
Table of Contents
- Why Van Mounts Fail More Than House Mounts
- Preparing Your Van or Caravan Roof Before Drilling
- Choosing Between Fixed Tilting and Rail Mounts
- Fastening and Sealing for a Leak Free Install
- Wind Safety Load Paths and Fire Access Checks
- Final Checks Maintenance and Next Wiring Steps
Why Van Mounts Fail More Than House Mounts
A domestic roof normally stays still while its mounting system carries wind, snow and the array's permanent load. A van adds vibration from the engine, suspension and road surface, plus repeated acceleration and braking. The roof skin may be thin aluminium, fibreglass or bonded composite, and a fixing that feels tight on installation day can loosen or enlarge its hole after months of movement.
I've seen the same pattern repeatedly. A converter chooses a neat adhesive-only installation, leaves a small void beneath one corner, then drives through wet weather before the sealant has cured properly. The panel may look fine from ground level, but the leading edge starts to lift, the sealant splits and water finds the cable entry or an unprotected fixing.
Practical rule: A secure solar panel mount must transfer movement into a suitable roof structure, keep water outside the vehicle and avoid trapping stress in the panel frame.
Motorway airflow is only part of the problem. A raised panel creates a leading edge that catches air, while a panel mounted close to a roof rib can rock if the bracket doesn't sit flat. Roof furniture creates turbulence and shade, and a badly chosen position can make it impossible to remove the panel without first dismantling a roof box or awning bracket.
A good result is unremarkable after a winter of driving. There's no whistle at speed, no cracked sealant, no staining inside, no soft or spinning fixings and no movement when you press the frame. The charging system remains stable because the panel, glands and cable route have all survived the same conditions as the vehicle.
The sensible build sequence is simple: inspect the roof, plan the array, choose hardware for the substrate, fasten or bond it correctly, seal every penetration, test for water ingress and only then complete the internal wiring. Treating the mount as part of the electrical installation, rather than an accessory stuck on at the end, prevents most expensive rework.
Preparing Your Van or Caravan Roof Before Drilling
Start from inside and outside the vehicle. Identify whether the roof is flat fibreglass, ribbed aluminium, sheet metal, composite or a thin caravan skin over a framed structure. Look for roof ribs, cross-members, bonded beams, roof lights, vents, aerials, awning fittings and any area where water naturally sits.
The visible roof surface doesn't tell you where a fixing can safely land. Use a stud finder where it works, inspect manufacturer drawings if available and open an interior lining panel when necessary. A fixing into a supported rib or reinforced zone has a very different load path from a screw held only by thin cladding.
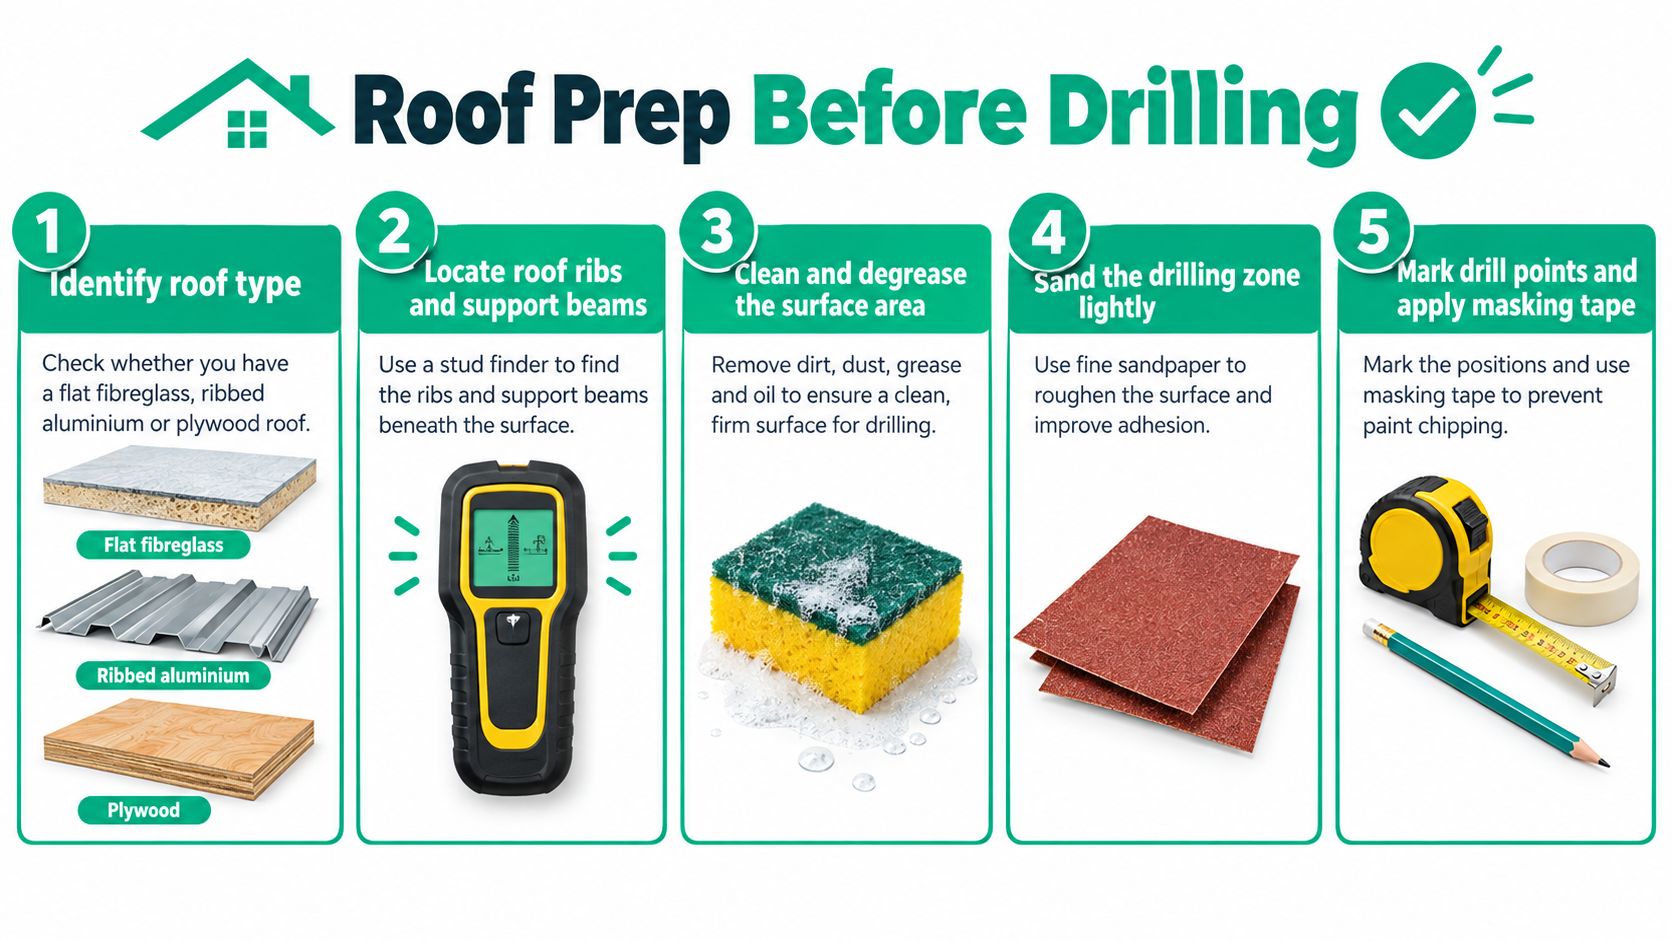
Lay out the panel before touching a drill
Put the panel, brackets or rails on the roof and mark the proposed footprint with masking tape. Open every nearby door, check the clearance around roof lights and leave room to reach the cable gland, clamps and fixing heads later. A panel that technically fits may still be wrong if it blocks a service hatch or forces the cable to run across a walking area.
Keep the cable entry close enough to the charge controller to avoid an unnecessarily long roof run, but don't place it in a drainage channel or directly beside a bracket. Mark the internal entry point too. You need to know whether you can reach it with a backing washer, gland nut and cable slack before drilling.
Take photographs of the roof and the marks from several angles. These images are useful when checking the layout after removing the panel, and they provide a record of where the structure and cable route sit beneath the finished installation.
Clean the surface properly
Remove wax, road film, silicone residue and loose paint with a compatible cleaner and lint-free cloths. Don't assume a surface is clean because it looks bright. Adhesive needs a sound, dry surface, and sealant won't rescue grease trapped under a bracket foot.
Where the adhesive system allows it, lightly abrade the bonding zone without cutting through the roof coating. Mask the perimeter, mark the drill points with a pencil and use a sharp bit suited to the roof material. Vacuum swarf immediately, particularly on painted metal, because loose filings can rust and stain the roof.
Check the weather before applying adhesive or sealant. The roof must be dry, the surface temperature must suit the product instructions and the vehicle should remain still while the material cures. If you can't protect the van from rain, condensation or washing during that period, postpone the job.
Choosing Between Fixed Tilting and Rail Mounts
The right mount depends on how the vehicle moves, where it parks and how often you need access to the roof. A low-profile fixed solar panel mount is usually the cleanest answer for a van that travels regularly. Tilting hardware can improve the panel's angle when parked, but it adds hinges, fasteners and a procedure that must be followed before driving away.
Full rails make sense when the array is larger, the panels may be repositioned or roof furniture creates a complicated layout. They distribute clamps along a continuous support and can simplify panel removal, but they sit higher and add more hardware to inspect.
| Mount type | Best for | Profile and effort |
|---|---|---|
| Fixed corner or Z-bracket mounts | Compact vans, regular travel and low-profile installations | Lowest profile and simplest layout, with limited adjustment once fitted |
| Tilting mounts | Stationary camping, seasonal use and owners prepared to adjust panels when parked | Higher profile and more handling, with useful angle adjustment but more hinges and locking points |
| Aluminium rail mounts | Larger arrays, multiple panels and roofs with awkward furniture positions | More flexible and serviceable, but heavier, taller and more involved to install |
Fixed mounts suit travelling vans
Fixed ABS feet or aluminium corner brackets keep the panel close to the roof and reduce opportunities for vibration to work on moving parts. On a VW Transporter used every weekend, that simplicity is often worth more than the theoretical gain from adjusting the angle. Keep the panel high enough for drainage and cable protection, but don't create an unnecessary air gap that turns the frame into a scoop.
Adhesive corner mounts can suit a sound, clean caravan or composite roof where drilling would damage a fragile skin. They still need correct surface preparation and a full, compatible adhesive bed. A bonded mount isn't a shortcut around load planning.
Tilting hardware needs a travel discipline
Tilting brackets are useful on a high-top Boxer that spends several days parked in one place, or on a caravan used seasonally. The trade-off is obvious: every hinge, prop, latch and exposed fastener needs inspection, and the panel must be lowered and secured before the vehicle moves. If other people use the vehicle, add a visible travel-position check to the departure routine.
For a broader overview of the hardware, layout and practical sequence involved in install caravan solar panels, compare the guidance with the actual roof construction rather than copying a bracket choice from a different vehicle.
Rail systems are valuable when a roof box, satellite dish or skylight makes corner mounting awkward. They also help when you expect to remove a panel later, because clamps can be released without disturbing every roof attachment. On a caravan with a delicate outer skin, however, the rail's loads still have to reach suitable structural members. A rail doesn't make an unsupported roof strong.
Fastening and Sealing for a Leak Free Install
Fastening and sealing are one job. A screw can hold a bracket mechanically while water enters around the hole, and adhesive can seal a foot while vibration slowly peels it from a contaminated surface. The finished mount needs both a sound load path and a continuous waterproof interface.
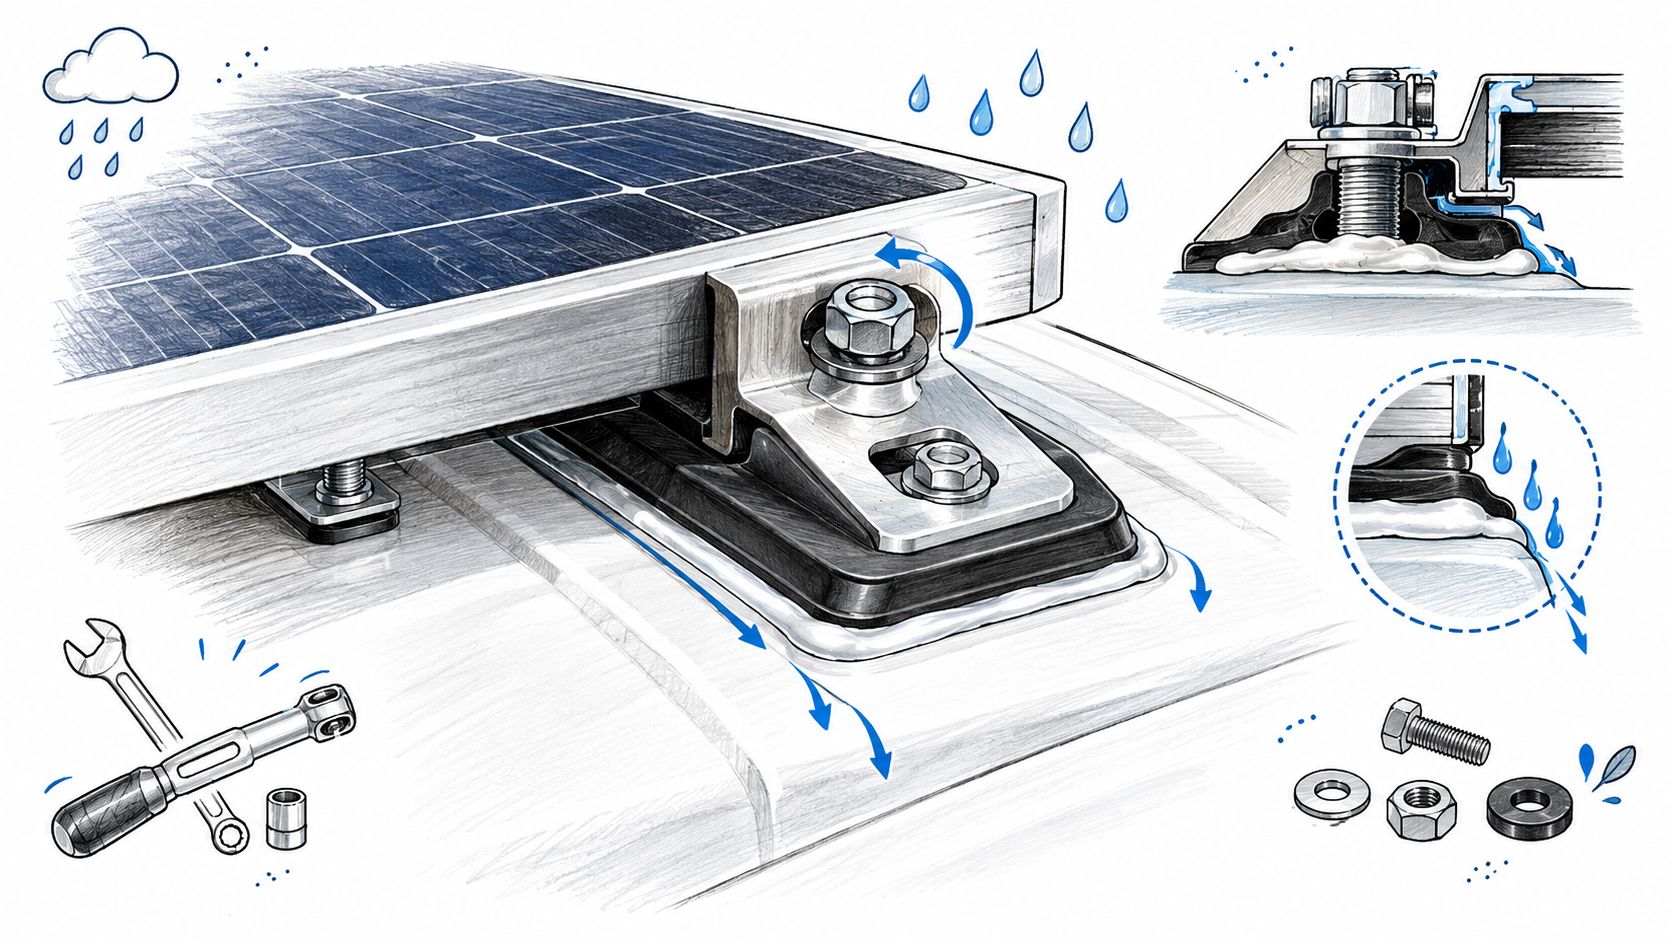
Match the fixing to the roof
On a metal van roof with a known rib beneath the fixing point, a stainless self-tapper can work when its length, diameter and thread engagement suit the structure. Where access allows, a machine screw with a washer and backing plate gives better control over the load. Don't rely on a screw biting only into thin sheet metal if the panel can pull against it repeatedly.
A fragile caravan skin may call for adhesive-only mounting, but only after checking that the outer skin is bonded to a suitable substrate and that the product is approved for the materials involved. Avoid mixing incompatible sealants. Silicone may release from surfaces where a polyurethane or polymer adhesive was specified, and some products can attack plastics or coatings.
Dry-fit everything first. Mark each bracket, remove the panel and prepare the surface without losing the layout. Apply a continuous bed beneath the foot with no unfilled channel where water can collect, then tighten the fastener until the bracket is held firmly. Don't crush an ABS foot or squeeze every trace of sealant out from under it.
A practical step-by-step RV roof solar setup can help first-time installers visualise the order of operations, but the product instructions and vehicle roof construction take priority.
Treat cable entry as a primary penetration
Use a proper solar cable gland or entry housing, not a loose blob of sealant around two wires. The cable should leave the panel with a little service slack, sit clear of sharp edges and enter the gland without a tight bend. Create a small drip path so water running along the cable falls away before it reaches the entry point.
Apply sealant beneath the gland base and around the fixing points as specified by the manufacturer. Tool the outer bead neatly, but don't hide a poorly fitted gland beneath a thick external fillet. If a hole is misdrilled, stop. Deburr it, protect exposed metal against corrosion and repair it with a suitable patch or replacement gland rather than filling the mistake with sealant alone.
Allow the adhesive and sealant to cure for the period specified on the product data sheet. Cold, damp UK weather can extend curing, so keep the vehicle stationary and dry. Once cured, carry out a controlled water test around the gland and every roof penetration. Don't use a pressure washer, and don't wire the system until the inside is dry.
For the wider electrical sequence, the campervan solar panel installation guide is useful because it keeps the roof work and internal system planning connected. The mount should be finished before the final cable termination, not treated as a separate cosmetic task.
Wind Safety Load Paths and Fire Access Checks
Panel weight is only one part of the design. On a moving vehicle, wind can try to lift the leading edge, peel an adhesive foot or pull a screw through thin cladding. The load travels from the panel frame into the brackets, through the roof skin or rib and into the vehicle structure. The weakest interface controls the result.
Domestic roof guidance reinforces the same principle. UK requirements call for mounting systems to resist relevant wind and snow loading, while UK solar mounting guidance highlights the need to assess roof type, exposure, array position and the full load path. Those assumptions can't be transferred to a lightweight van roof, where vibration, aerodynamic lift and local reinforcement matter together.
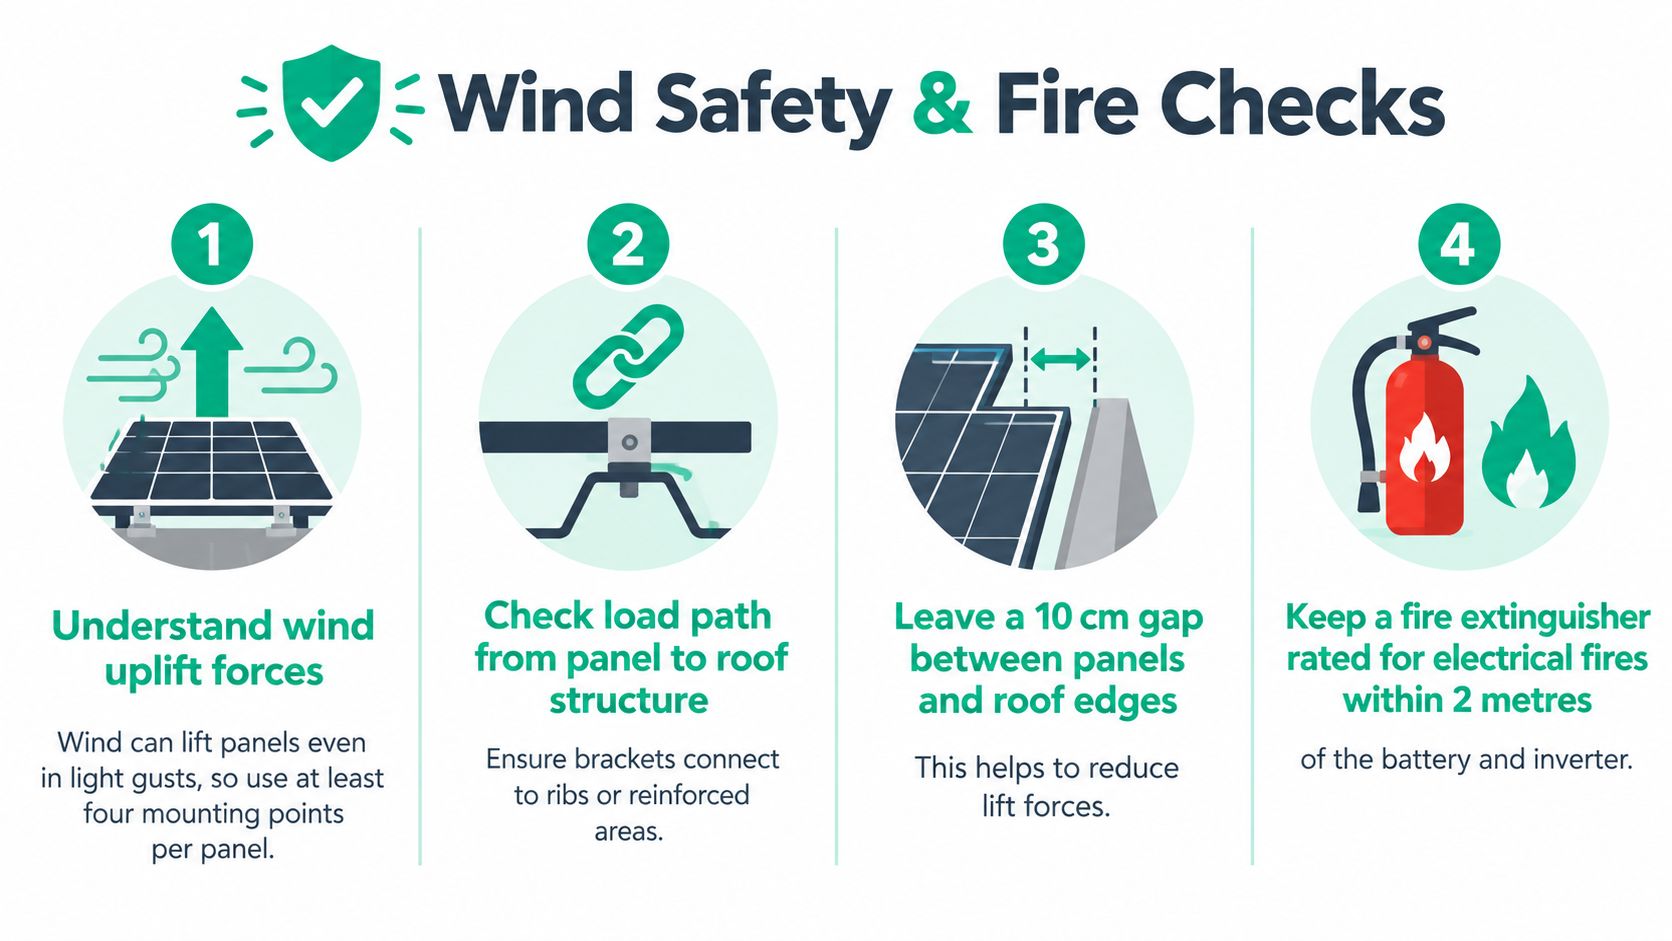
Run a short safety sign-off
- Check the edge position: Keep the array away from vulnerable roof edges, corners, roof lights and access routes. An exposed leading edge deserves more scrutiny than a panel centred between structural ribs.
- Follow the load path: Confirm that every bracket reaches a rib, beam, reinforced panel or properly assessed substrate. Cladding-only fixings are a red flag where the roof skin is thin or damaged.
- Inspect for movement: Press the frame and look for rocking, lifted corners, elongated holes or sealant separation. Any movement means stop and reinforce before driving.
- Protect the emergency route: Keep cable runs away from sharp edges, hot equipment and moving trim. Label the solar isolation point and make sure the array doesn't obstruct roof access or emergency operations.
Fire safety deserves a separate check because panels, cables and roof coverings can change access and isolation arrangements. UK government work on fire safety for solar photovoltaic panels on roofs examines how rooftop PV can affect roof construction and firefighting operations. A van or caravan has less space, so cable routes, battery isolation, inverter access and combustible lining need careful consideration.
Ask for professional assessment if the roof is thin, cracked, corroded, delaminated or already showing movement. The correct answer may be a different mounting position, internal reinforcement or no roof installation at all.
Final Checks Maintenance and Next Wiring Steps
Let the completed mount settle before judging it finished. Recheck accessible fasteners after the first long drive, inspect the sealant for lifting or splits and look inside for any sign of dampness around the cable entry. A new whistle, rattle, panel movement or change in charging behaviour deserves investigation immediately.
Keep a simple record with photographs of the fixing points, cable route and gland position. It helps with future servicing, resale and roof-box changes. Carry a compatible spare sealant cartridge, replacement cable caps and the tools needed to inspect the brackets, but don't add sealant over a failed joint without finding the cause.
Clean beneath low-mounted panels when practical, particularly where leaves and road grime can hold moisture against the roof. Before adding an awning, roof box or satellite equipment, check that it won't block panel removal or put a new load into the mount.
UK deployment continues to create demand for sound installation practice. Government data reports 269,500 installations coming online during 2025, the highest annual total recorded in that series according to the published rooftop solar specification guidance. For a van owner, the useful lesson isn't the market size. It's that mounting quality remains the foundation of every system, whether the roof belongs to a house, caravan or vehicle.
Once the roof is dry, silent and solid, finish the electrical work with correctly sized cables, fusing, isolation and protected connectors. The guide to installing MC4 solar connectors helps keep the final connection clean and serviceable. Then connect the Victron-based charge system using a wiring diagram that matches the actual panel arrangement and cable route.
Vunked supplies campervan and small off-grid electrical kits with mounting hardware, Victron-based system designs, pre-wired boards and personalised wiring diagrams. If you want the roof mount and charging system planned together, visit Vunked for an install-ready layout and technical support before you drill.
Enhanced by Outrank