
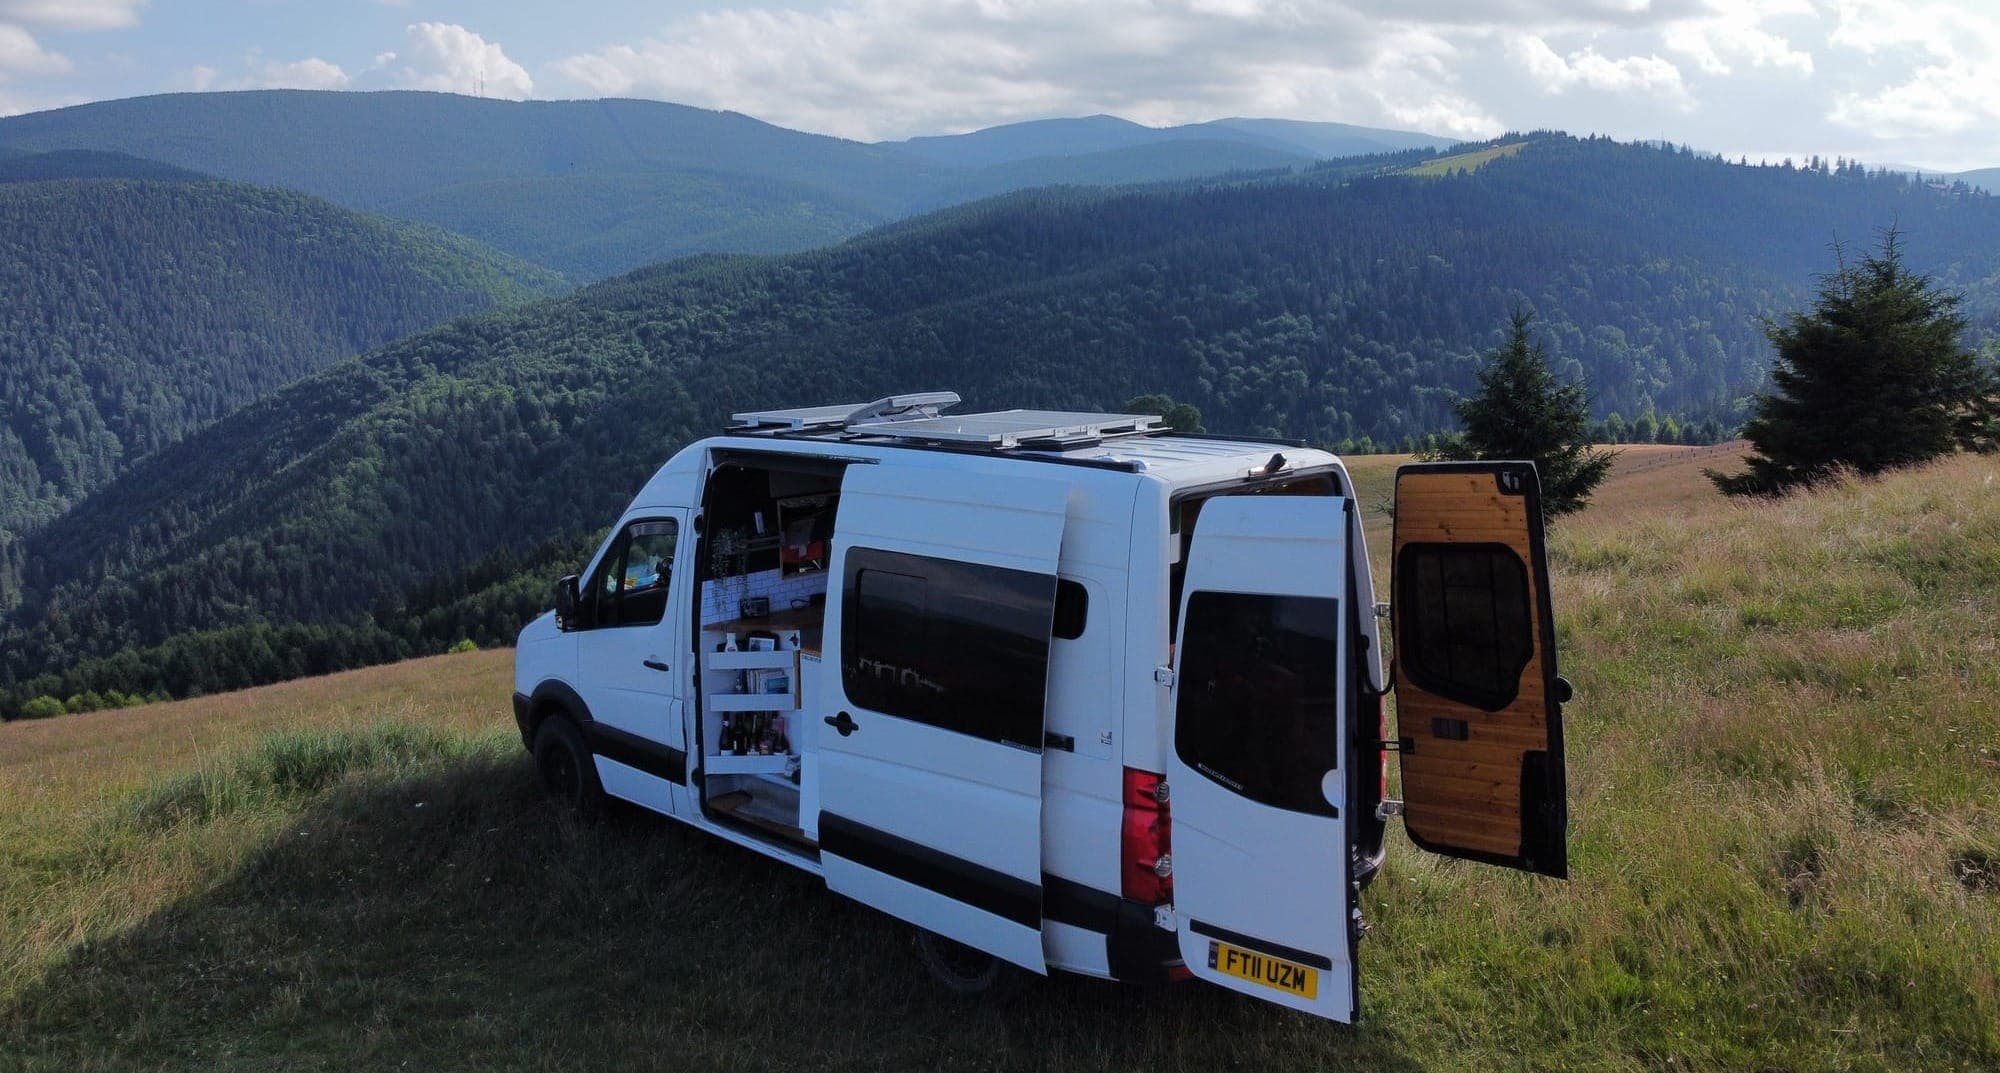
How to install campervan solar panels
To attach solar panels to a van roof, you’ll usually either bolt rigid panels down with z-brackets, glue rigid panels on with corner mounts, or bond flexible panels directly to the roof, then route the cables through a sealed entry gland. If you’re planning a DIY campervan solar panel installation, the first step is to measure your roof space properly, check what the roof can actually take, and choose the mounting method that suits your panel type and van layout.
Installing large, breakable panels onto the roof of your pride and joy is rarely an enjoyable experience. There’s a lot at stake, and it’s worth taking your time and making sure it’s done correctly, especially if you want reliable off-grid power without turning your roof into an accidental water feature. For DIY campervan and van-life builders in the UK and EU, particularly first-time and intermediate converters, this installation guide walks through the practical decisions and fitting steps so you can install solar panels safely and with confidence; if you’re still mapping out your whole system, our broader introduction to campervan electrics is a useful foundation.
We’ll cover the panel types you can use, what to look for on your van roof, the equipment needed, the difference between z-brackets and corner mounts, how to fit rigid and flexible panels, and how to install your cable entry and route cables towards your MPPT charge controller.
If you want to skip to how to install campervan solar panels, click here for:
- Z-Bracket Installation for Rigid Solar Panels
- Corner Mount Installation for Rigid Solar Panels
- Flexible Solar Panel Installation
Types of Solar Panels
There are 2 main types of panels we’ll consider for campervan solar panel installation on our van today - rigid and flexible. Rigid panels tend to be the standard for campervan conversions due to their low cost, high durability, and strong power output. They’ll fit on most vans and usually offer the optimum solution, with better efficiency thanks to proven cell technology used in many solar panel kits, including options built around Victron Energy components.
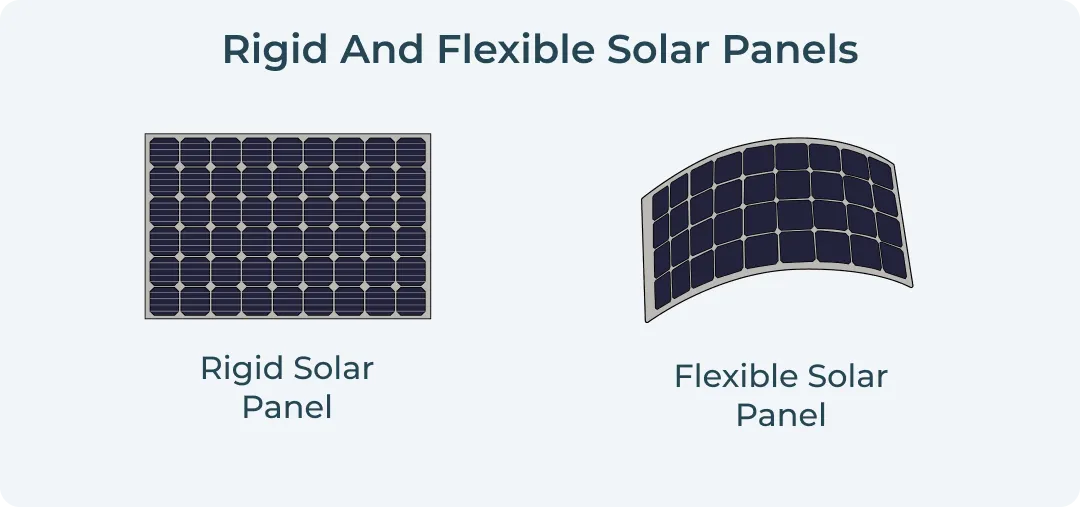
On the other hand, flexible panels are more expensive but may be necessary if you’re working with an unusual roof shape (think retro airstream trailers or vintage VWs). For our full explainer, why not check out our introduction to solar blog.
What Type Of Solar Panel Can I Install On My Roof?
If you haven’t installed your campervan solar panels, roof fan or given it a deep clean yet, then there’s a good chance you’ve never seen the roof of your van. Disappointingly, it’s not a perfect, flat, smooth surface for you to work on. The roofs of most vans have lots of ridges running the length of the van to make things complicated, so you’ll have to plan carefully before getting started. On some models, including the Ford Transit, those roof channels affect where panels can be mounted and the angle your brackets sit at.
Rigid or Flat Campervan Roof?
We recommend getting well acquainted with your roof before buying any solar panels. The easiest way to do this is to take a tape measure and a camera to map out the grooves and see what space you have to work with, including common ridge patterns on vans such as a Ford Transit. This way, you’ll know the maximum dimensions of the roof and, more importantly, the space between the grooves where you have to mount your panels or brackets, ideally over structural roof ribs where possible for support.
Make sure you choose the right solar panel kit for campervan use so all components are compatible before getting started; our guide to campervan solar panel kits for off-grid living can help you size a system that matches your energy needs and budget, especially in a van conversion where cable entry points and future access also need planning.
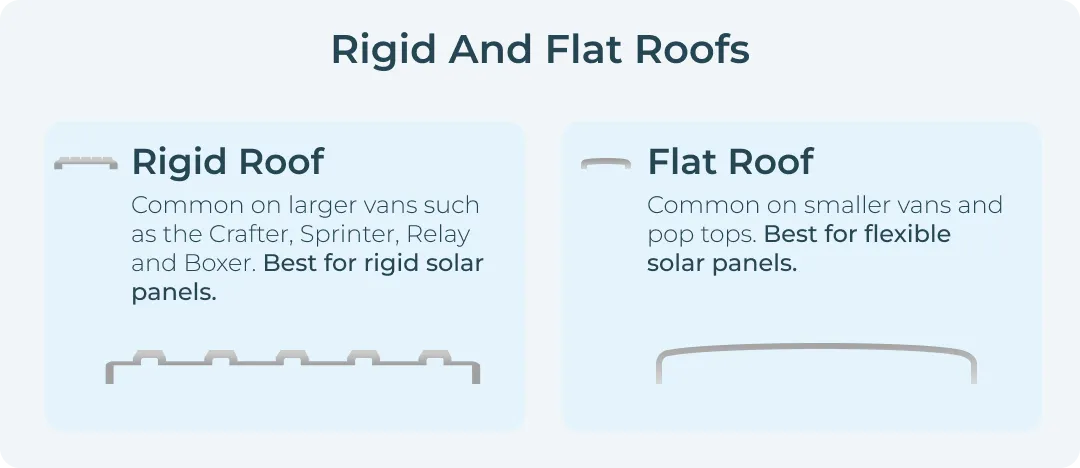
This way, you’ll know the maximum dimensions of the roof and, more importantly, the space between the grooves where you have to mount your panels, as roof shape and bracket angle affect both fit and waterproofing.
Single or Multiple Panels?
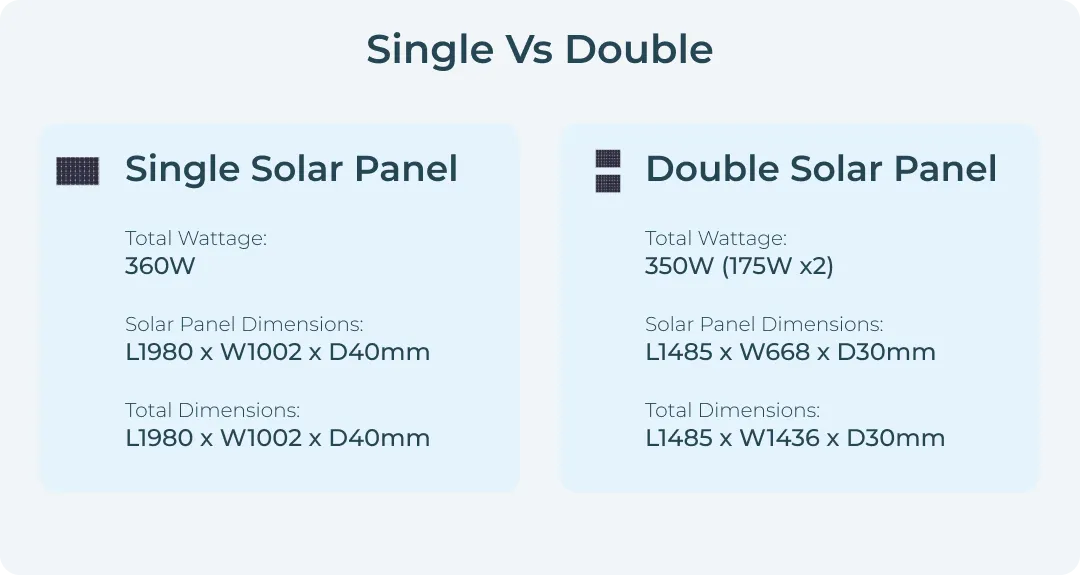
As part of your wider van conversion planning, decide whether one large solar panel or two smaller ones makes more sense and how they’ll pair with your battery bank; understanding how to choose a campervan battery and solar panel kit will help you balance panel size with storage capacity. A 360W solar panel can measure up to 2m long. If you’re a solo converter, you’ll need a friend or two to help with the solar installation.
A single large solar panel might take up less space than two smaller panels with the same output wattage, but installation can be much easier. When mapping roof grooves and usable space, leave access for future maintenance and cable routing to connect components cleanly. Two panels can also help minimize the effect of partial shade, and wiring solar panels gives you the option to run them in parallel if that better suits your setup. That said, plan where the wires will go before you mount anything.
Now that we’ve considered the size of the solar panels, we need to discuss mounting methods...
Solar Panel Mounting Options
Once you’re happy with your roof space and what solar panels your van can accommodate, you’ll have to consider how to mount them.
You can choose one larger panel or two smaller panels depending on the roof layout and how you want them mounted. Two smaller panels can make placement around vents or roof furniture more flexible. Wiring panels in series increases voltage and wattage. In series wiring, amperage remains the same across panels, and many Victron-based campervan electrical systems are designed to take advantage of higher-voltage solar arrays feeding efficient charge controllers.
Parallel wiring increases amperage while voltage stays constant. You can use MC4 connectors for the parallel links, and fuses are required to prevent overcurrent; pre-designed Victron solar kits for campervans usually specify these protection details and connector layouts for you.
If your van roof is clear and uninterrupted, one big panel can be the simplest option. But if you have a roof vent, skylight, or other obstructions, splitting your solar into two panels might fit the space better, and installation can be much easier because shading can cut output by 25-40%, light shading can reduce it by 20-30%, a shaded panel in series pulls down the whole string, parallel wiring lets unshaded panels keep producing, and bypass diodes help limit the loss.
Z-Brackets vs Corner Mounts
There are 2 main ways to do this without a roof rack:
- Using z-brackets to bolt the panels to the van
- Using corner mounts to glue the panels to the van
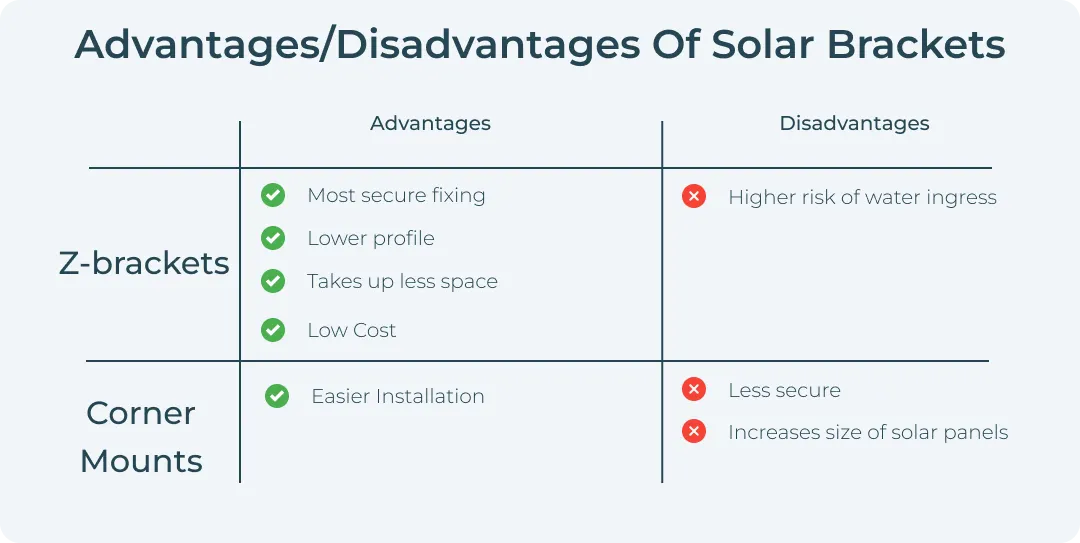
Attaching solar panels to a van roof is a common DIY project, but the install needs to cope with constant vibration and high wind loads. At a high level, the main mounting methods are adhesive-only, rivet or screws, and roof rack options.
Z-brackets are supplied as standard with all rigid-panel solar packages, such as this 350W solar system. These mounting brackets typically use two holes for the bolts, with some designs adding a slotted hole for easier adjustment. However, if you prefer corner mounts, please let us know, and we can swap them.
If your van is fitted with a roof rack, you will also have other options. However, we don’t feel this is necessary, so if you don’t already have a roof rack, we don’t recommend buying one to mount your solar panels.
Z-Bracket and Corner Mount Sizes
Z-brackets are often the cheapest method of attaching solar panels to your campervan roof. They are easy to install with a rivet/screw-style fixing and heavy-duty mounting brackets, and they sit almost flush with your campervan roof, usually with two holes per bracket for fastening and adjustment.
Z-brackets will add about 20mm to the width and length of your solar panel when attached.
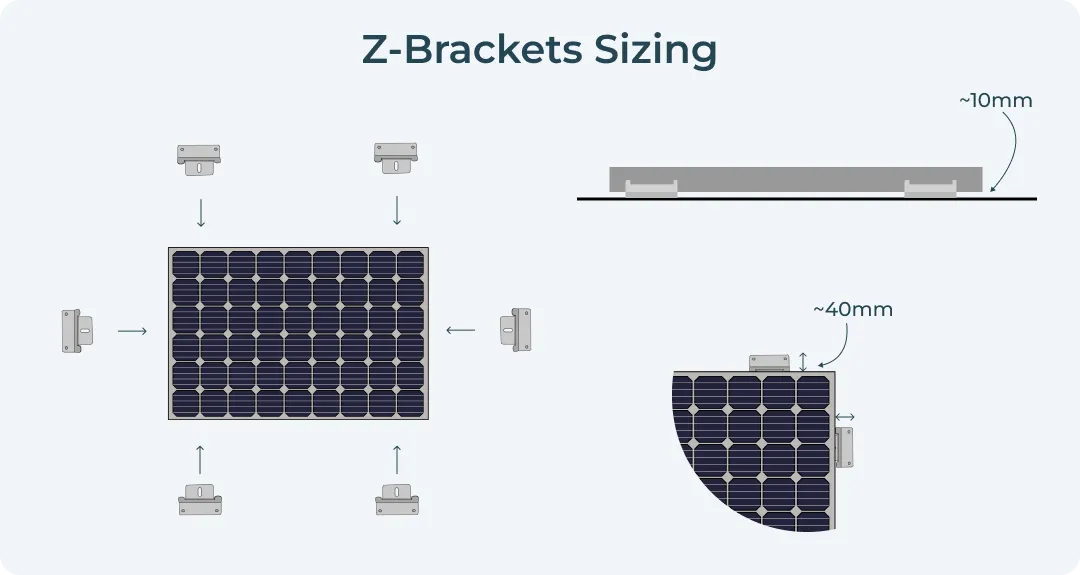
Roof racks provide a stable mounting platform, but they usually add more height than direct bracket mounting. Aluminum Z-brackets or aluminum angle brackets are generally preferred for durability, and they help maintain an air gap under rigid panels.
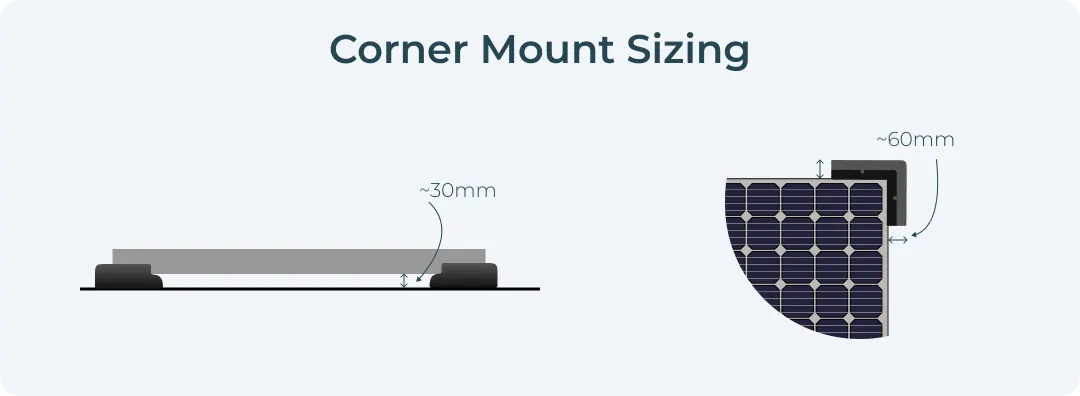
Corner moults can often be more expensive than z-brackets and add 30mm to the height profile of your campervan. Some people don’t like this look as it’s less stealthy than the z-brackets.
Others don’t like corner moulds because glueing something to your roof sounds scary when driving at 70mph on the motorway.
Corner mounts will also increase the size of your solar panel by 60mm in each direction. Again, this must be considered before purchasing.
Does my Solar Panel Type Influence my Mounting Method?
Yes it does...
Suppose you’ve opted for a rigid solar panel. In that case, you can attach it to your campervan roof using z-brackets or adhesive corner brackets. With z-brackets, the raised profile creates an air gap under the panel, and around 1 inch of space helps cooling and efficiency. Adhesive-only installs often use vhb tape as a strong, non-invasive fixing method when applied to a properly prepared roof surface. Alternatively, a flexible solar panel can be glued directly to your roof. Flatter installs can trap more heat, which is one reason flexible solar panels often run hotter when mounted flat.
What Else Should I consider For Solar Panel Mounting?
Remember to consider your roof fan and solar cable entry at this stage. Although smaller than your solar panels, you may want to position the fan in a particular place, such as above the kitchen or bed, for ventilation.
Top Tip
Your fan is much more likely to become a source of water ingress than your solar panels. This is because installing a roof fan results in the edge of the perimeter of the fan that needs to be completely sealed.
Every roof penetration, including fan cut-outs, bracket holes, and cable entry points, must be properly sealed and kept watertight with lap sealant where appropriate, as good sealing prevents water ingress and potential electrical hazards.
Whereas solar panels only require small holes or even nothing at all, depending on how they are installed. For this reason, we recommend giving your roof fan priority on your roof and arranging your solar panels around it.
How To Install Campervan Solar Panels
Now that we understand the following, you can also start thinking about whether a pre-built Weekender campervan electrical system kit or a fully custom setup makes more sense for your build:
- What type and size of the solar panel is suitable for my van
- Which solar panel mounting technique do I prefer
- How the solar array fits into the wider electrical system
- Where the charge controller will sit and how cables will enter the vehicle
We can begin installing our shiny new solar panels on our campervan roof.
If you're also working around a roof fan, take extra care, as poor sealing in that area is a common leak risk. Holes and roof seams are often finished with Dicor Lap Sealant or a similar lap sealant for waterproofing.
Depending on which solar panel mounting technique you have chosen, you can jump to:
- Z-Bracket Installation for Rigid Solar Panels
- Corner Mount Installation for Rigid Solar Panels
- Flexible Solar Panel Installation
Z-Bracket Installation for Rigid Solar Panels
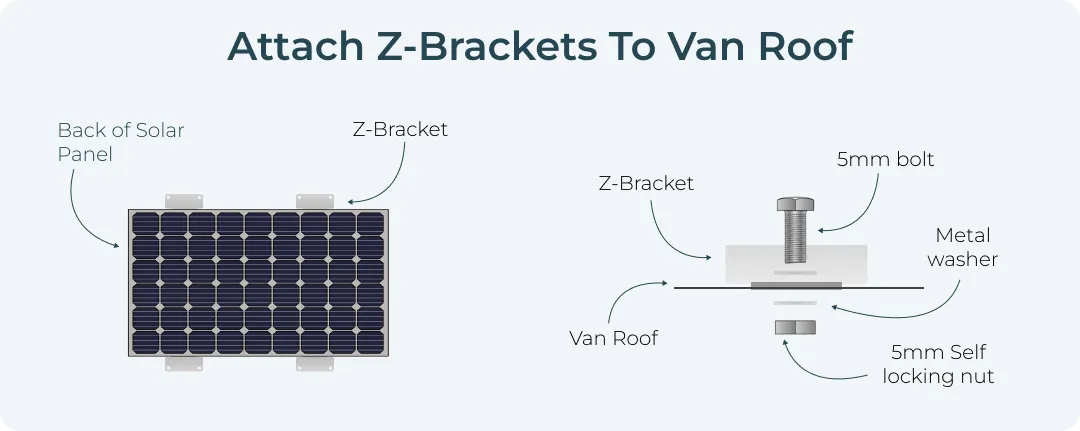
When considering installing z-brackets, remember they will add about 20mm to the width/length of your solar panel where attached.
What You Will Need:
- Solar panels
- 4 brackets per panel (6 for panels > 175W)
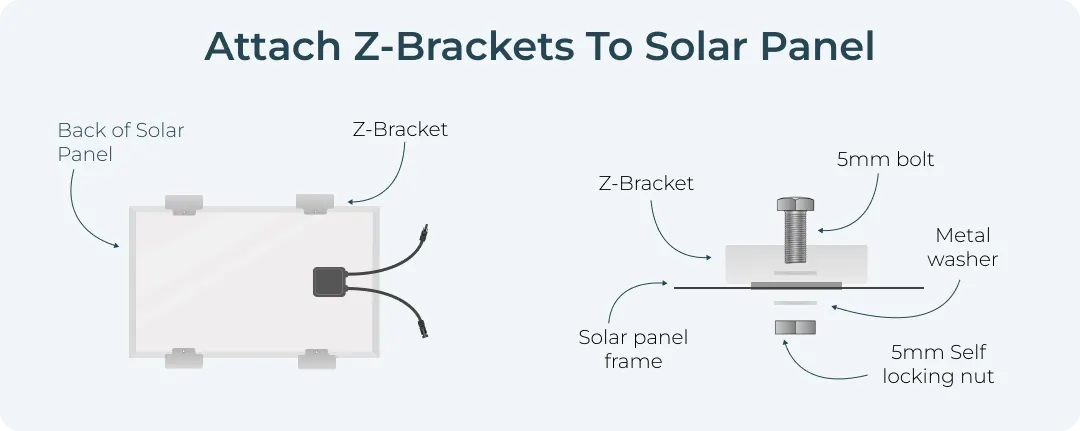
- M5 bolts and locking nuts, ideally 316 stainless steel (2 per bracket)
- M5 penny washers
- 5mm metal drill bit
- SikaFlex 221
- A friend to help
Installation Steps:
You’ve hopefully figured out exactly where your solar panels will fit on your roof, so now it’s time to install them.
- Start by fitting the brackets to your solar panel frame. You’ll need to drill a small hole for the bolts to fit through.
- Bring one of your solar panels onto the roof of your van and position it to be installed.
- Use a pencil to mark through the bracket holes to the van roof, making sure the panel doesn’t move as you make your way around all the brackets.
- Remove the panel from the roof and prepare for drilling. We recommend masking tape and bin bags to catch all the metal filings produced when drilling - these are a nightmare for inducing corrosion. If you spot any surface rust before you drill, clean it back and treat it first so you don’t trap moisture under the brackets.
- Drill through the van roof using your 5mm metal drill bit for each bracket, taking care not to distort the sheet metal.
- Bring the panel back onto the roof, laying a generous amount of SikaFlex 221 sealant underneath the brackets.
- Attach the panel to the roof using the M5 bolts and penny washers from the roof side, with another washer and locking nut from inside the van - you’ll need your friend to help here. If you want an extra sealing option for the bracket holes, add well nuts to your materials list.
Corner Mount Installation for Rigid Solar Panels
Remember corner mounts will increase the size of your solar panel by 60mm in each direction.
What You Will Need:
- Corner mounts
- Side mounts for panels larger than 175W
- SikaFlex 221
- Rubbing alcohol
SkilaFlex221
SikaFlex 221 is the industry standard and is designed for use on metalwork for caravans. It’s therefore the perfect choice for campervan conversions.
Installation Steps:
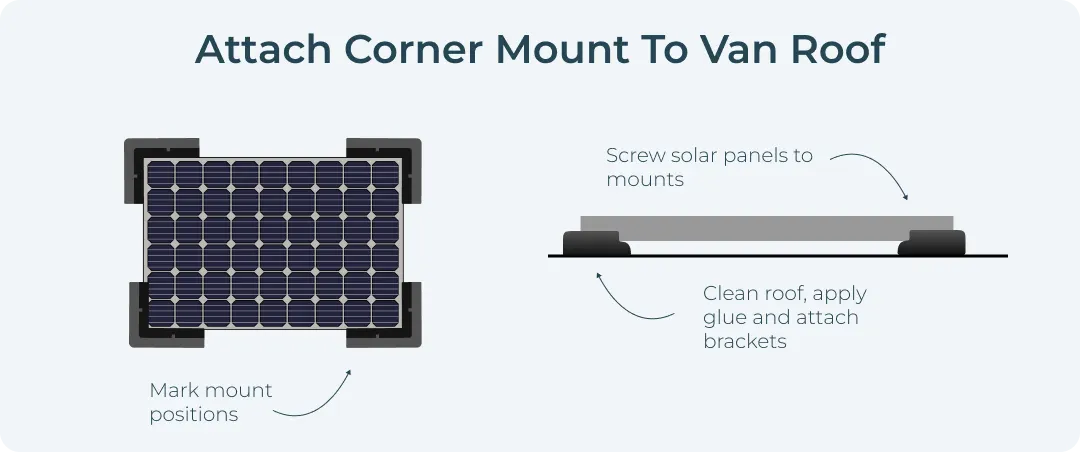
1. Start by bringing all panels and corner mounts onto the roof of your van and arranging them how you plan to install them. Ensure the corner mounts fit flat on the roof and are not uneven due to the ridges in the van roof.
2. Mark where the mounts will be positioned and remove the panels from the roof
3. Clean the area where the mounts will be positioned with rubbing alcohol - this encourages good adhesion.
4. Use SikaFlex 221 to attach the mounts to the roof, leaving it to dry as per SikaFlex guidance.
5. Once you’re happy the SikeFlex is set, bring the panel onto the roof and position them on the corner mounts. You’ll now need to drill through the mount to secure the panels, and if you’ve opted for a pre-matched campervan solar kit with panels and MPPT controller, most of the cabling and connector choices will already be specified.
Flexible Solar Panel Installation
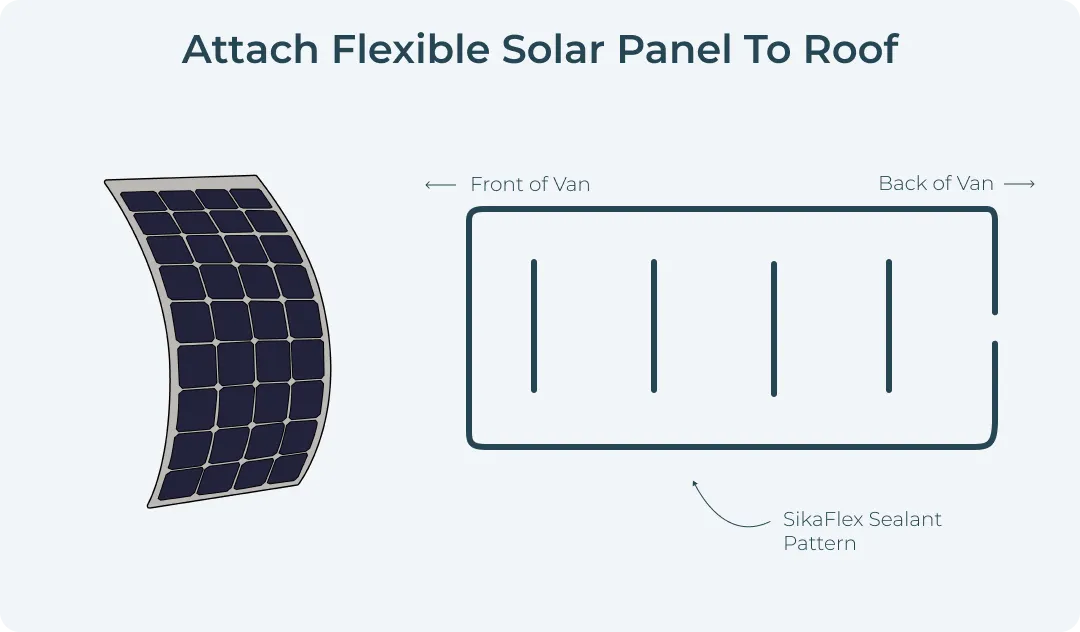
Flexible solar panels are easy to install and require being glued to the van’s roof. Therefore, we usually only recommend installing flexible solar panels on flat roofs, which are common on the VW T series, as this gives the best mounting surface and helps maintain efficiency. Before bonding any panel in place, make sure the metal surface is thoroughly cleaned and primed so the adhesive can key properly. This ensures the best mounting surface. Once fitted, let the adhesive fully cure, as a secure van solar installation must withstand constant vibration and high wind loads.
Installation Steps:
- Clean the roof around where the solar panel(s) will be placed thoroughly, ideally with rubbing alcohol (this will help to promote better adhesion).
- Using Sikaflex, securely fix the roof mountings and leave them dry. This ensures the best mounting surface. Flat-mounted flexible solar panels typically run hotter, which can reduce efficiency compared with rigid panels that sit off the roof with an air gap.
Cable Entry into Campervan
The next task for your solar panel installation is to bring the cable into your van. We have written about the importance of MC4 Connectors, so check that out before going any further, and if you’re planning to add 230V hook-up or high-power appliances, it’s worth understanding how a Victron Multiplus inverter/charger fits into a campervan system at this stage.
To bring your solar cables inside, you’ll have to drill yet another hole in the roof. In a typical van conversion, this is usually sealed with a cable gland, and a Scanstrut Cable Seal is a common upgrade for a more robust waterproof finish. To do this, follow the easy steps below
Step 1: Mark the cable entry point carefully, then drill a hole large enough for the cable run and seal to fit without strain.
Step 2: Deburr the edges and test-fit the parts before sealing everything down. Where the panel design allows, leave a small air gap under the panel to help cooling rather than trapping heat against the roof.
Installation Steps:
- Bring your solar entry gland onto the roof of your van and choose where it will be positioned. Its location should be selected to minimise cable length from your panels to the gland, but it must also be flat to form a good seal. Mark this location.
- Drill a 10mm hole in the centre of your gland location.
- File the edges of the hole, be careful to collect any metal shavings, and give it a Hammerite coating to protect it from corrosion.
- Once the Hammerite is dry, insert a rubber grommet in the hole to protect your cables, you can also use a short length of flexible conduit if you want.
- Route your cables into the entry gland and through the rubber grommet to the inside of the van.
- Use SikaFlex 221 to secure the gland to the roof of your van, making sure to leave it time to set before driving.
Running Cables from your Solar Panel to MPPT
You’ll need to run 10 mm² solar cable from your solar panels to your MPPT, and we always like to remind you that the cable run is probably longer than you think in a van, especially if you need to connect the panels, route the wires neatly, and allow enough room for a protection sleeve or grommet where they pass through the roof.
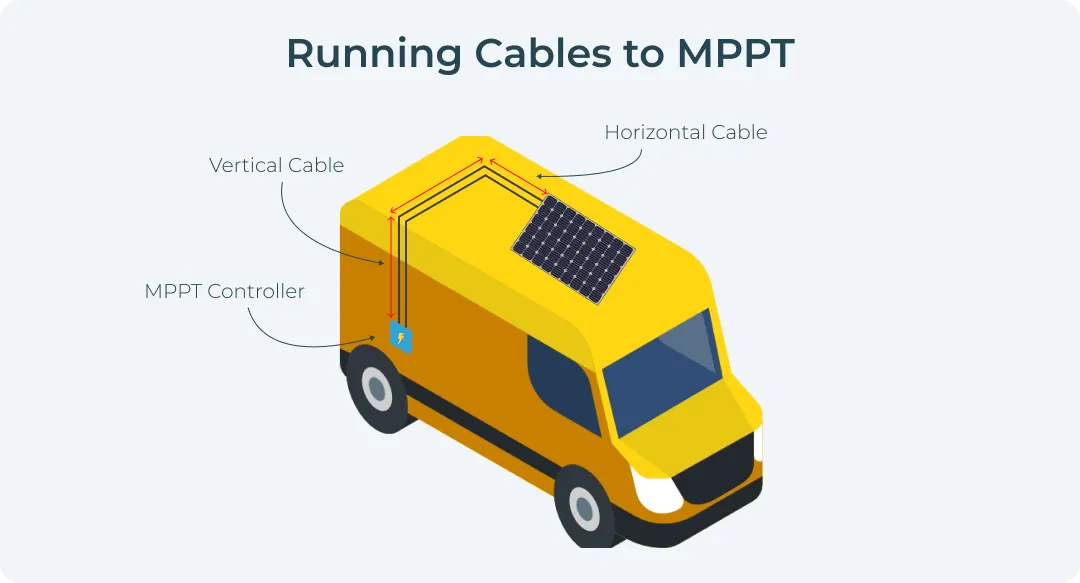
We must consider the horizontal and vertical distance the cable needs to run to get to the MPPT because nothing is simple like everything else in the campervan conversion, and understanding how an MPPT solar charge controller works will help you choose the right cable size and controller rating, since both PWM and MPPT controllers manage solar electricity input, but MPPT controllers track battery charge profiles digitally and can improve charging by up to 30%, while PWM units are roughly 30% less efficient.
To do this, we need to measure the total distance the solar cable will travel before it reaches the MPPT solar charge controller, while also considering the path of the sun to reduce shading and maintain output.
If you’re wiring panels in parallel, plan for the extra current and leave space for the right protection and cable routing. Fit a 40A inline breaker to protect the solar charge controller from surges. A double-pole DC breaker is also recommended for safety.
From there, the solar feed runs to the charge controller, then on to the battery system and 12V loads like lights, and complete Victron campervan electrical kits show how this pathway integrates with inverters, chargers, and monitoring hardware.
Make sure the controller and related connections are correctly bonded to ground where required.
When you install the cable gland, the gland itself and every roof penetration must be fully sealed watertight to prevent leaks.